View Categories

UPS – General Settings

You can reach the plugin settings by choosing the WooCommerce → Settings → Shipping → UPS Live Rates from the sidebar.

Ups Settings

API Settings

Our plugin allows connecting via REST API or XML API (Legacy). Regardless of which method you’ll choose, you need to register a UPS account to use the UPS shipping services.

You can switch between the API Type by selecting one in the dropdown list.

Ups Settings Api Type

For REST API you can choose between two Authorization Types: Auth Code and Client Credentials.

Zrzut Ekranu 2024 11 14 O 12.21.

REST API – Auth Code

For this method, you only need to own a UPS Account.

Ups Settings Auth Code

Press Authorize to be redirected to UPS.com site. Then please type your UPS email or usernamepassword and agree to connect our plugin with your account by checking the checkbox. Then click Log In.

Ups Oauth Log In

Once the OAuth connection is established, then you’ll see a Revoke button and the API Connection Status as a green OK.

Ups Settings Revoke

To disconnect your UPS account from our plugin, press Revoke. Optionally, if you use UPS SurePost shipping service, please fill in the UPS Account Number. If you don’t use UPS SurePost, leave this field empty.

REST API – Client Credentials

In order to use this authentication method you need to create a UPS application first. This section will guide you through the process.

Go to https://developer.ups.com/apps and click Add Apps.

My Apps

Select „I want to integrate UPS technology into my business” from „I need API credentials because” field. Below, select your account number from the dropdown. If you don’t have one, you need to add it or create new one by choosing the appropriate option. Hit Next

Pasted Graphic

Next, you will see Primary Contact form. Fill-in required fields and proceed by clicking Next just below the form.

Pasted Graphic

This step is very important. You need to define your App Name and select APIs (Add Products section) that your App will get access to. Select Authorization (OAuth), Locator, Address Validation, Rating*. To proceed click Save.

*Important: If the ‘Products Included In This App’ section does not display certain options (e.g., Rating) during app creation, proceed by creating the app. Afterward, edit the created app to manually add the missing products. Click here for detailed instruction.

Apps Details

Congratulations! Your App has been created. Now, copy Client ID and Client Secret.

Octolizetutorial

Go to UPS Live Rates plugin settings page, select REST API for API Type and Client Credentials for Authorization Type. Fill in Client ID, Client Secret and UPS Account Number.

Zrzut Ekranu 2024 11 14 O 12.03.

Save changes and wait for Connection status to say OK. When it does, you’re good to go!

XML API (Legacy)

For this method, you need to own a UPS account with access to the API. If you haven’t gained the API access, please check our guide on how to get the UPS API Access Key →

Enter your credentials (User IDPasswordAccess Key and Account Number) in the plugin’s API Settings section fields below:

Zrzut Ekranu 2024 11 14 O 12.29.

Origin Settings

The UPS plugin uses the shop’s origin entered in the WooCommerce settings at WooCommerce → Settings → General → Store Address by default. However, if you want the live rates to be calculated for the different shipper’s address than your shop’s because e.g. you ship your products not from the shop but directly from the warehouse located somewhere else, you can define the Custom Origin using the fields below:
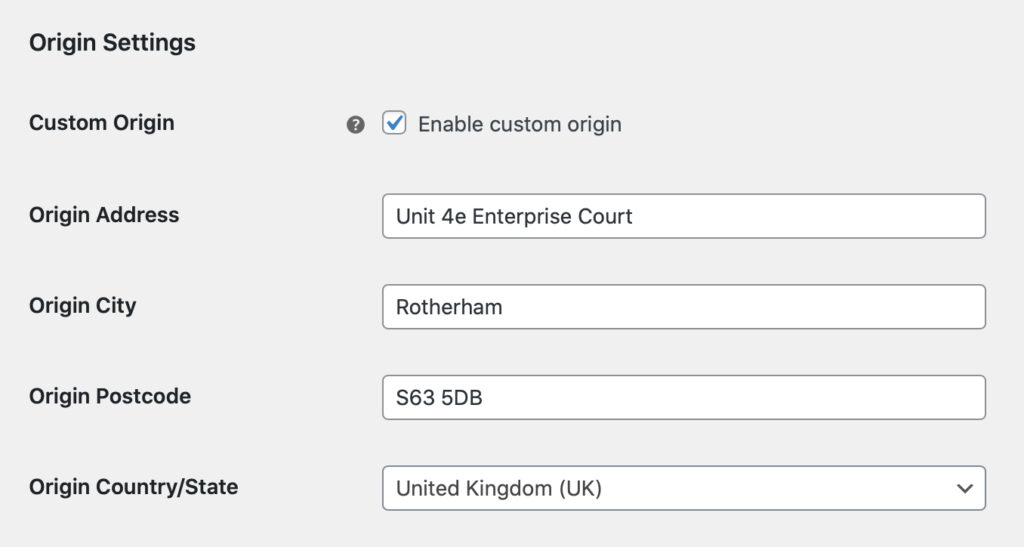
Ups Live Rates Woocommerce Origin Settings

Custom Origin is fully optional for WooCommerce 3.2 and later releases. If, for some reason, your shop still uses the WooCommerce pre-3.2 version, defining the Custom Origin in the plugin settings above is mandatory.

Please be advised that each shipping method that uses UPS plugin can have its own Custom Origin. To learn more about Multiple Custom Origins feature – read this article →

Advanced Options

Zrzut Ekranu 2024 11 14 O 12.30.0

Measurement Units

– this option allows you to change the measurement units used to calculate the UPS live rates. The plugin uses the units selected in the WooCommerce settings by default. ( WooCommerce → Settings → Products → Measurements).

Use this option if you get the This measurement system is not valid for the selected country error. Once it is changed the plugin will recalculate the units used in your shop to the ones supported by your UPS account.

Please also mind that if the individual product’s weight has not been entered in the WooCommerce Product data → Shipping → Weight field for each of the products in your shop, the 0.1 kg / lbs weight value will be used by default in order for the UPS API to be able to calculate the shipping rates.

Debug Mode

– enabling the Debug Mode will let you identify and analyze the problems with UPS services price calculation. All the requests, responses and the error messages coming back from the UPS API will be displayed in the cart and on the order summary page:

Ups Live Rates Woocommerce Debug Mode

Please mind that if you have the UPS SurePost services active on your UPS account, the UPS SurePost Live Rates shipping method has been added within a shipping zone and the Debug Mode enabled, it will display each UPS SurePost service as a separate request:
Ups Surepost Live Rates Woocommerce Debug Mode

All the notices and data coming from enabled Debug Mode will be visible only for the Site Administrators and Shop Managers. Your customers, no matter if they are guests or logged in, won’t see any unnecessary info on the shop’s front.

API Connection Status

– once your login credentials were entered and Save changes button hit, the API Connection Status should change to OK and turn green as a confirmation the API connection has been established:

Zrzut Ekranu 2024 11 14 O 12.30.

If, for some reason, the plugin cannot establish the connection with the UPS API, you will see the error message coming from the API with the detailed information on the cause of the problem, e.g.:

Failure: Invalid Access License number (250003)

Zrzut Ekranu 2024 11 14 O 12.31.

Failure: 250002: Invalid Authentication Information 250002 error

To resolve 250002: Invalid Authentication Information connection problems, please consider switching to the Client Credentials feature. If you continue to see the same error despite switching to Client Credentials, then please follow these steps:
Step 1: Enter the application you created and hit the ‘Edit App’ button developer.ups.com/apps 250002 error

Step 2:Add ‘Authorization (OAuth)’ ‘Rating’, ‘Address Validation’, ‘Locator’ applications using the plus button 250002 error

Step 3:Select ‘Authorization Type: Client credentials’ and hit ‘Save changes’ button 250002 error


That’s it, now everything should work smoothly.

Scroll to Top