- Adding the Pickup points selector block to the Checkout page
- Octolize Pickup Points PRO Global settings
- Carriers and Countries
- Adding carrier pickup points for selected country
- Saving the information about the customer's selected pickup point to the order details
- Passing the selected pickup point to the 3rd party integrations
If your store is running on a Shopify Plus plan, simply proceed with the further instructions below. If, in turn, you are currently on a different plan than Shopify Plus, please refer to the proper dedicated guide for the Shopify plan your store is currently using →
During the app installation the Octolize Pickup Points PRO rates will be automatically added for the currently existing Shipping zones in the Shopify settings at Settings → Shipping and delivery → Shipping zones:
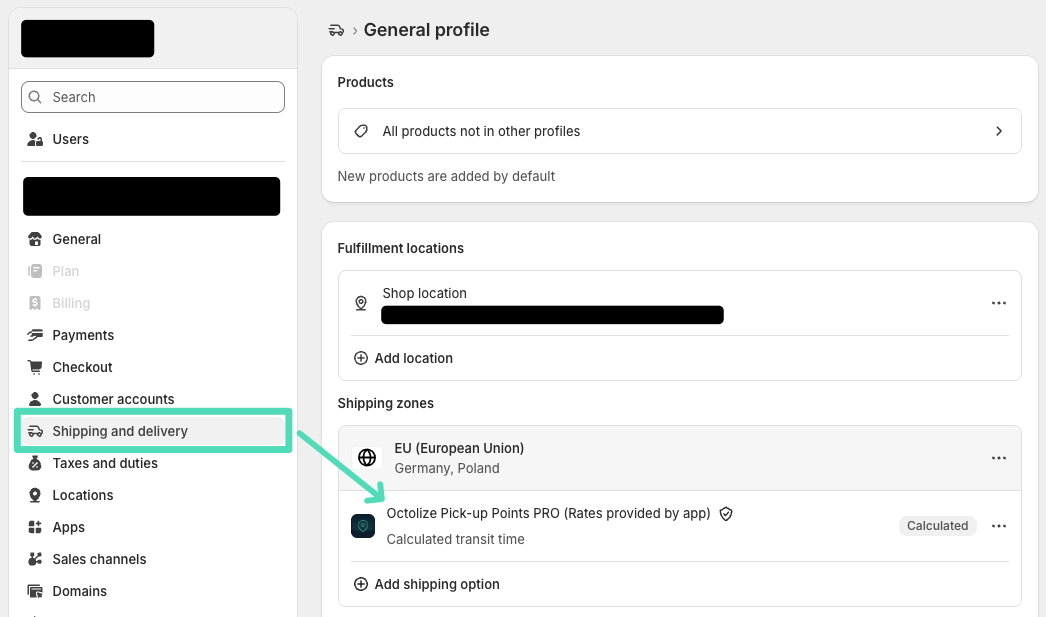
If for some reason this does not happen and the Octolize Distance Based Rates app’s rates have not been added there by default (i.e. if a given shipping zone was created after the app had already been installed), use the + Add shipping option button to do it manually.
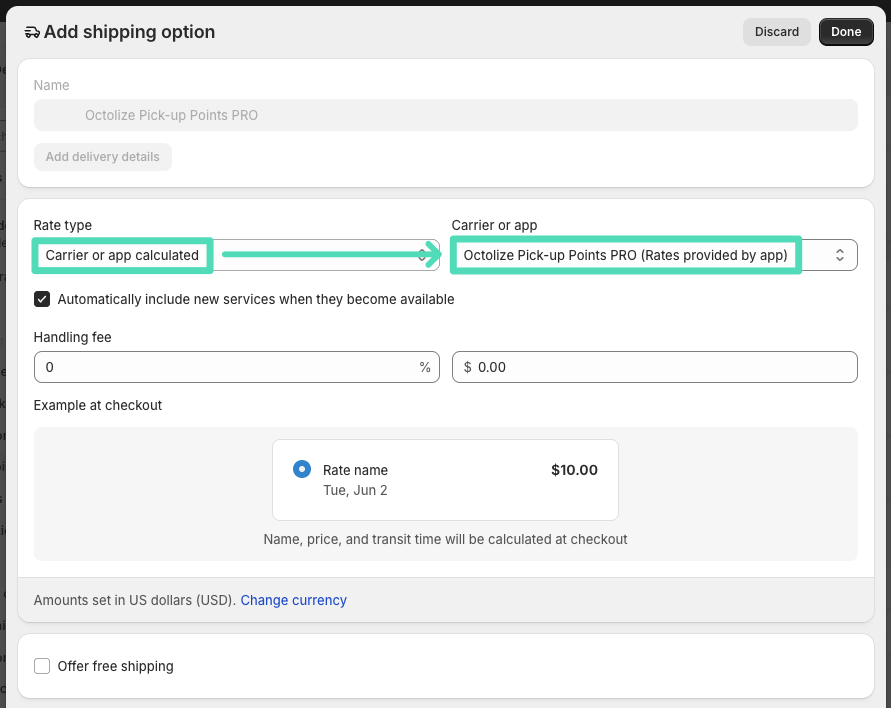
In the window that appears, select the following options in order:
- Rate type: Carrier or app calculated
- Carrier or app: Octolize Pickup Points PRO (Rates provided by app),
then confirm everything by clicking Done:
Once the app installation process is complete, let’s move on to…
Adding the Pickup points selector block to the Checkout page
In order to be able to offer your customers the option to select the pickup points at the checkout of your store, you need to add the dedicated Pickup points selector block to the Checkout page template first. If you haven’t done it yet, the following info banner will be displayed at the very top of the screen once the app is installed:

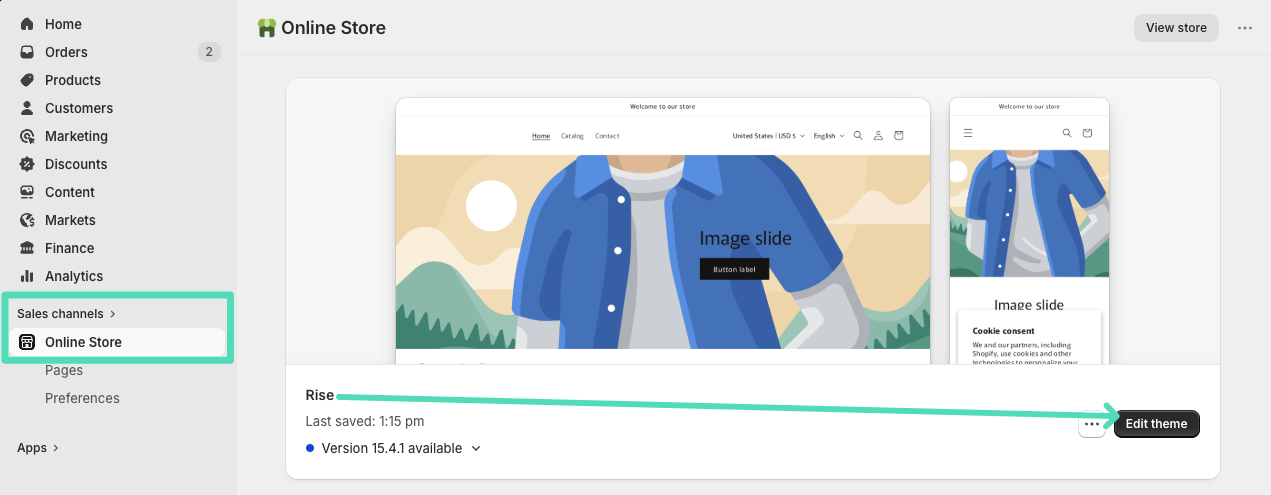
Click the Go to Shopify store theme customizer button or reach the theme editor by choosing the Sales channels → Online store → Themes in the Shopify sidebar menu and using the Edit theme button next to the currently used theme in your store:
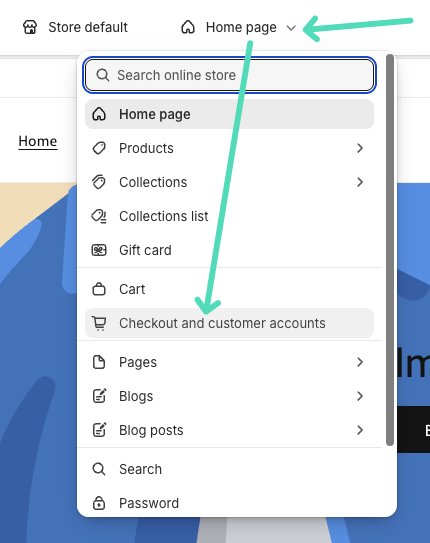
If you hit the Go to Shopify theme editor button you should be automatically redirected to the Checkout page template editing screen. If for some reason it did not happen, click the drop-down list at the top and choose the Checkout and customer accounts page template there:
You should reach the following Checkout page template editing screen:
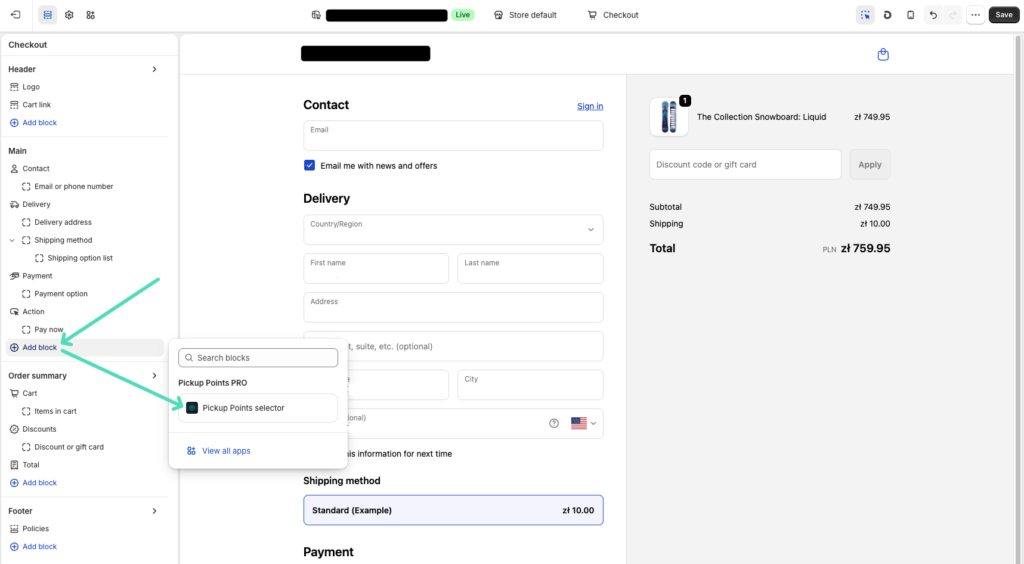
Click the + Add block option in the left sidebar and choose the Pickup points selector block. In some cases you may need to use the search box if it is not displayed there by default.
The Pickup points selector block will be added to the Checkout page template and the selector widget will appear in the preview panel below the shipping method:
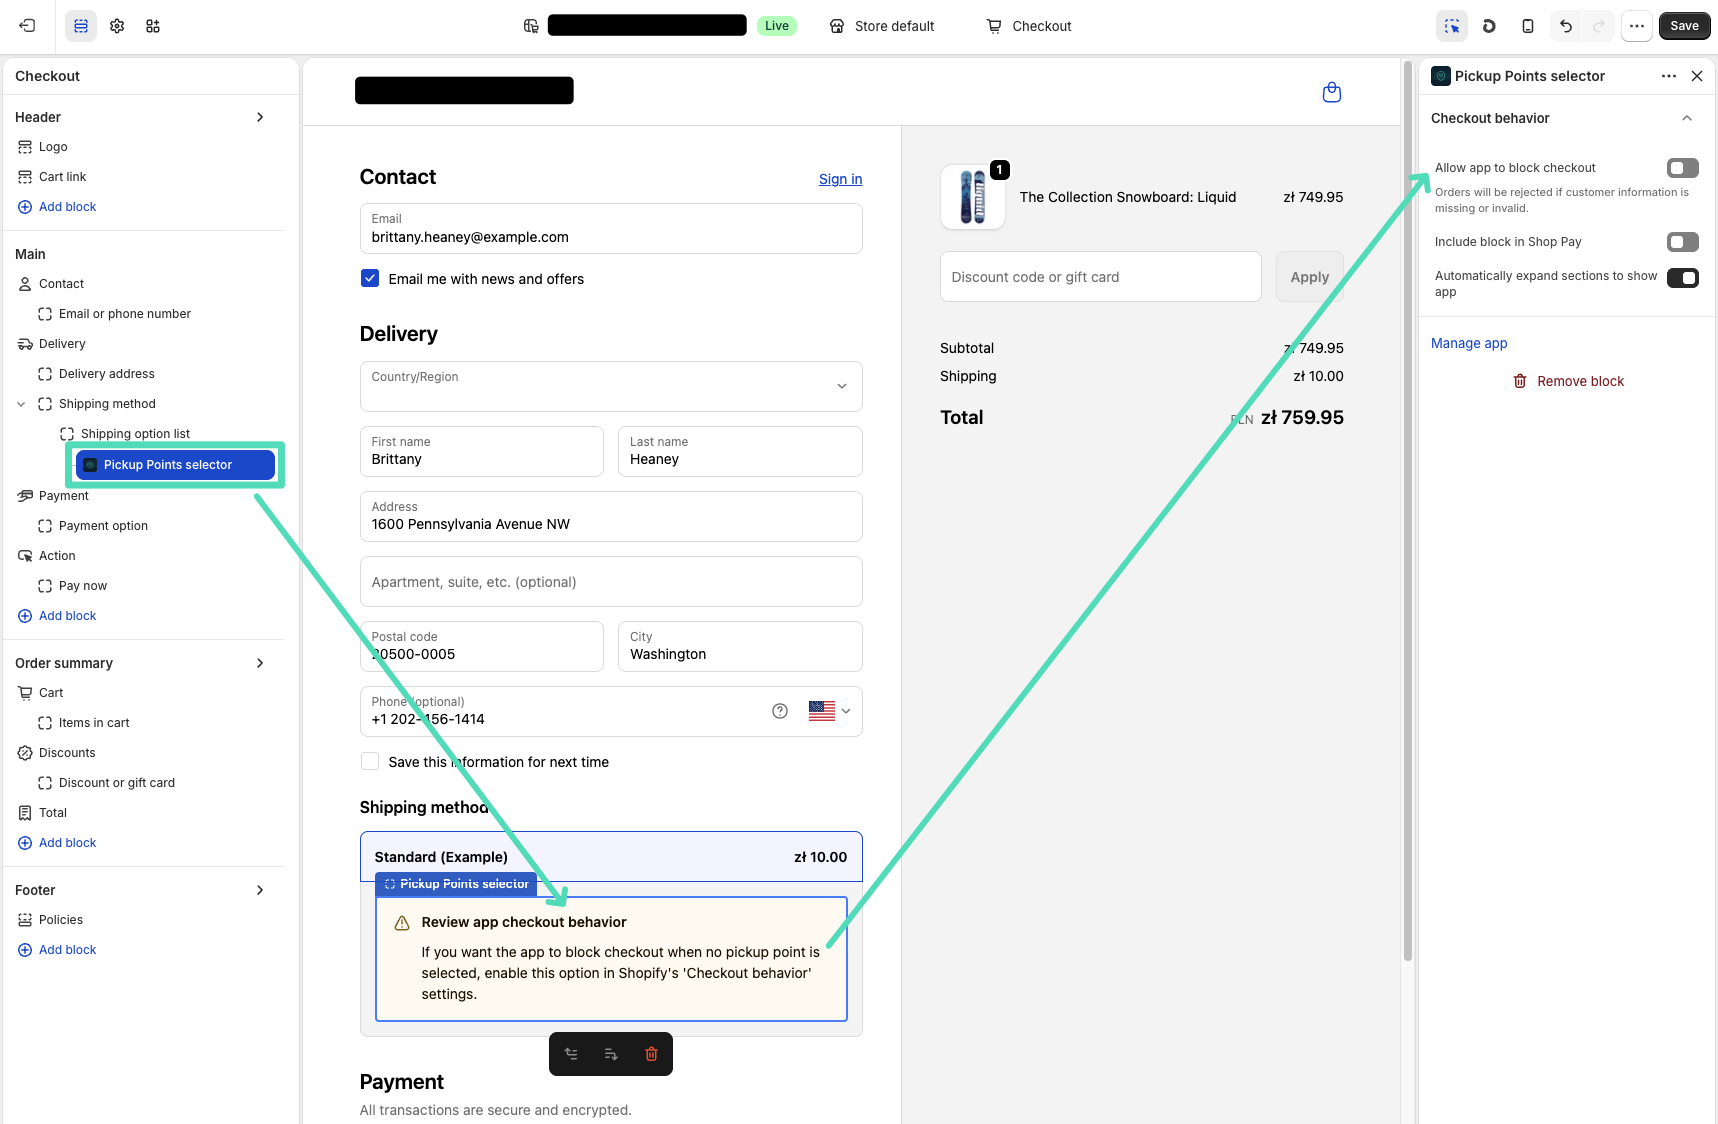
You can also use the toggles available in the panel on the right to manage and enable additional options for the Pickup Points Selector block, including:
- Allow app to block checkout – enable (recommended) or disable checkout validation that prevents customers from placing an order if they select a pickup point delivery but don’t choose a specific pickup point,
- Include block in Shop Pay – enable or disable the Pickup Points selector block when customers are checking out using Shop Pay,
- Automatically expand sections to show app – enable or disable auto-expanding the pickup points selection section when a customer clicks on the pickup point delivery method during checkout (enabled by default).
Having it done, the only thing left now is to add the carrier pickup points to the specific countries in the Carriers and Countries table. But before we proceed with that, click the Global settings option in the app menu in the left sidebar. Let’s take a moment first to take a closer look at…
Octolize Pickup Points PRO Global settings
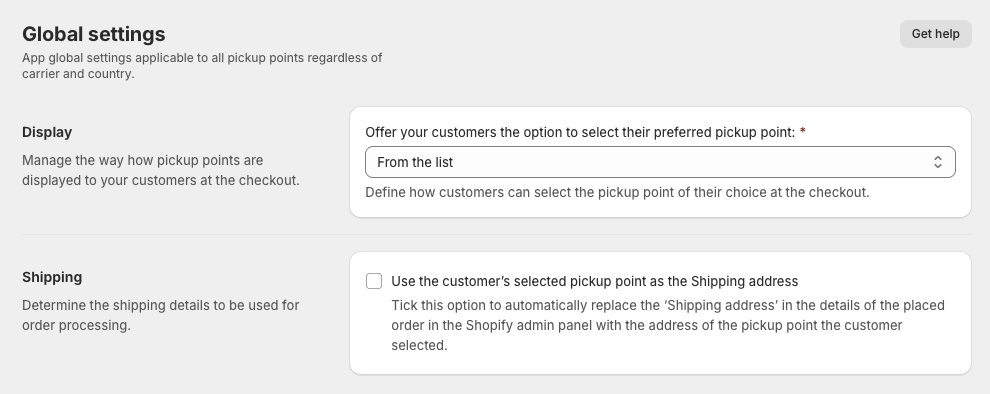
Display

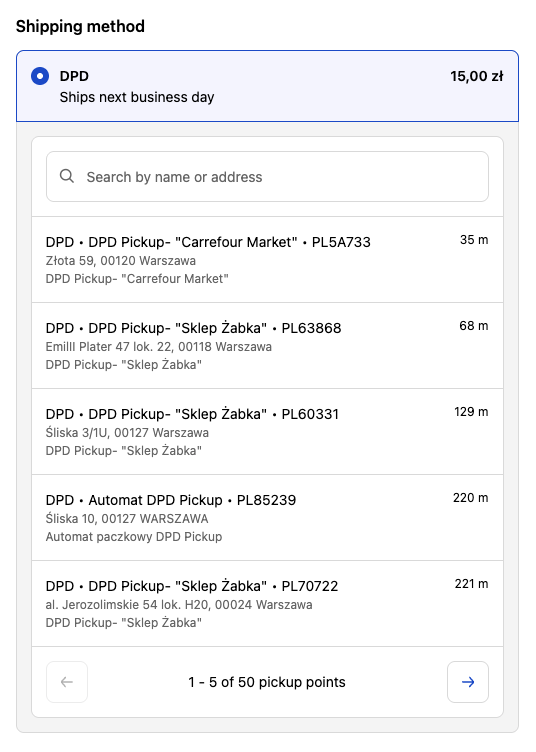
From the list – customers will be able to choose their pickup point using the list displayed below the shipping method at the checkout:
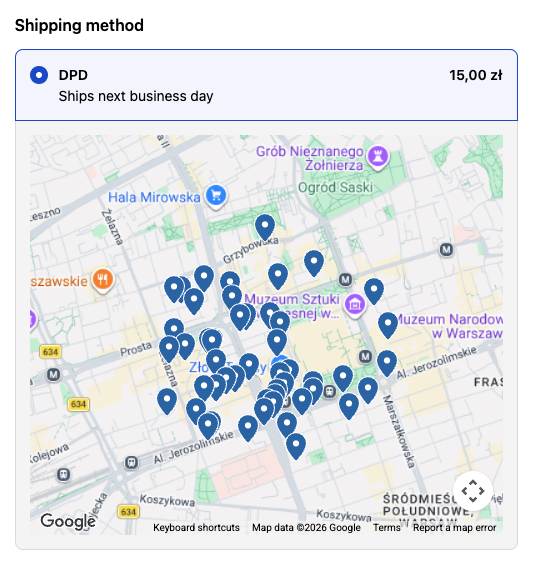
From the map – customers will be able to choose their pickup point using the mini-map displayed below the shipping method at the checkout:
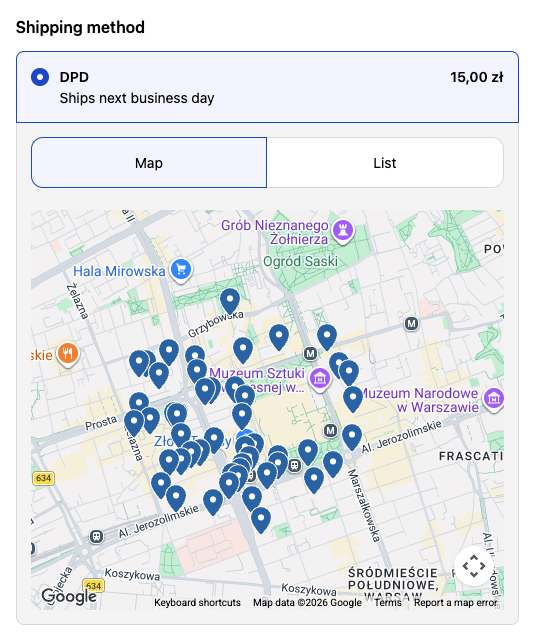
From the map and from the list – customers will be able to choose their pickup point using either the mini-map or the list displayed below the shipping method at the checkout:
If you select one of the options allowing your customers to choose their preferred pickup point From the map or From the map or list, the following required Google Maps API key field will below:

Google Maps API key – paste your Google Maps API key to be able to display your customers the pickup points mini-map at the checkout.
If the From the list option is selected, entering the Google Maps API key is not required and this field will remain hidden.
If you do not have your own Google Maps API key yet, find out how to obtain it →
Shipping

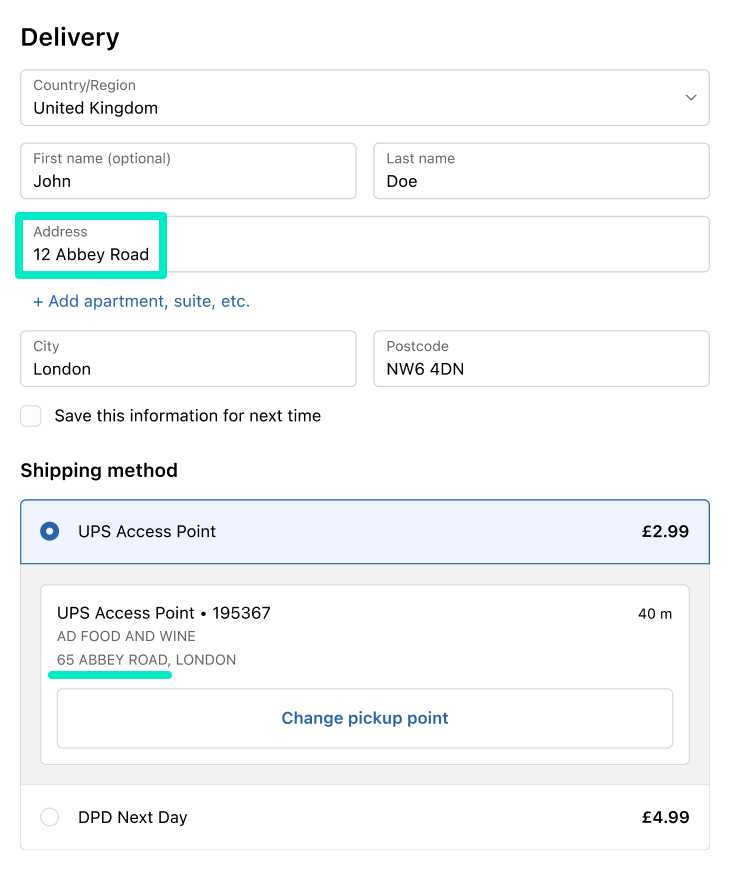
Use the customer’s selected pickup point as the Shipping address – tick this checkbox to automatically replace the ‘Shipping address’ in the order details of the placed order in the Shopify admin panel with the address of the pickup point the customer selected at the checkout.

Carriers and Countries
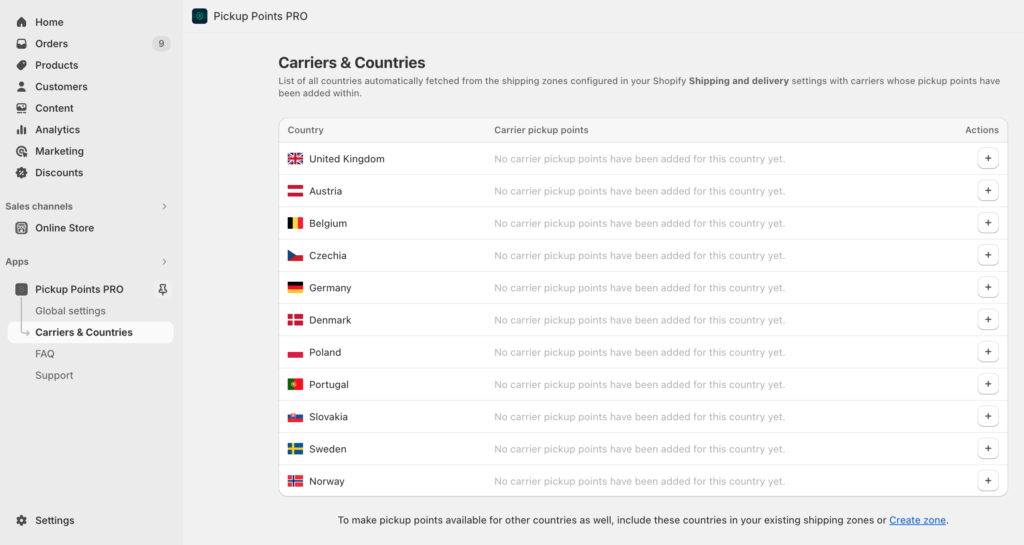
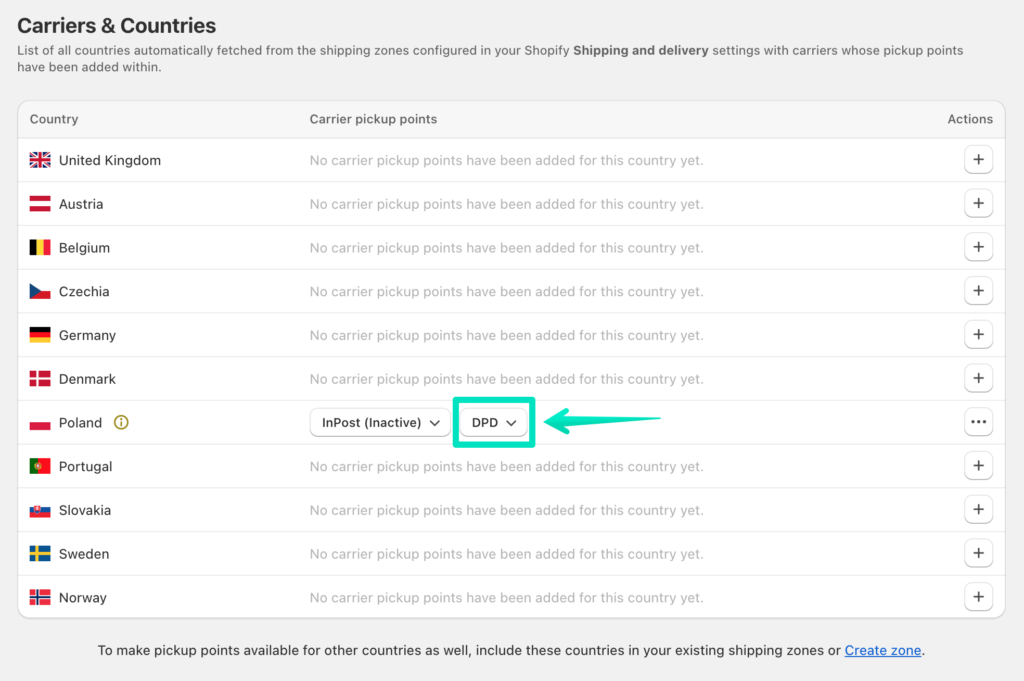
This page contains a table with all countries you are shipping to, automatically fetched from the shipping zones configured in your Shopify Shipping and delivery settings. It is also a place from where you will be able to manage what carrier pickup points should be available for shipping to each listed country.
If a country which you want to make pickup points also available for is not currently listed in the Carriers & Countries table, add it to an existing shipping zone in your Shopify Shipping and delivery settings or create a new zone including this country. Once it is added this way, it will also appear in the table.
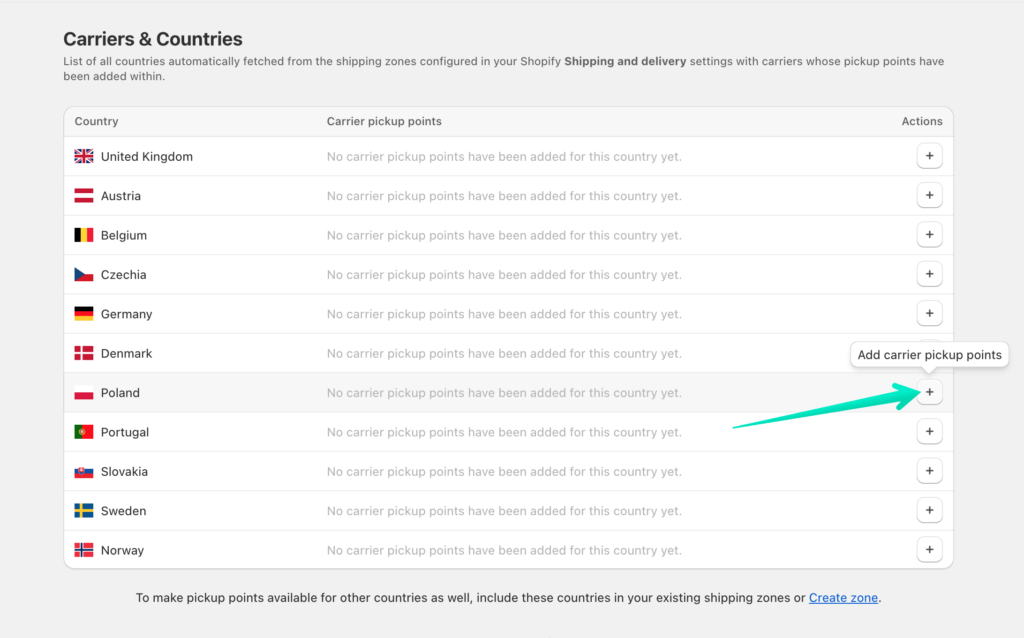
Adding carrier pickup points for selected country
To add the specific carrier’s pickup points for shipping to the country where you want them to be available for, click the + plus button in the Actions column next to this respective country:

Carrier pickup points available in the app
The Octolize Pickup Points PRO app currently provides the pickup points of the following carriers:
- ACS
- AlzaBox (Česká pošta)
- Balíkovna (Česká pošta)
- BEX
- BOX NOW
- bpost
- bring
- Cargus
- Česká pošta
- Colissimo
- Correos
- Crosswin (Romania Express)
- dao
- Dexpress
- DHL
- DHL Express
- DPD
- DPD Relais France
- Econt
- Elta Courier
- Express One
- FAN
- FedEx
- FoxPost
- GAP Akis Express
- GLS
- Hermes
- Hrvatska Pošta
- InPost
- Lietuvos paštas
- Magyar Posta
- Matkahuolto
- Meest
- Mondial Relay (InPost)
- MRW
- NACEX
- Nova Post
- Omniva
- ORLEN Paczka
- Packeta
- Poczta Polska
- Pošta Slovenije
- Poste Italiane
- PostNord
- PPL
- Royal Mail
- Sameday
- Slovak Parcel Service
- Slovenská pošta
- Speedy
- UPS
- Venipak
- WEDO
- Zásilkovna
Please mind that the availability of specific carriers’ pickup points may vary depending on the country you are shipping to.
If the app is currently missing the specific carrier’s pickup points which you would like to use to ship your products to certain country, please let us know about it by clicking the Request new carrier button at the bottom, providing the name of the carrier you’d like to be added and sending the new carrier’s request.
The selected carriers’ pickup points will be added to the respective country:
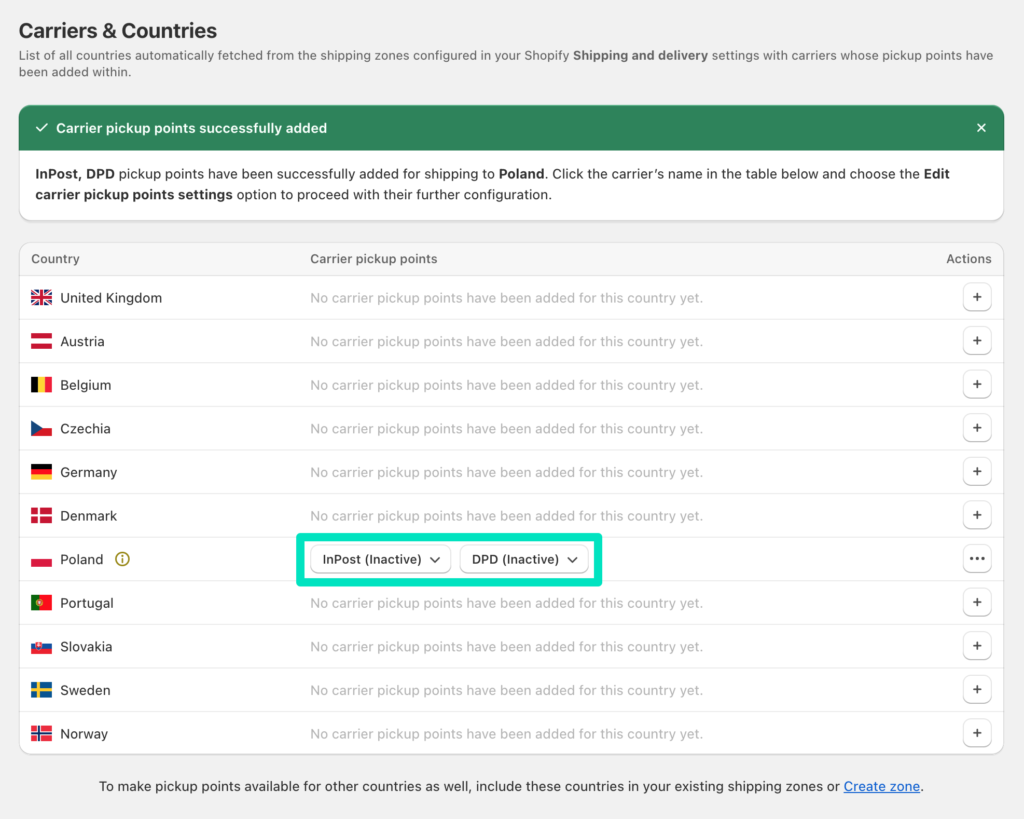
However, as you can see above, despite being added, they have (Inactive) status and they are not enabled yet. Click the carrier’s name to open the drop-down menu and choose the Edit carrier pickup points settings to proceed with its further configuration:
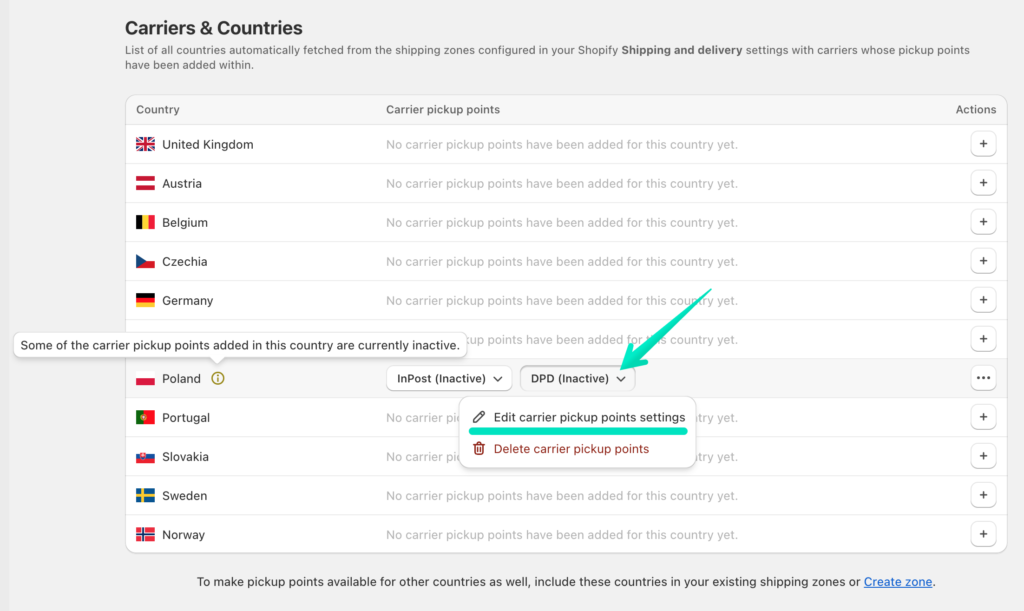
You will be redirected to…
Carrier pickup points configuration screen
…with the individual shipping settings for the pickup points of a specific carrier in that country:
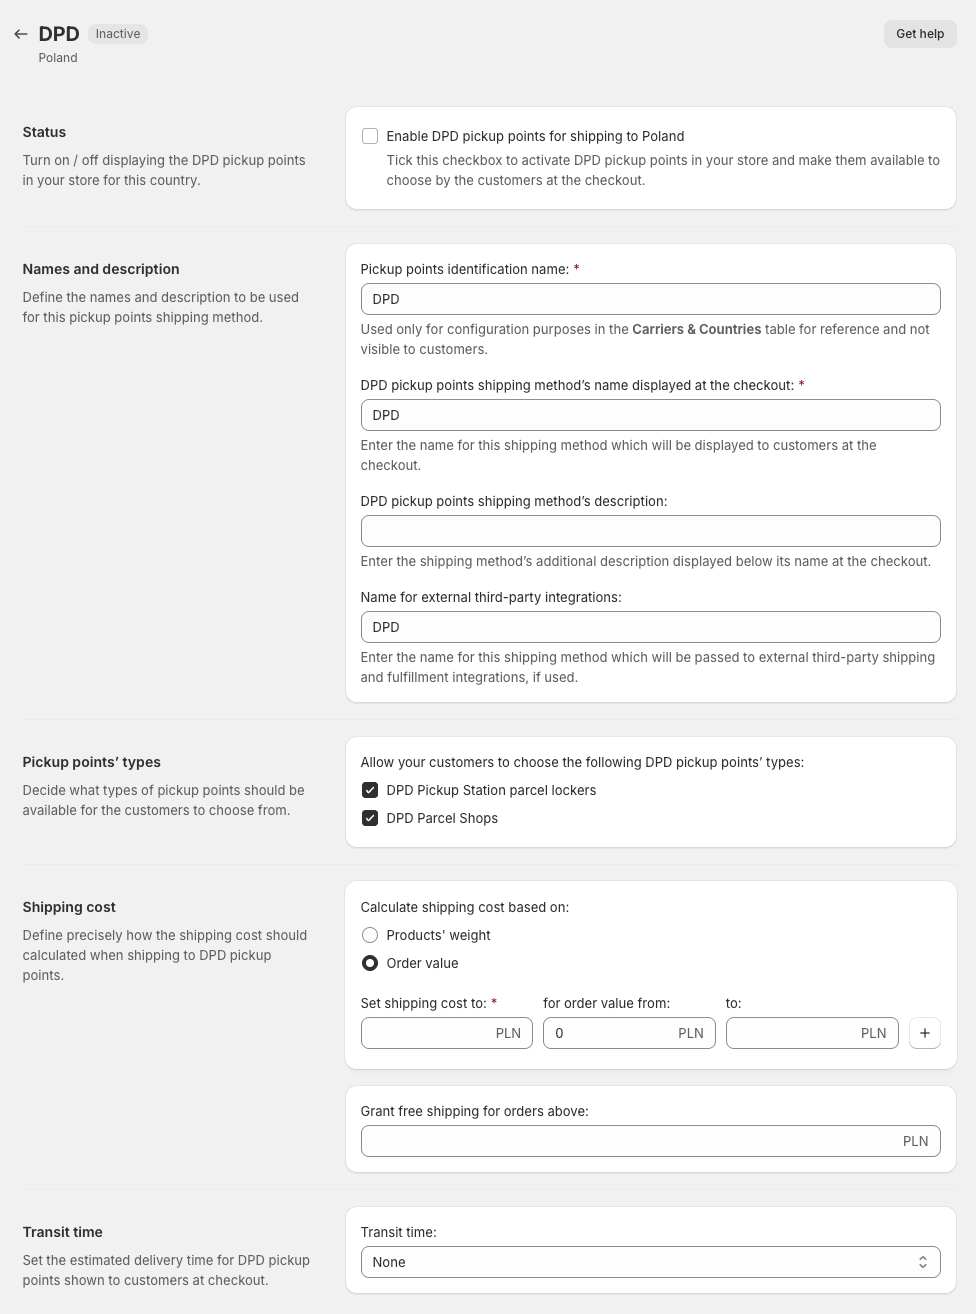
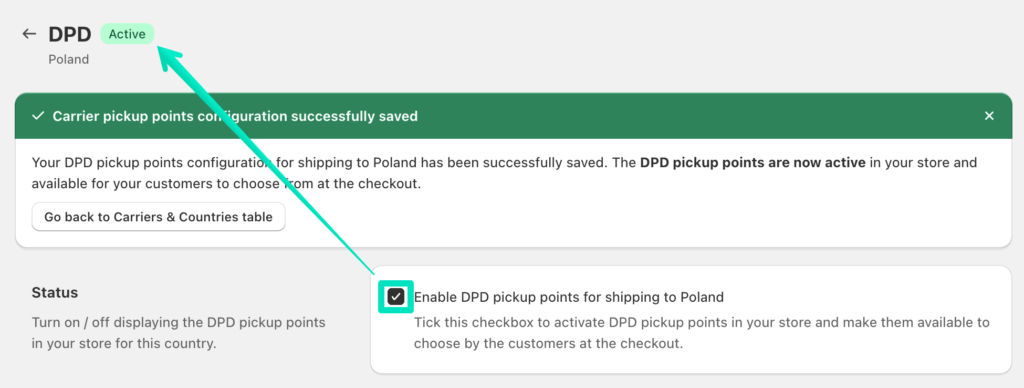
Status

Enable {carrier name} pickup points for shipping to {country} – tick this checkbox to activate the carrier’s pickup points in your store and make them available to choose by the customers at the checkout.
Names and Description
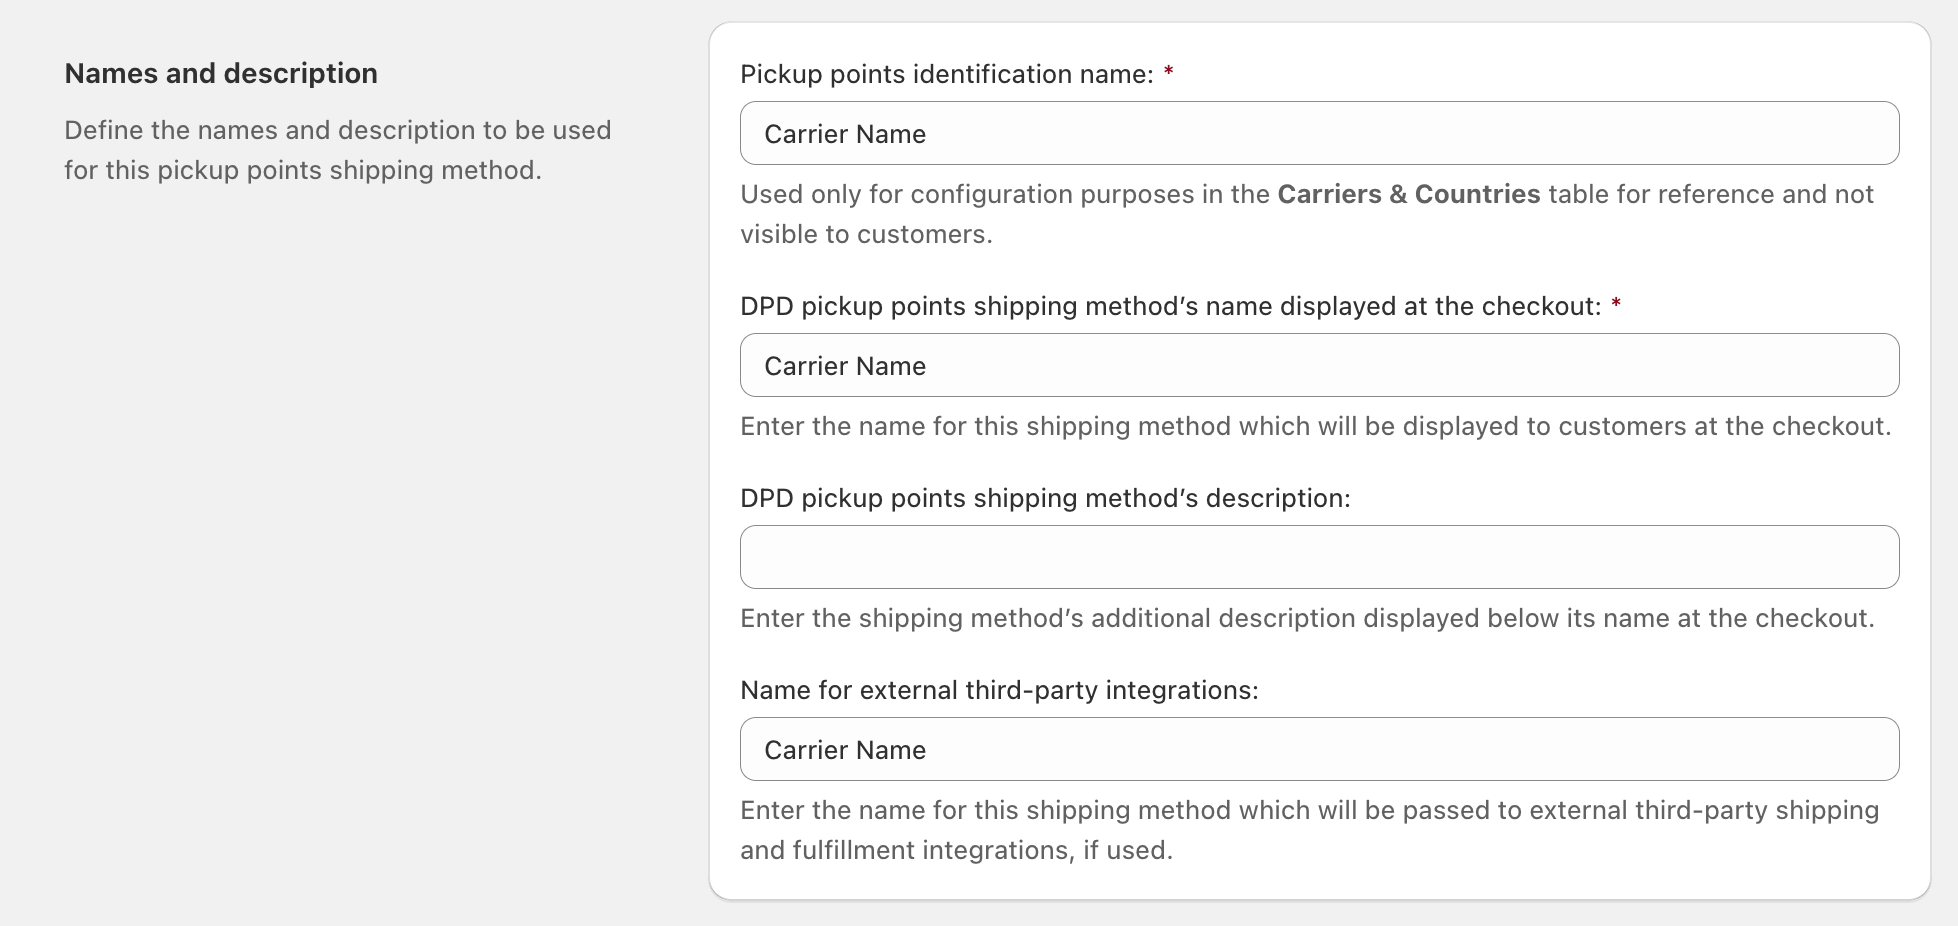
Pickup points identification name: An internal-only name used to identify this specific carrier configuration within the “Carriers & Countries” table in the app dashboard. It is not visible to customers.
Checkout Name: The shipping method name exactly as it will appear to the customer during the checkout process.
Description: Additional text displayed below the shipping method name at checkout to provide more context.
Third-party Integrations Name: A specific name passed to external shipping and fulfillment platforms.
Pickup points’ types
Some carriers may also have additional options allowing to select the type of pickup point available for customers to choose from:

Shipping cost
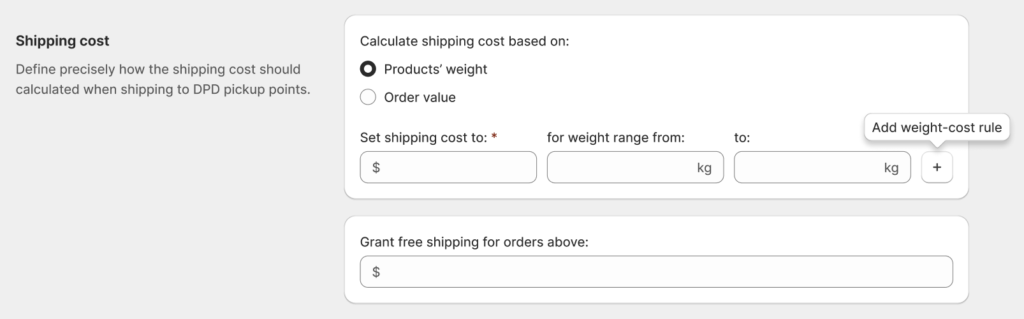
- Products’ weight – the shipping cost will be calculated based on the total weight of the products the customer orders,
- Order value – the shipping cost will be calculated based on the total price of the products the customer orders.
Set shipping cost to: – fill in these fields with the preferable value to define the shipping cost the customers should be charged with when they choose this shipping method to ship the ordered products.
for weight range / for order value from: / to: – define the weight or price range of the products in the cart the shipping cost defined above should be applied to.
Please mind that you can use the + plus button to add as many weight or price ranges as you need and configure the respective shipping cost for each of them:
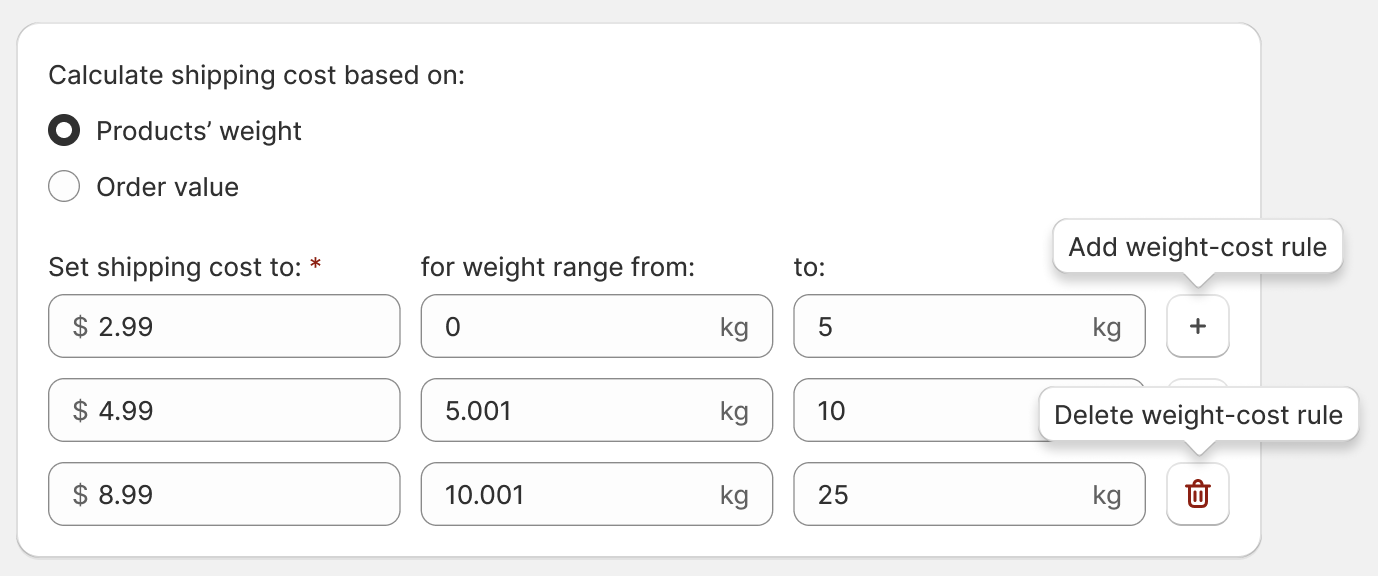
as well as delete the unnecessary weight or price rules with the Trash button.
Grant free shipping for orders above: – set the free shipping threshold and enter the order price value which, once reached, will result in granting your customers the free shipping.
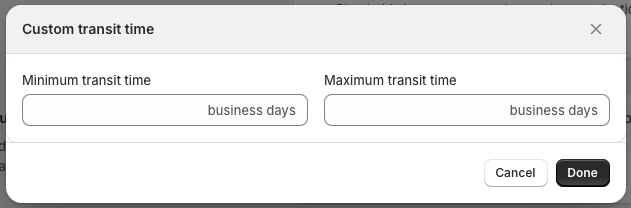
Transit time

- None – estimated delivery times for pickup points won’t be displayed at checkout,
- 1 to 2 business days,
- 3 to 5 business days,
- 5 to 8 business days,
Custom – choose this option to enter your own custom delivery time range:
Please make sure the Enable {carrier name} pickup points for shipping to {country} checkbox at the top of the screen has been ticked to make pickup points available to choose by your customers at the checkout.
The pickup points should be available from now on to choose by your customers at the checkout the way you configured in the carrier’s Display settings.
If you added multiple carrier pickup points to a country, e.g., DPD and InPost, DHL and UPS, etc., please simply repeat for them all the configuration steps described above the same way.
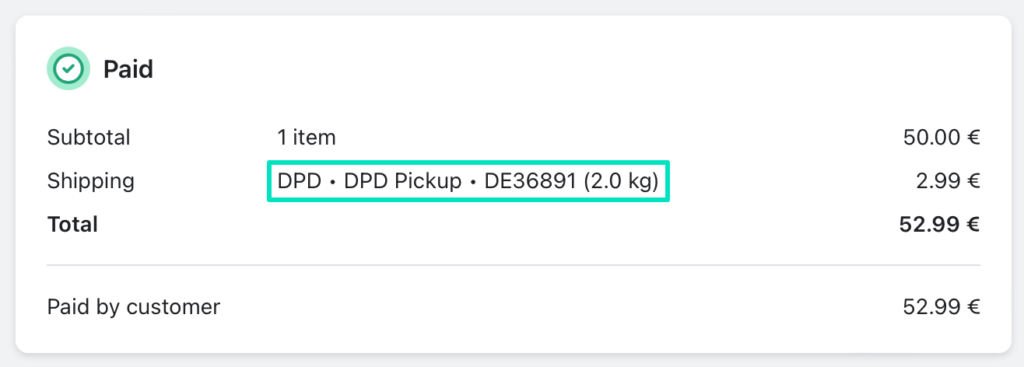
Saving the information about the customer’s selected pickup point to the order details
When the customer places an order and selects the pickup point as preferred shipping method, the information about their choice will be saved to the order details:
Passing the selected pickup point to the 3rd party integrations
The Octolize Pickup Points PRO app allows you not only to save the information about the pickup point the customer selected to the order details, but also to pass it further to the external shipping integrations, such as BaseLinker, etc.
If you use such 3rd party integrations in your store, the information about the selected pickup point along with its ID and other details can be passed from the order details to the target integration.