- Shopify Basic plan and plans without Carrier-Calculated Shipping (CCS) enabled
- How does the Octolize Pickup Points PRO app work on Shopify Basic plan and plans without enabled CCS?
- What if the app cannot find the pickup point for the shipping address the customer entered?
- What if the location on a map serves as a pickup point for multiple carriers, e.g., for DPD and DHL?
- Can I set a different shipping cost depending on which carrier's pickup points I ship to?
- Can I customize the Pickup points map cart widget’s look and texts?
- Shopify Grow, Shopify Advanced and plans with Carrier-Calculated Shipping (CCS) enabled
- How does the Octolize Pickup Points PRO app work on Shopify Grow, Shopify Advanced and plans with enabled CCS?
- What if the app cannot find the pickup point for the shipping address the customer entered?
- What if one location serves as a pickup point for multiple carriers, e.g., for DPD and DHL?
- What if my app settings are configured properly, but the pickup points still don't show up at the checkout?
- Can I set a different shipping cost depending on which carrier's pickup points I ship to?
- Can I show my customers the pickup points they can choose on the map?
- Shopify Plus plan
- How does the Octolize Pickup Points PRO app work on Shopify Plus plan?
- What if the app cannot find the pickup point for the shipping address the customer entered?
- What if my app settings are configured properly, but the pickup points still don't show up at the checkout?
- Can I set a different shipping cost depending on which carrier's pickup points I ship to?
- How to obtain the Google Maps API key?
- I have an idea on how to improve the Octolize Pickup Points PRO app
Shopify Basic plan and plans without Carrier-Calculated Shipping (CCS) enabled
How does the Octolize Pickup Points PRO app work on Shopify Basic plan and plans without enabled CCS?
Once the Pickup points map cart widget block is added to the store theme’s Cart template, the app inserts a section in the cart with a button allowing the customers to choose their preferred pickup point for order delivery on the map. Their selection is then saved to the order details.
What if the app cannot find the pickup point for the shipping address the customer entered?
In such a situation, the app will automatically suggest pickup points located closest to the address entered by the customer and simply zooming out the map may be a solution. Nevertheless, we highly advise to provide your customers with possibility to choose the pickup points of two different carriers, in order to prevent such situations from happening.
What if the location on a map serves as a pickup point for multiple carriers, e.g., for DPD and DHL?
It will be displayed as two separate pins on the map and as two separate pickup point suggestions to choose from in the sidebar, providing your customers with a choice of which carrier should handle the delivery to this pickup point.
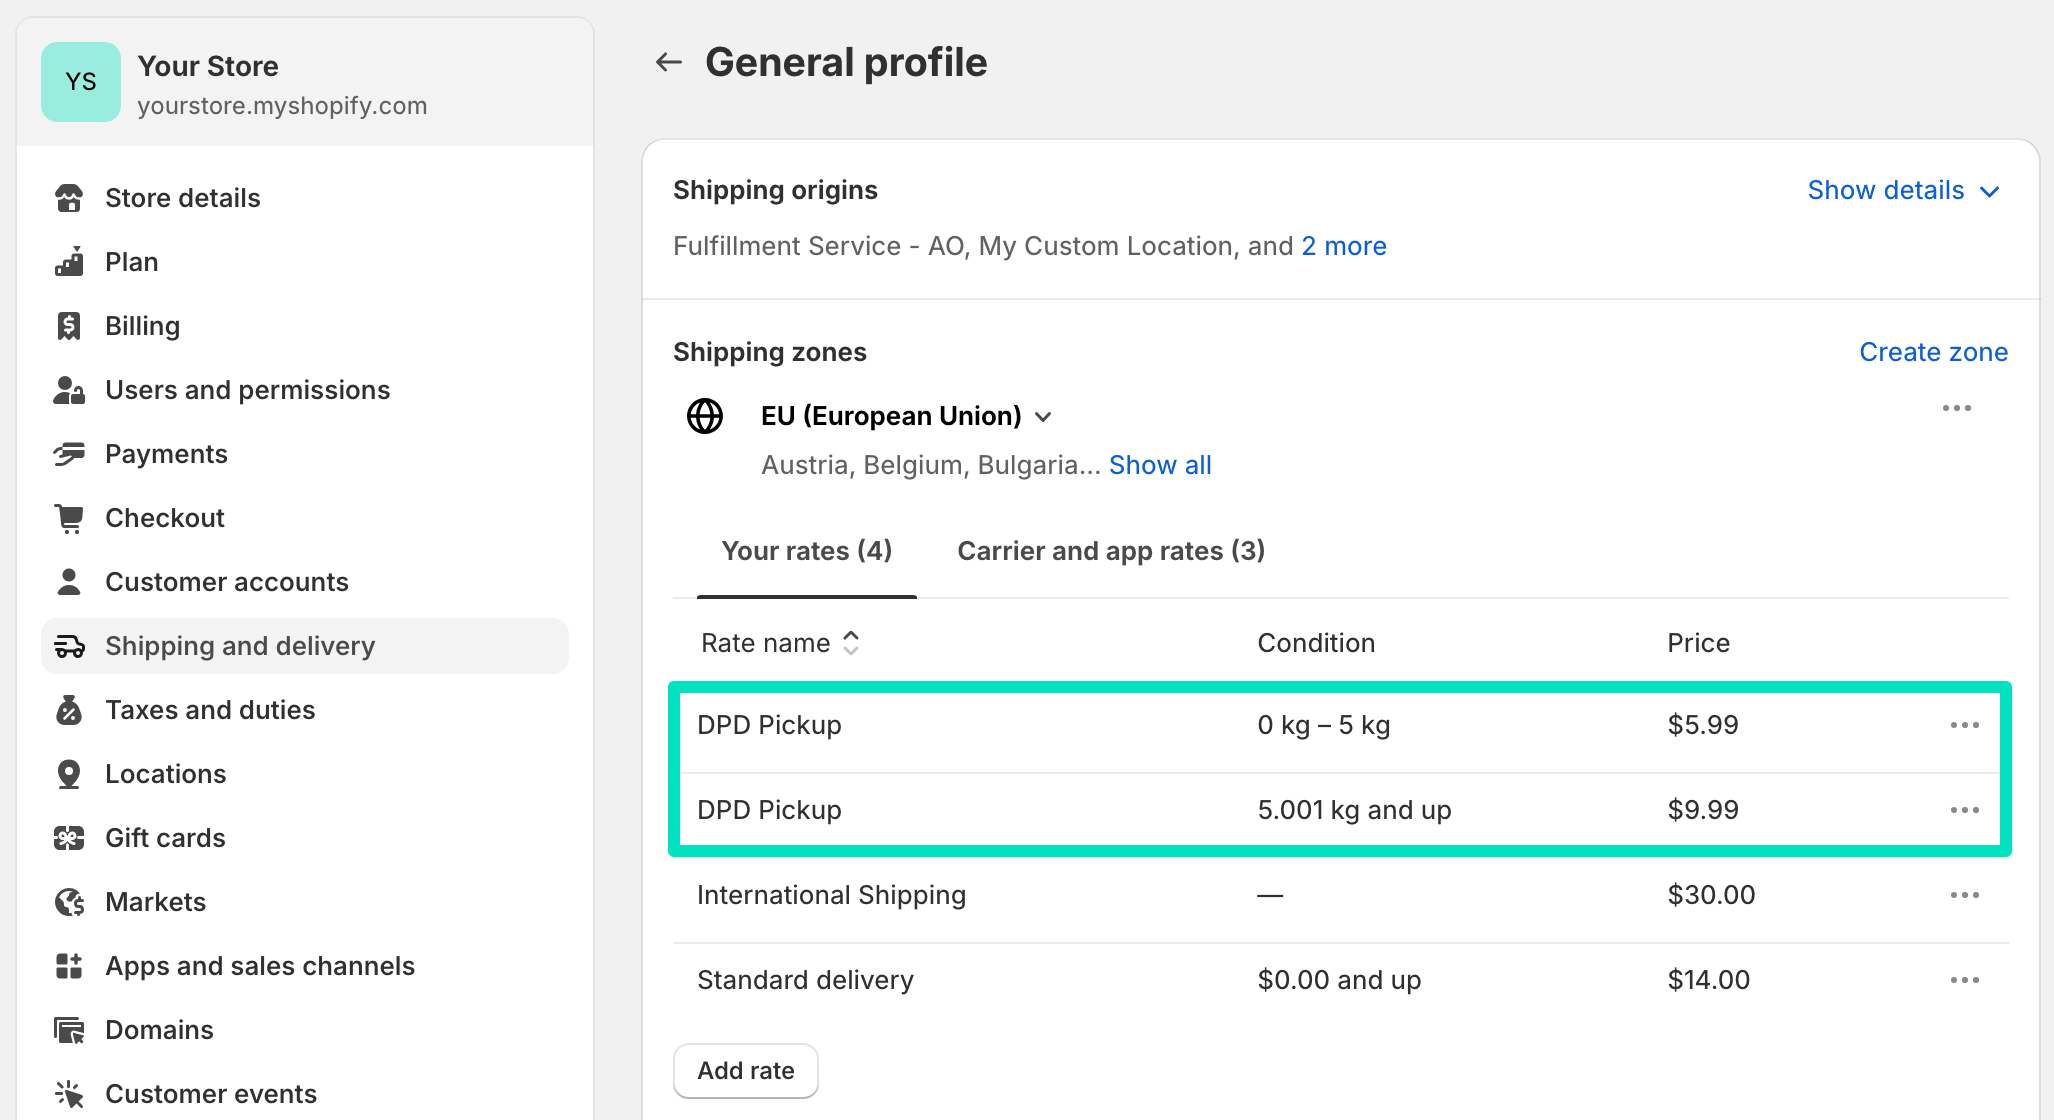
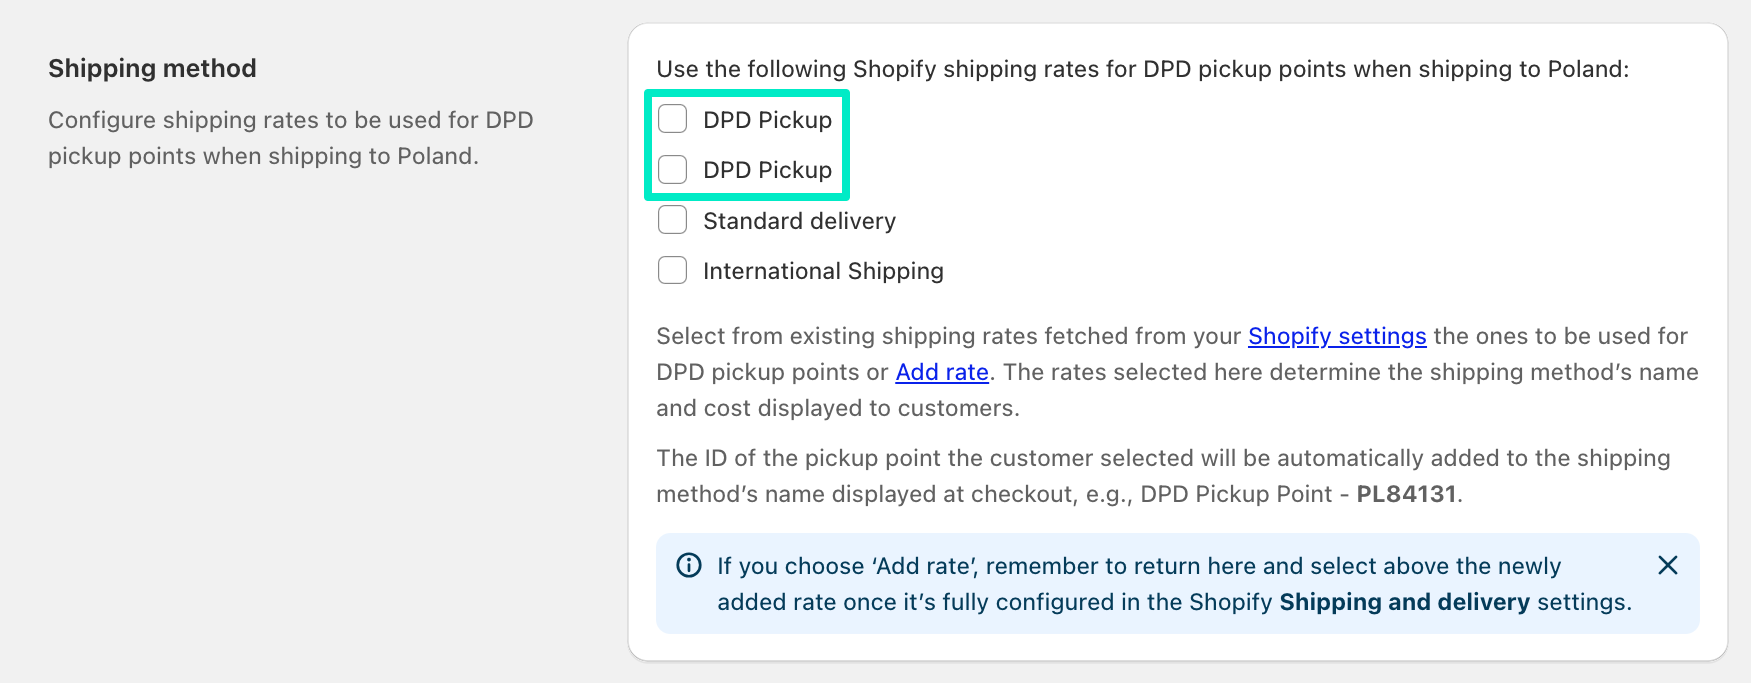
Can I set a different shipping cost depending on which carrier’s pickup points I ship to?
Absolutely! You can easily configure shipping cost to specific carrier pickup points and make it vary depending on the country you are shipping to. It can be done in the Shopify Shipping and delivery settings by editing the cost of the corresponding rates which you have mapped with the specific pickup points.
Can I customize the Pickup points map cart widget’s look and texts?
Yes, you can customize it and adjust it to your needs using the Pickup points map cart widget block options available in the Theme editor:
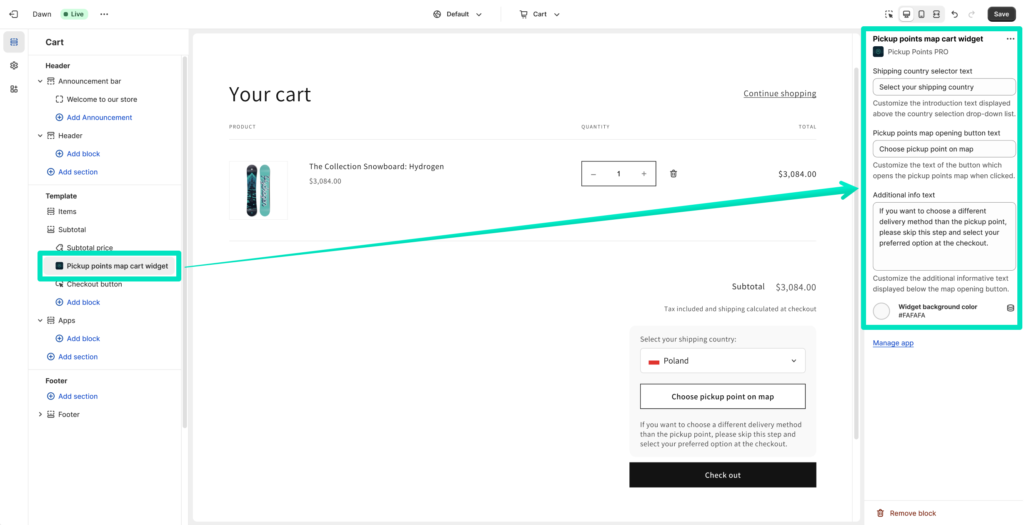
as well as style it with CSS rules to fit your theme. You can find more detailed information about it in the dedicated Pickup points map cart widget appearance customization docs section.
Shopify Grow, Shopify Advanced and plans with Carrier-Calculated Shipping (CCS) enabled
How does the Octolize Pickup Points PRO app work on Shopify Grow, Shopify Advanced and plans with enabled CCS?
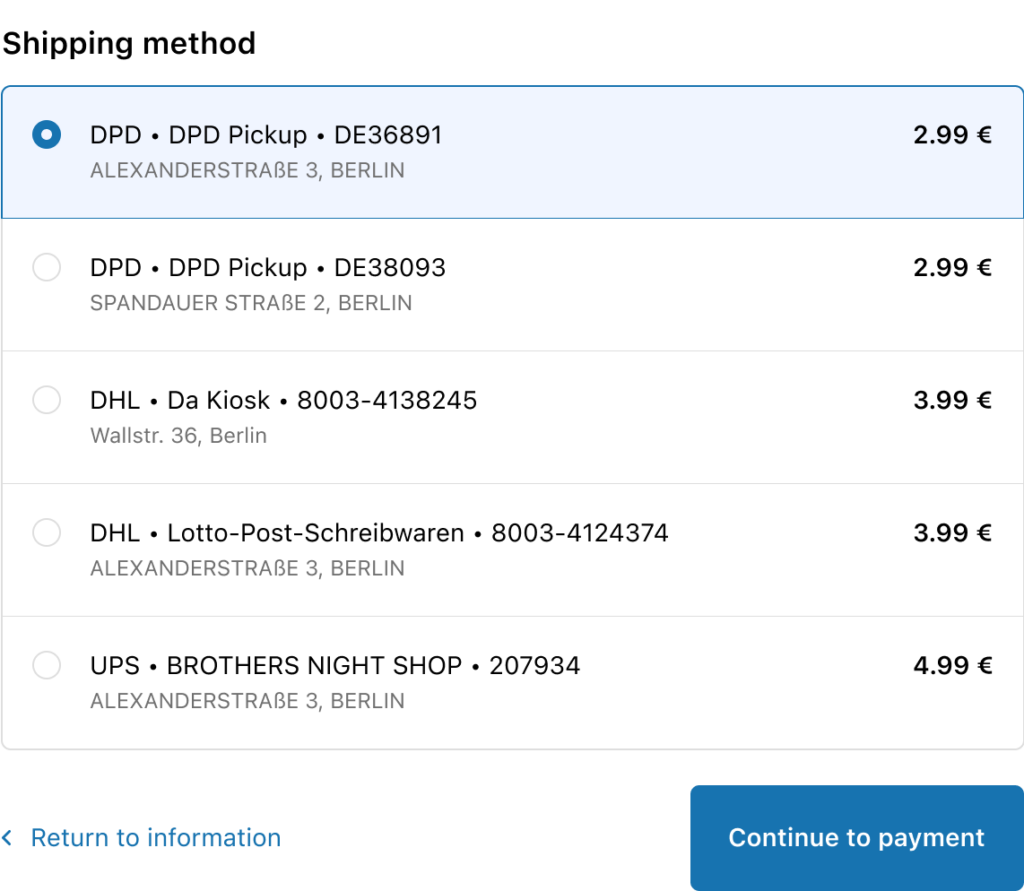
Once the customer enters the Ship to details at the checkout, the Octolize Pickup Points PRO app finds the nearest available pickup points within a 25 km radius from the entered shipping address. Then, according to the configured app settings, the pickup points of the selected carrier are displayed in the Shopify store’s Shipping method checkout section the way below:
The number of pickup points displayed at the checkout is determined by the Number of pickup points to be displayed option in the app Global settings‘ Display section:

What if the app cannot find the pickup point for the shipping address the customer entered?
The app won’t show the pickup points at the checkout. Only the other shipping methods configured in the Shopify shipping settings will be displayed in such case. This is why it’s highly advised to provide your customers with possibility to choose the pickup points of two different carriers, in order to prevent such situations from happening.
What if one location serves as a pickup point for multiple carriers, e.g., for DPD and DHL?
They will be displayed as two separate shipping methods in order to give your customers a choice on which carrier should handle the delivery to this pickup point.
What if my app settings are configured properly, but the pickup points still don’t show up at the checkout?
Please make sure that Octolize Pickup Points PRO app’s rates have been automatically added to the right shipping zone in the Shopify Shipping and delivery settings.
Navigate to: Settings → Shipping and delivery → {Name of the shipping profile} and check if there are the ‘Octolize Pickup Points PRO’ rates added to the country you want the pickup points to be offered within. If they are not, add them using the + Add shipping option button, choose the Rate type: Carrier or app calculated option and select the Carrier or app: Octolize Pickup Points PRO (Rates provided by app). Confirm the changes made here with the Done button. Move on next to the store’s checkout, update the entered shipping address and verify if the pickup points are displayed properly now. If there is still something wrong, please contact us via the contact form on the Support page.
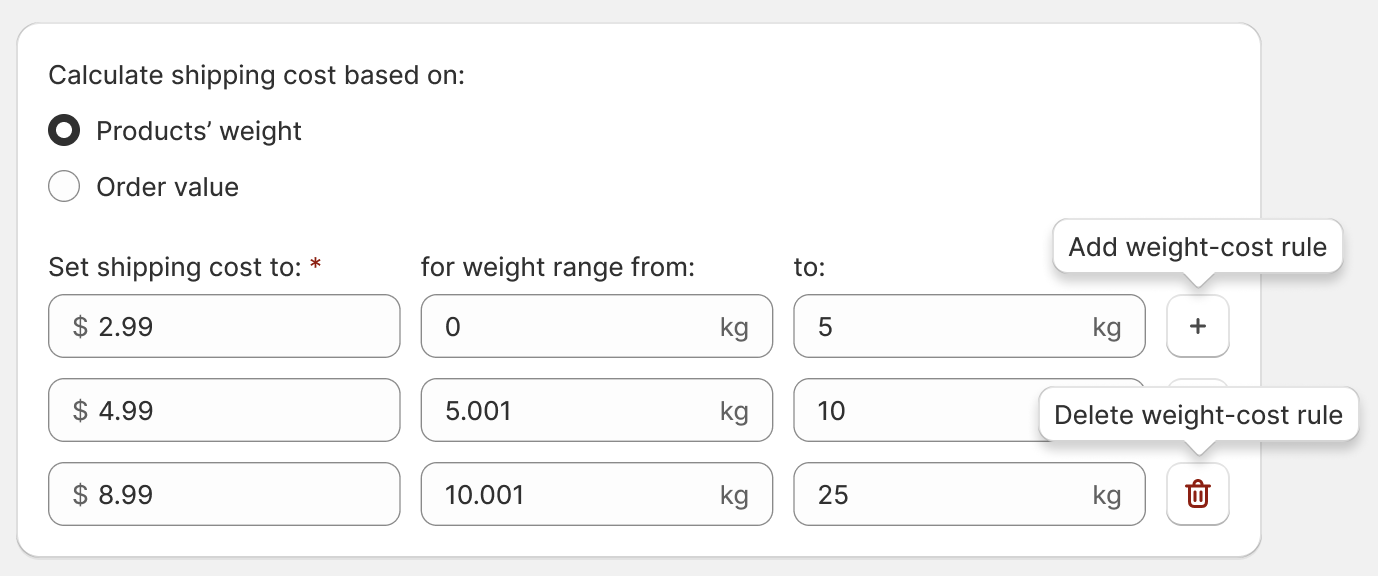
Can I set a different shipping cost depending on which carrier’s pickup points I ship to?
Sure thing, you can easily configure the cost of shipping to specific carrier pickup points and make it vary depending on the country you are shipping to. It can be done using either the weight-based (Products’ weight) or price-based (Order value) cost calculation rules directly on the carrier’s settings screen in the country it’s been added to.
Can I show my customers the pickup points they can choose on the map?
Unfortunately, not yet due to the current Shopify plans limitations. Displaying the pickup points map to the customers at the checkout requires the default checkout to be modified using the Checkout Extensibility features available at the moment only on the Shopify Plus plan. This is why the option to select a pickup point from the map at the checkout is currently limited to this plan. However, we are keeping an eye on this matter and as soon as it becomes possible and Shopify lifts these restrictions, this option will also be available for other Shopify plans.
Shopify Plus plan
How does the Octolize Pickup Points PRO app work on Shopify Plus plan?
Once the customer enters the Ship to details at the checkout, the Octolize Pickup Points PRO app finds the nearest available pickup points within a 25 km radius from the entered shipping address. Then, after selecting the relevant shipping method, either the map:
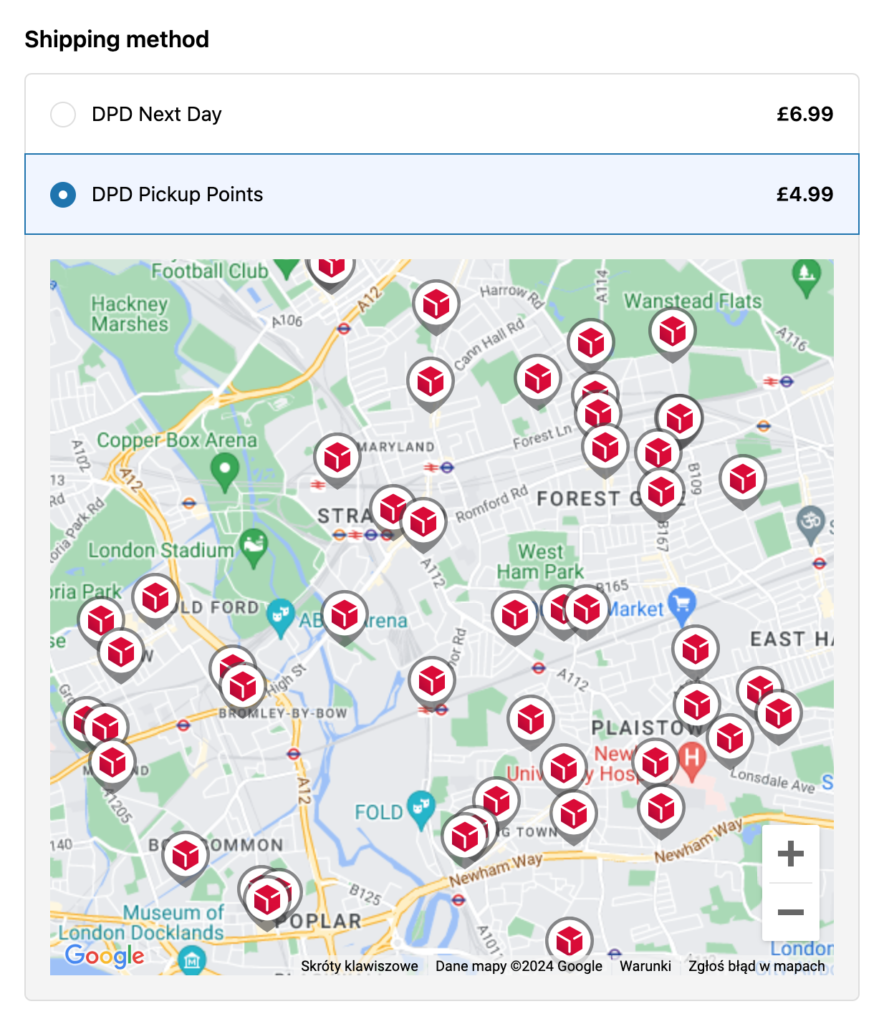
or the list:
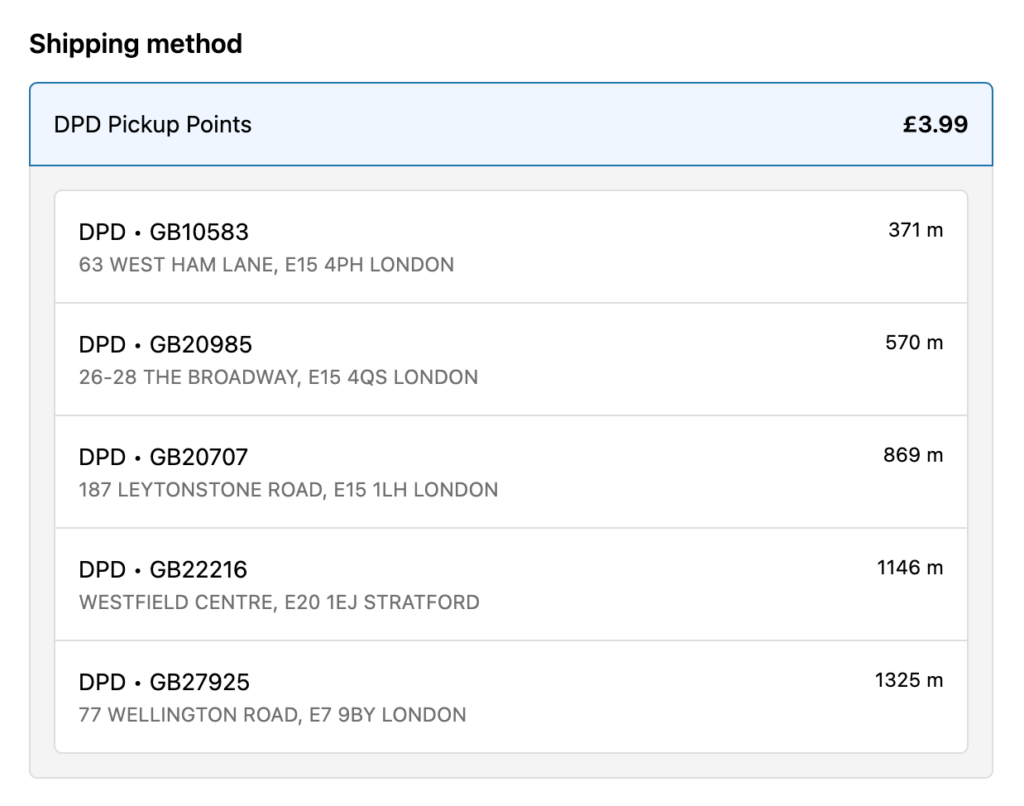
…of the respective carrier’s pickup points is displayed in the Shopify store’s Shipping method checkout section.
What if the app cannot find the pickup point for the shipping address the customer entered?
The app won’t show the pickup points at the checkout. Only the other shipping methods configured in the Shopify shipping settings will be displayed in such case. This is why it’s highly advised to provide your customers with possibility to choose the pickup points of two different carriers, in order to prevent such situations from happening.
What if my app settings are configured properly, but the pickup points still don’t show up at the checkout?
Please make sure that Octolize Pickup Points PRO app has been automatically added to the right shipping zone in the Shopify Shipping and delivery settings.
Navigate to: Settings → Shipping and delivery → {Name of the shipping profile} and check if there are the ‘Octolize Pickup Points PRO’ rates added to the country you want the pickup points to be offered within. If they are not, add them using the + Add shipping option button, choose the Rate type: Carrier or app calculated option and select the Carrier or app: Octolize Pickup Points PRO (Rates provided by app). Confirm the changes made here with the Done button. Move on next to the store’s checkout, update the entered shipping address and verify if the pickup points are displayed properly now.
If this doesn’t resolve the issue, and if you selected an option to display pickup points From the map or From the map and from the list, please make sure if the required Google Maps API key has been entered in the app Global settings:

Can I set a different shipping cost depending on which carrier’s pickup points I ship to?
Sure thing, you can easily configure the cost of shipping to specific carrier pickup points and make it vary depending on the country you are shipping to. It can be done using either the weight-based (Products’ weight) or price-based (Order value) cost calculation rules directly on the carrier’s settings screen in the country it’s been added to.
How to obtain the Google Maps API key?
To enable your customers to select pickup points directly from a map at the checkout of your Shopify store, you need to generate your own Google Maps API key and enter it in the app Global settings’ General section. Without this key, the pickup points selection map cannot be displayed.
Note: Google Maps services are paid, however, Google offers a $200 monthly credit at no charge on billing accounts, which can cover usage fees for most Shopify stores (up to 28,500 map views per month). Learn more about Google Maps pricing →
To generate your Google Maps API key, please follow these steps:
- Log in to your Google account and go to the Google Cloud Platform Console
- If you don’t already have an existing project, create a new one by clicking New project and follow the on-screen instructions, filling in the necessary information to set it up.
- Once the project is created, use the Quick access: APIs & Services button to reach the APIs & Services dashboard.
- Click the + ENABLE APIS AND SERVICES link at the top and you will be redirected to the API Library screen.
- Select the ‘Google Maps JavaScript API Maps for your website’ (It should be displayed right at the top, in the Maps section, however, you can also use the search box to find it if it’s not there for some reason) and click the ENABLE button on the next screen to activate it for your project.
- Provide your payment details if prompted. Now, go to the Keys & Credentials tab, and in the API Keys section, click on the newly created Maps API Key.
- You should be redirected to the Key restrictions screen, where you can restrict your API key to prevent unauthorized use. In the Set an application restriction section select Websites option and in the Website restrictions, which should appear below, click the + ADD button.
- Add the following referrer domains to restrict API key usage only to your Shopify store:
https://yourdomain.comhttps://*.yourdomain.comhttps://shop.apphttps://shopify.com- If your store also operates on other additional domains, please remember to include them here as well.
- Confirm all the changes by clicking the SAVE at the bottom of the screen and copy the Google Maps API key you’ve just generated.
If you encountered any difficulties in this part, please refer to the official Google guide on how to obtain an API key →
- With your Google Maps API key generated, log in to your Shopify store’s admin panel.
- Navigate to the Pickup Points PRO app and then to its Global settings.
- Paste your Google Maps API key into the dedicated field in the Display settings section and click Save button at the top of the screen.
Completing the steps above and integrating the Google Maps API key, followed by adding the Pickup points selector block to the Checkout page template, provides your customers with a fully functional map-based pickup point selector and improves their shopping experience.
I have an idea on how to improve the Octolize Pickup Points PRO app
That’s great! We really appreciate every improvement suggestion, especially when it comes from the app users and we’d love to hear your feeadback. Please drop us a line using the contact form on the Support page.