
- Home
- WooCommerce
- What plugin are you looking for?
- Shopify
- What Do I Need?
- About us
- Blog
- Docs
- Contact us
- What can we help you with?
🚀 See how your shipping experience performs from product page to checkout. Request your FREE Shipping Audit →

A customer fills their cart with two products. One ships from your main warehouse, the other from a supplier across the country (or across the world). WooCommerce looks at that cart, picks a single ship-from address, and quotes one shipping rate with one delivery estimate. It’s wrong on both counts: and you either pay the difference or annoy the customer.
If you run WooCommerce shipping from multiple locations (either two warehouses, a dropshipping setup sourcing from several suppliers, or a store where oversized items live somewhere separate) this is the core problem you have to solve. This guide explains why WooCommerce can’t handle it natively, what a real multi-location setup actually requires, and how to build one by splitting the cart into separate packages.
WooCommerce was built around a single store address. There’s one “ship from” location in the settings, and the shipping calculation assumes every item in the cart leaves from that one place, in one shipment, on one timeline.
That assumption holds up fine if you store everything in one room. It falls apart the moment your inventory is spread out. WooCommerce has no native concept of “this product ships from Warehouse A and that one ships from Supplier B,” so it can’t:
You can bolt on multiple shipping zones and classes, but zones describe where the customer is, not where the product ships from. To genuinely support multiple origins, you need to change how the cart itself is grouped before rates are ever calculated.
Strip the problem down and a working setup needs four things:
The most important step is the first one. Once the cart is correctly grouped into packages, everything else (rates, delivery times, fulfillment) follows from it.
The cleanest way to do this is to map each location to a shipping class, split the cart into separate packages based on those classes, and then price each package with its own table-rate rules. Shipping Packages for WooCommerce handles the splitting. It groups cart items into packages so products from different warehouses or suppliers can ship with different methods, rates, and delivery times. Flexible Shipping PRO sets the cost for each one.
Here’s the whole setup at a glance:
Prefer to watch before you build? Here’s a short walkthrough:
Now each step in detail.
To get started, navigate to your WooCommerce shipping setup. From the sidebar go to WooCommerce → Settings → Shipping → Shipping classes. Here, you will find a list of all shipping classes created to date, along with the number of products assigned to each shipping class. Here you can create a new shipping class or edit an existing one.
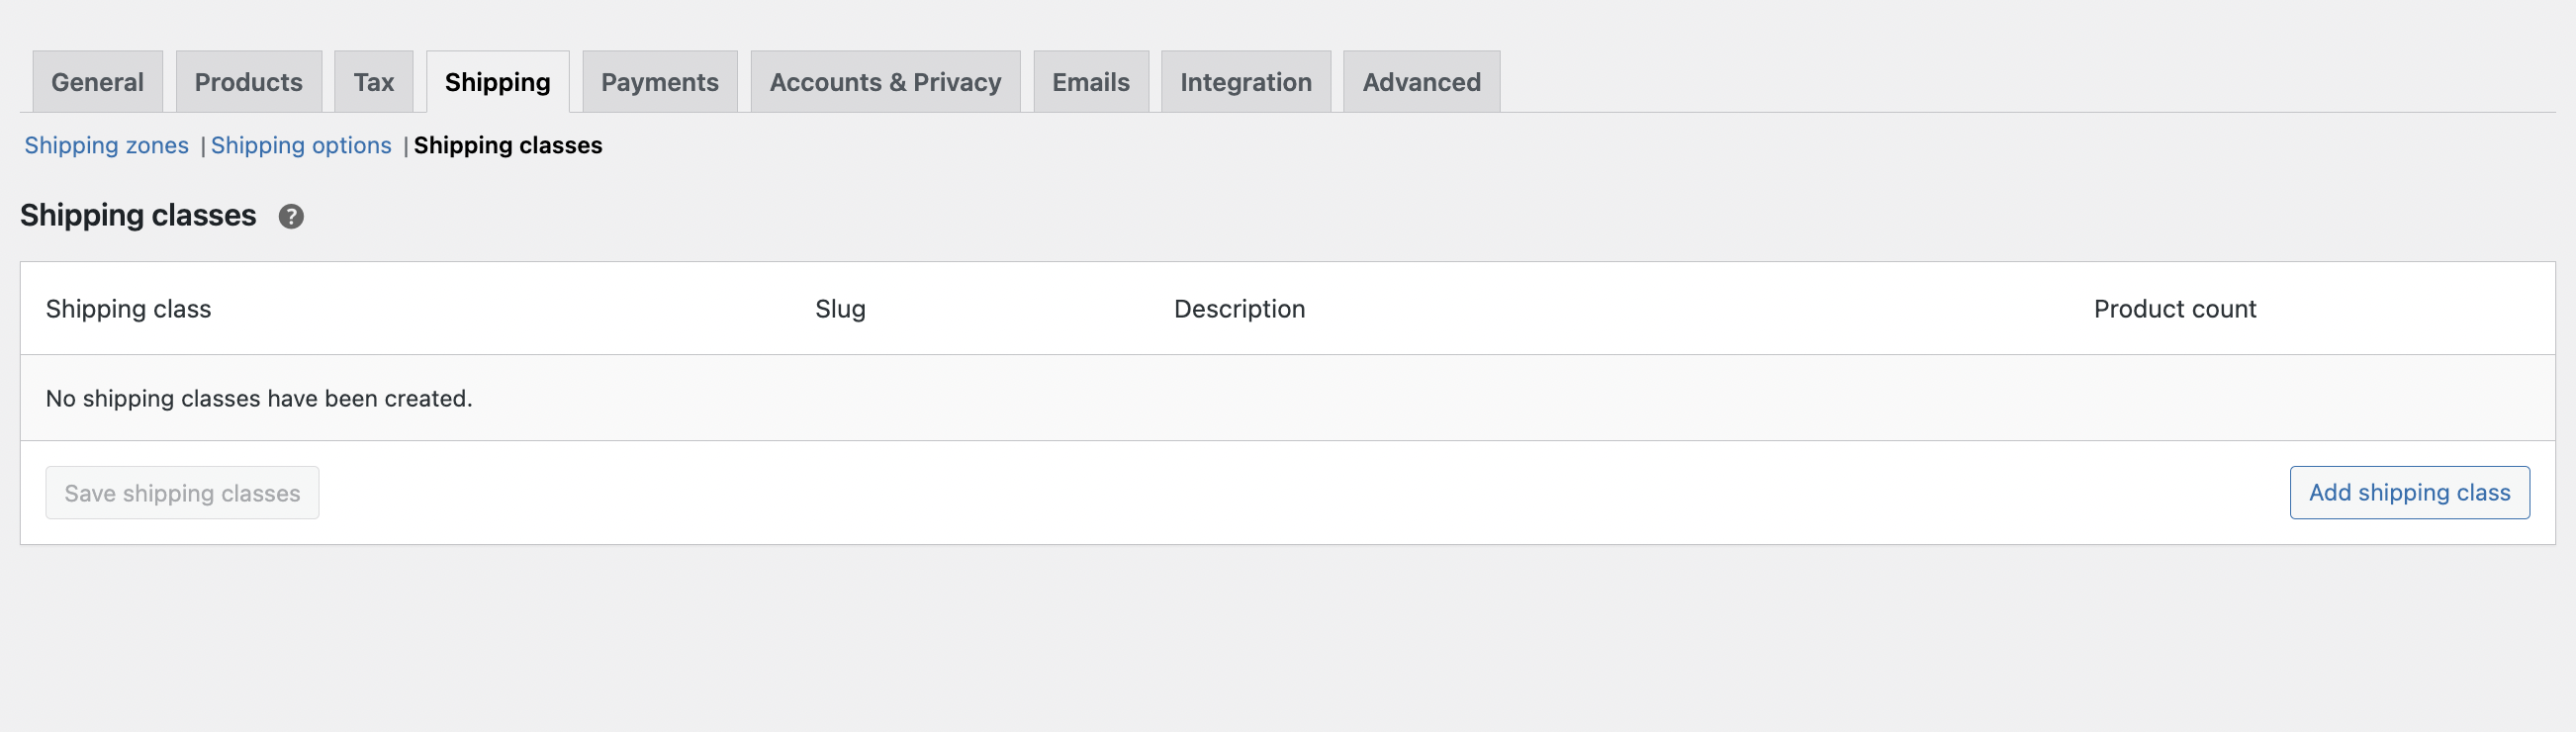
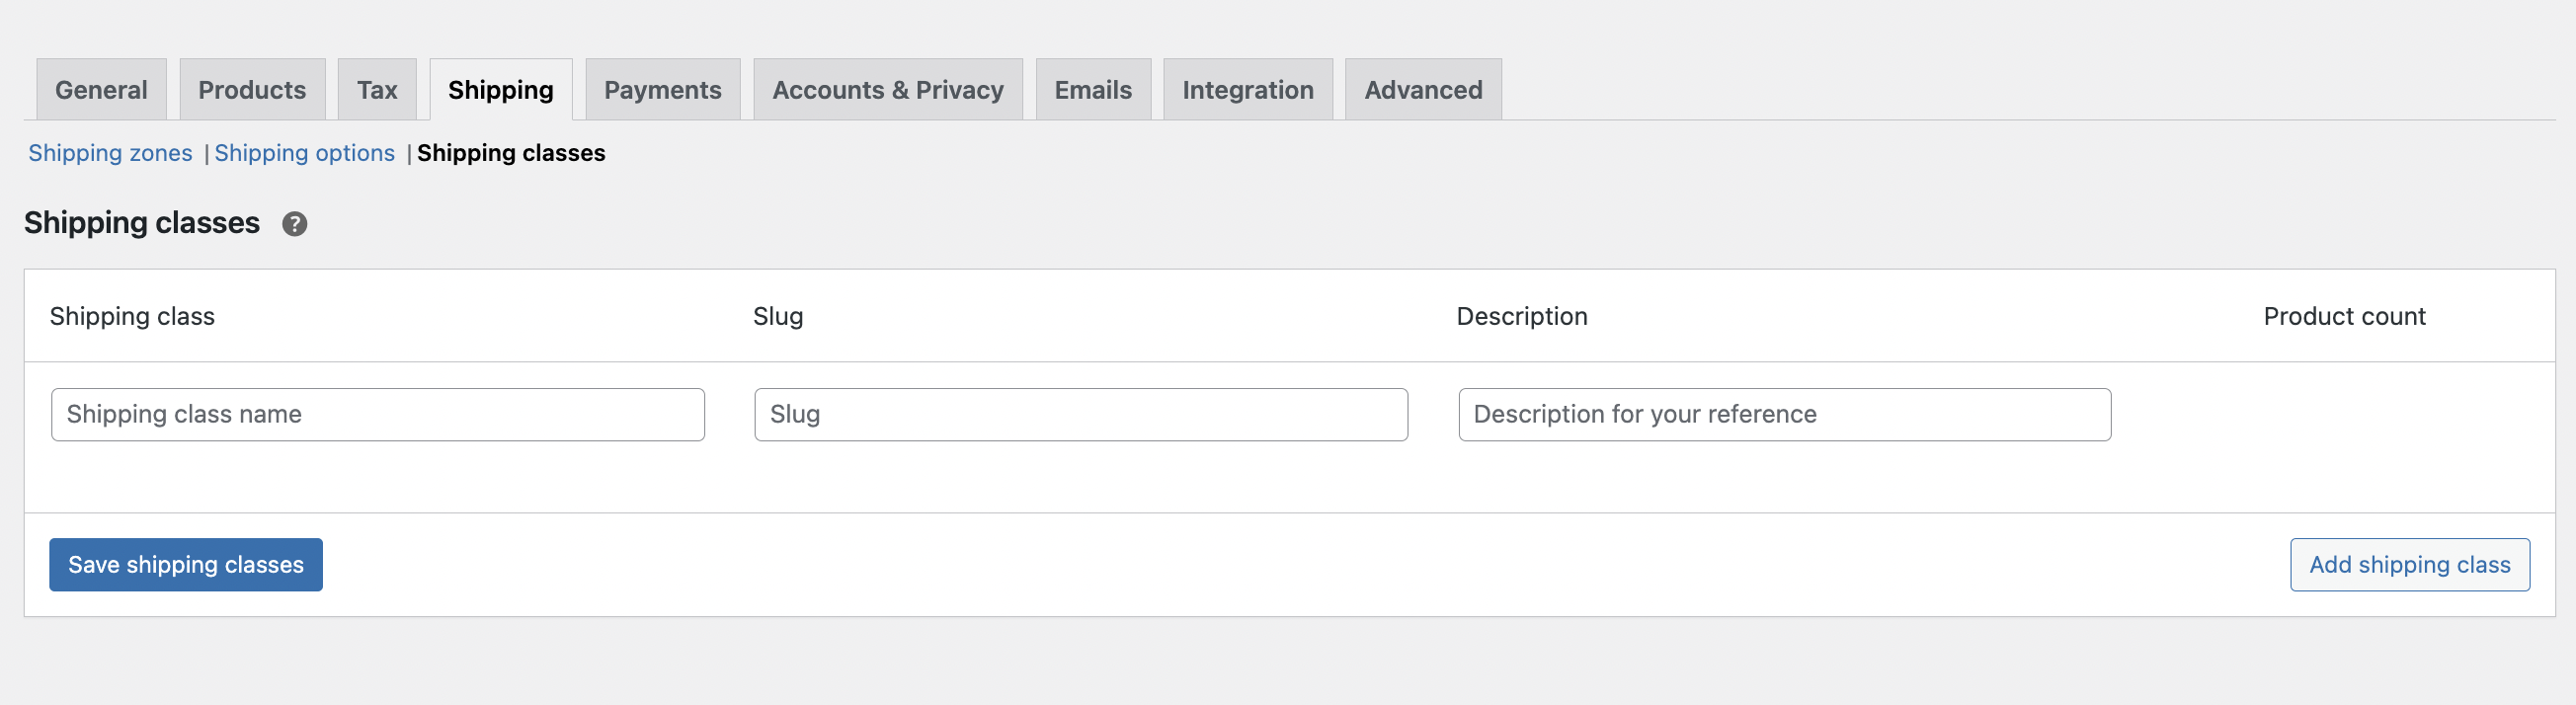
If you want to create a new shipping class, use the Add shipping class button and fill in the details for your new shipping class:
Shipping classes are the labels everything else keys off, so name them after the location, not the product type.
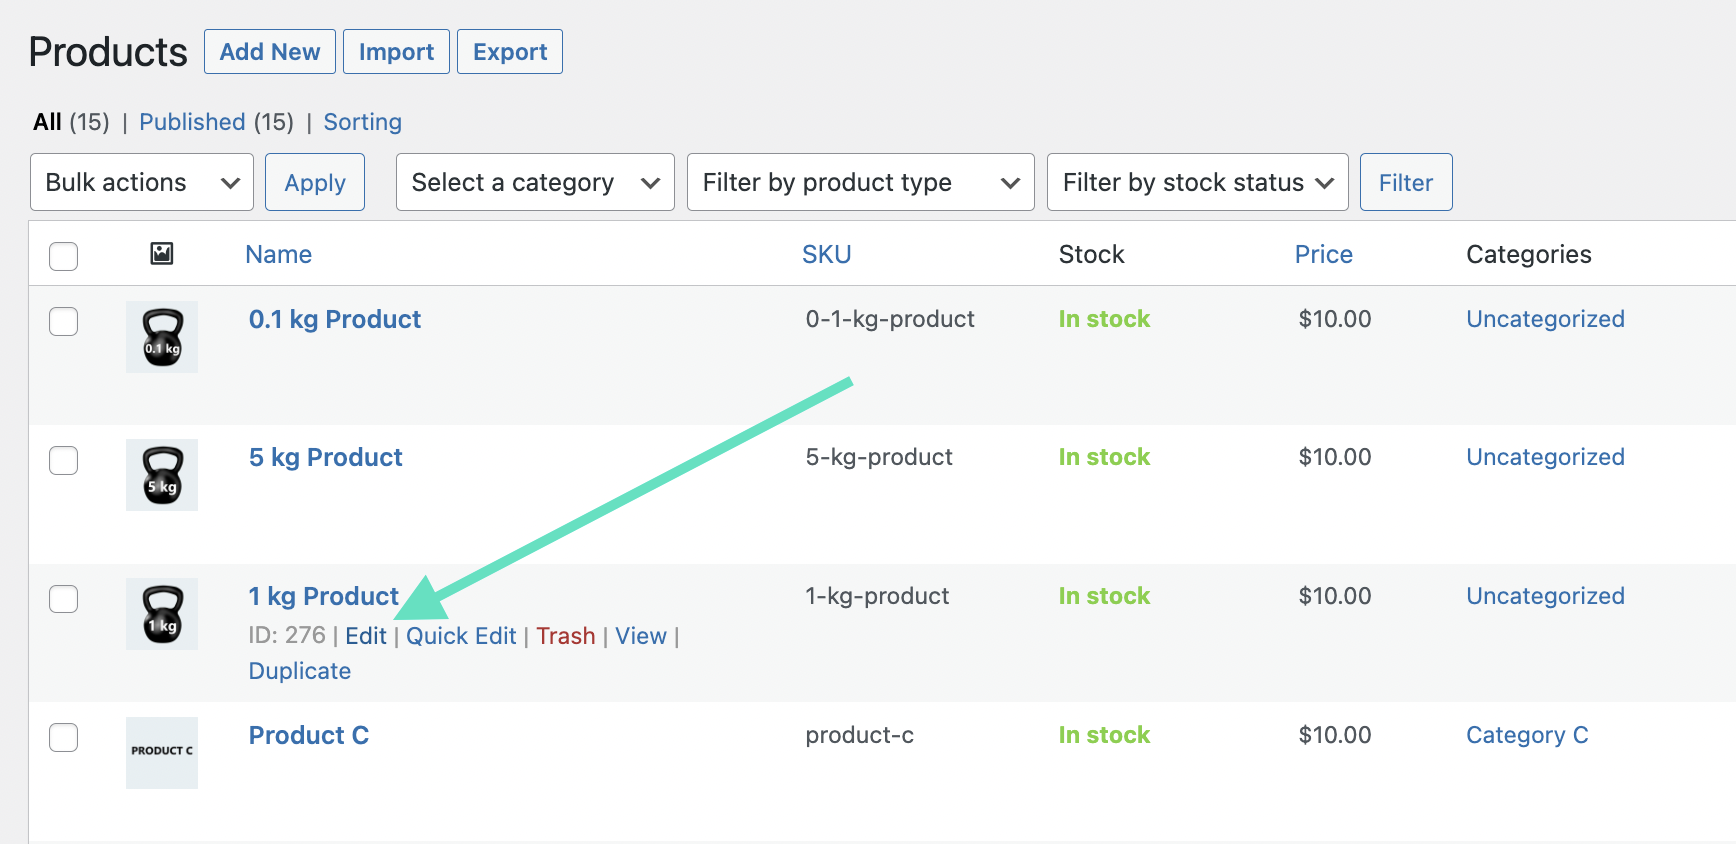
This is the single most important data-entry step: the cart can only split correctly if every product carries the right class. Open each product (or use bulk edit) and set its shipping class to the location it ships from. To do so, go to the Products section of your WooCommerce dashboard. Once you are in the right place, select a product you want to assign a shipping class to. Click Edit to open the product’s settings.
In the product’s settings page, scroll down to the Product Data section. Then, click on the Shipping tab.
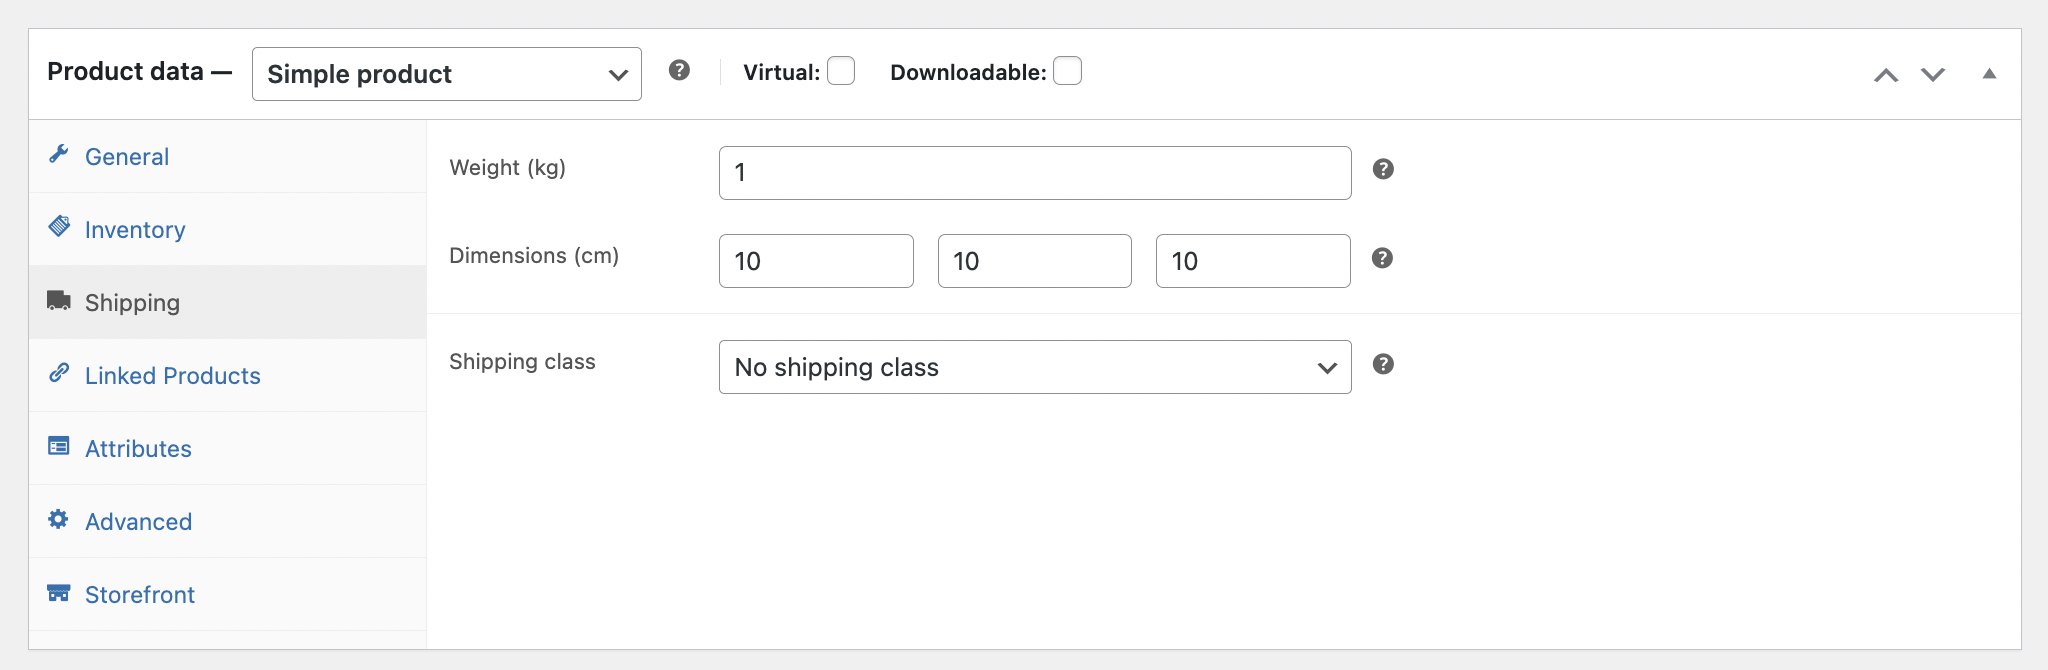
Then, select the shipping class for the product and save the changes.
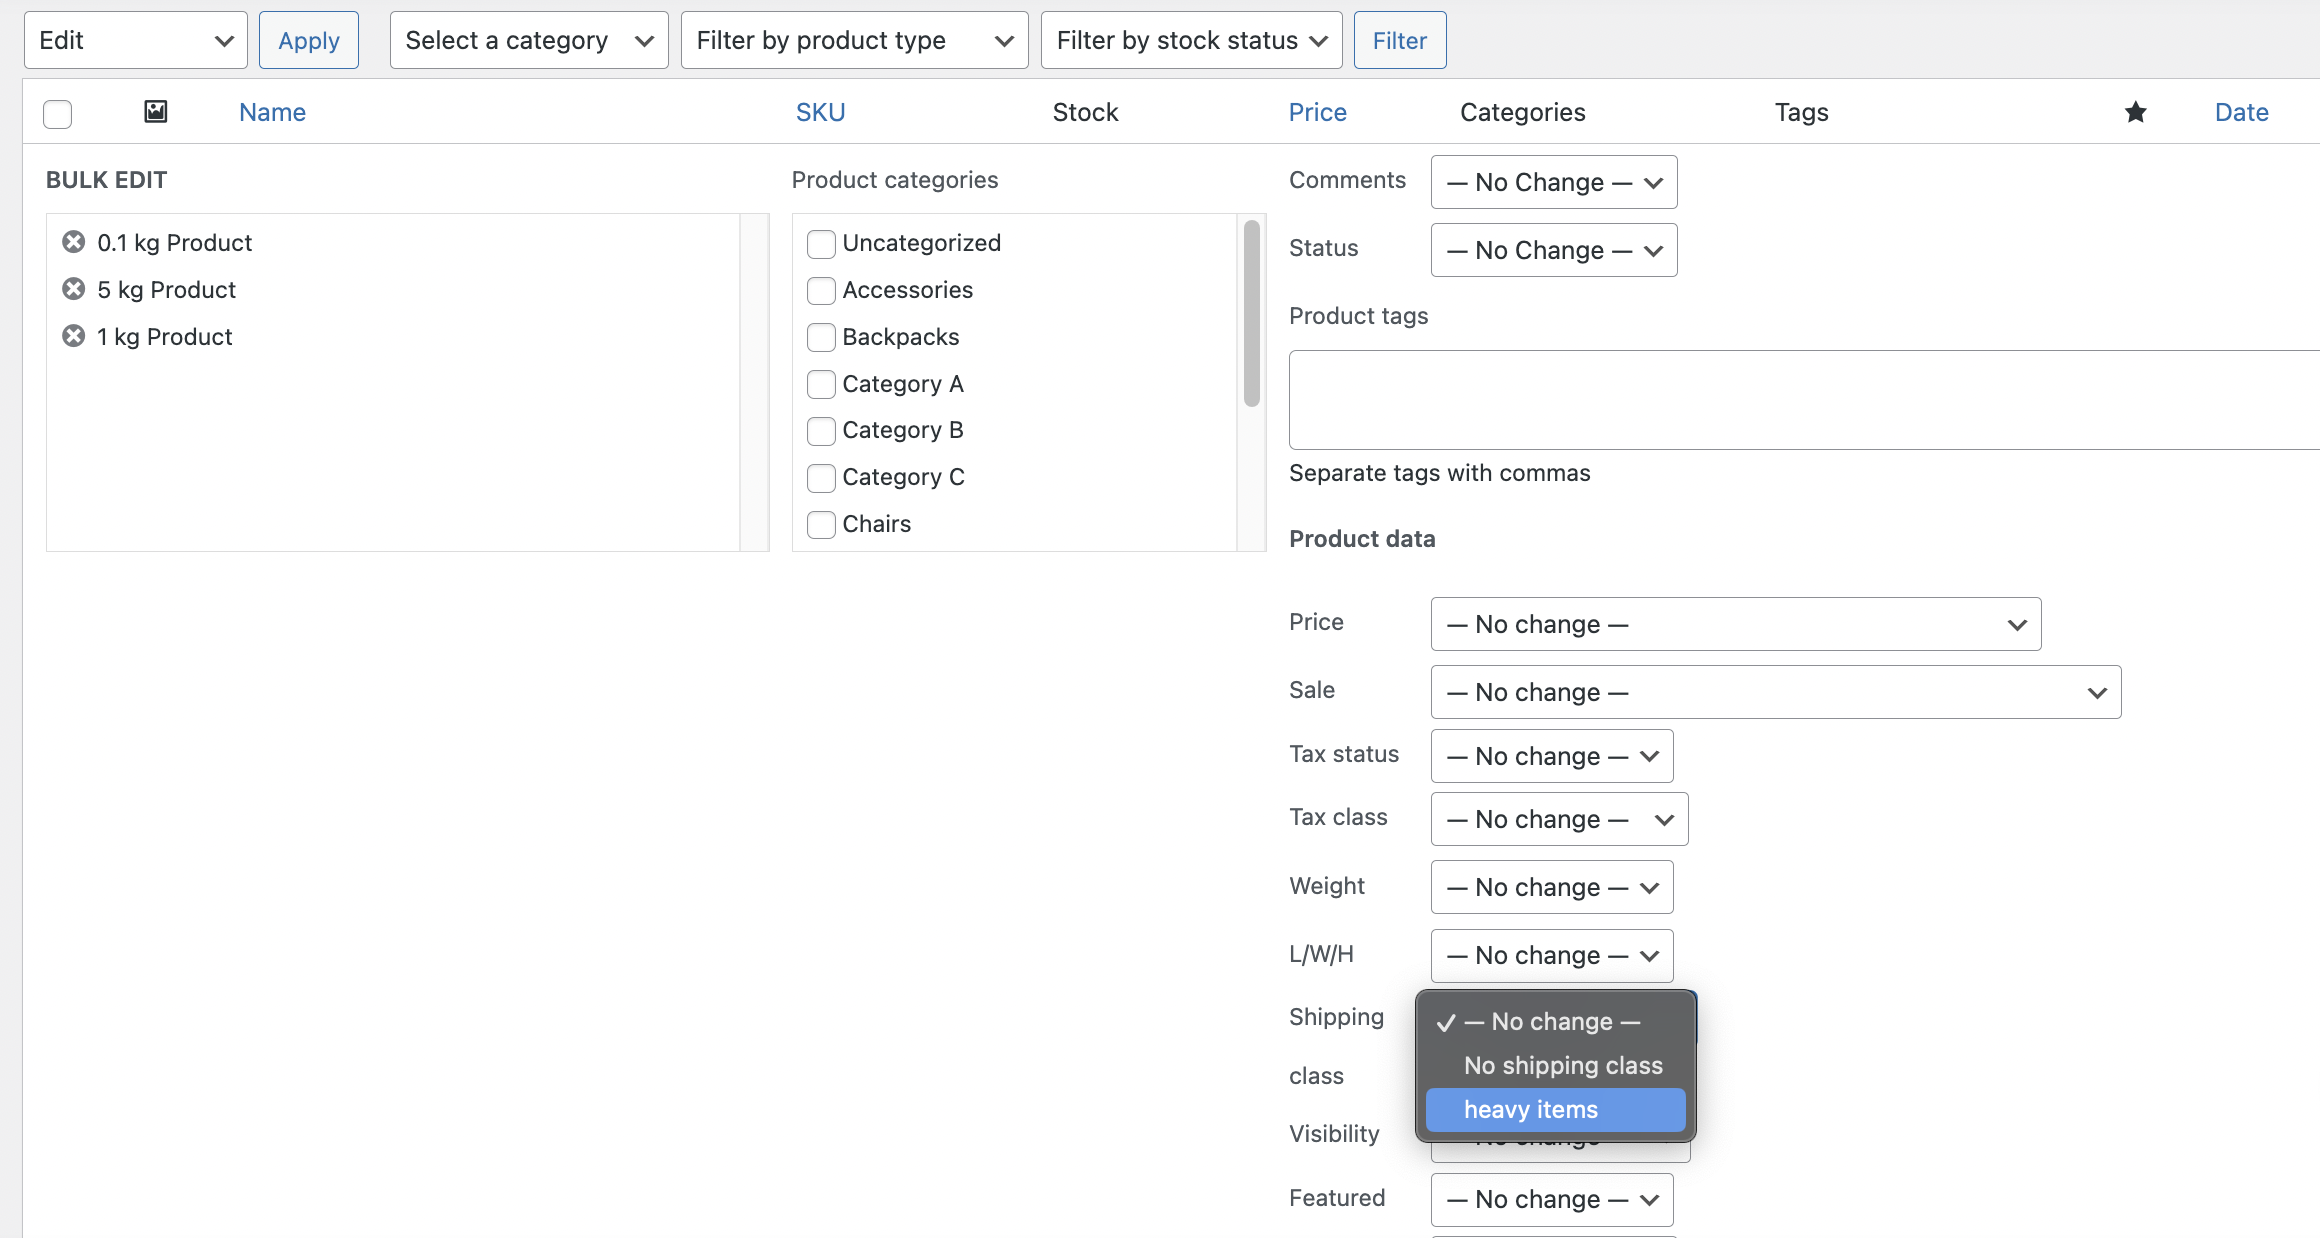
Bulk Assign Shipping Classes
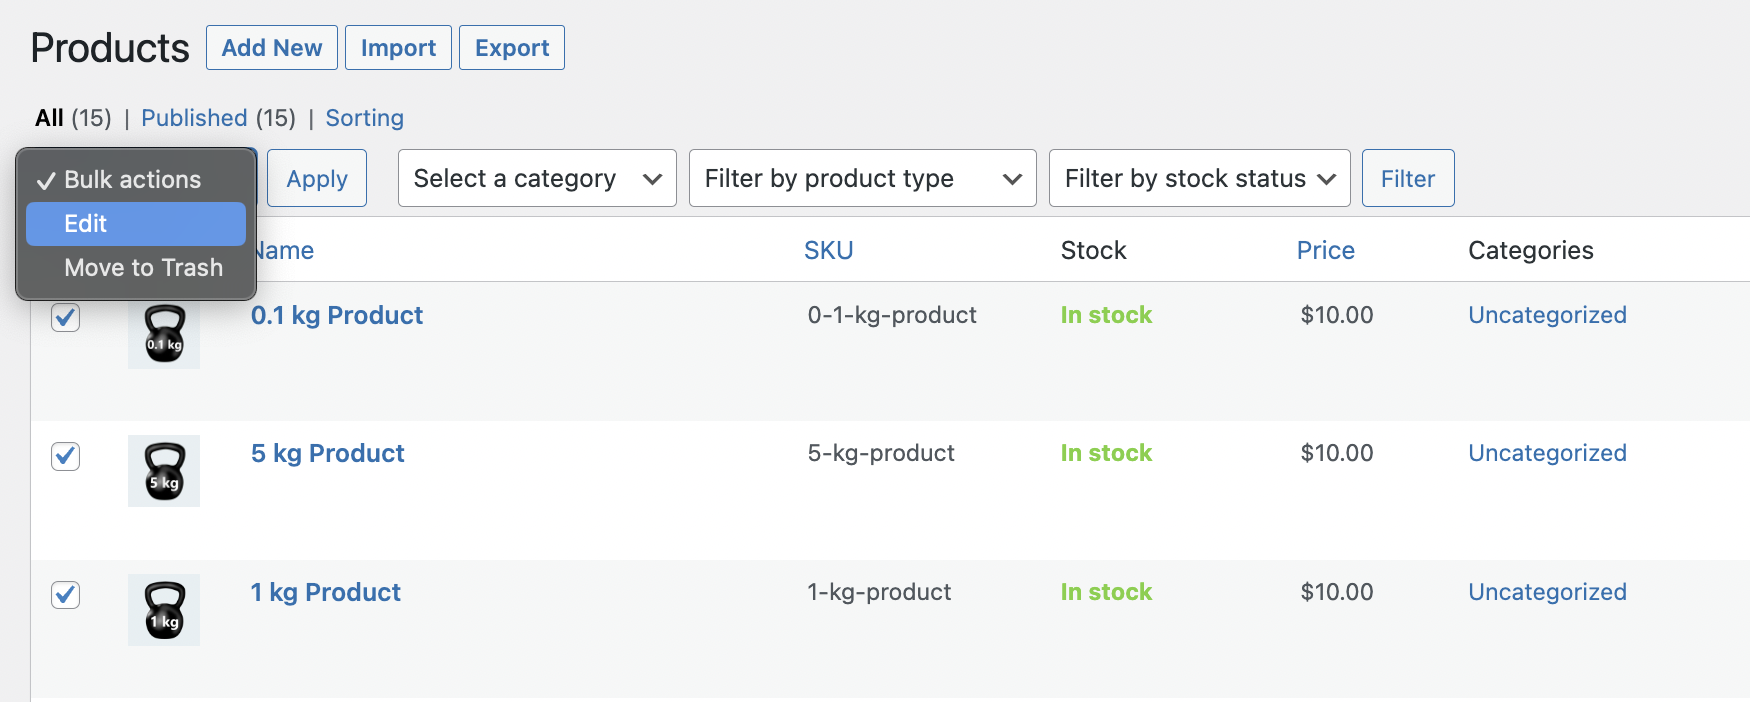
If you have many products to update, WooCommerce allows you to assign shipping classes in bulk. To do this, go to the Products section, select the products you want to update, choose Edit from the bulk actions menu and hit the Apply button.
In the bulk edit screen, you can assign a shipping class to all selected products at once, saving time and ensuring consistency across your store.
To do so, you can use Shipping Packages WooCommerce plugin.

Decide which products should be shipped together and split the cart into multiple packages.
View DetailsorAdd to cartGo to WooCommerce → Shipping → Shipping Packages.
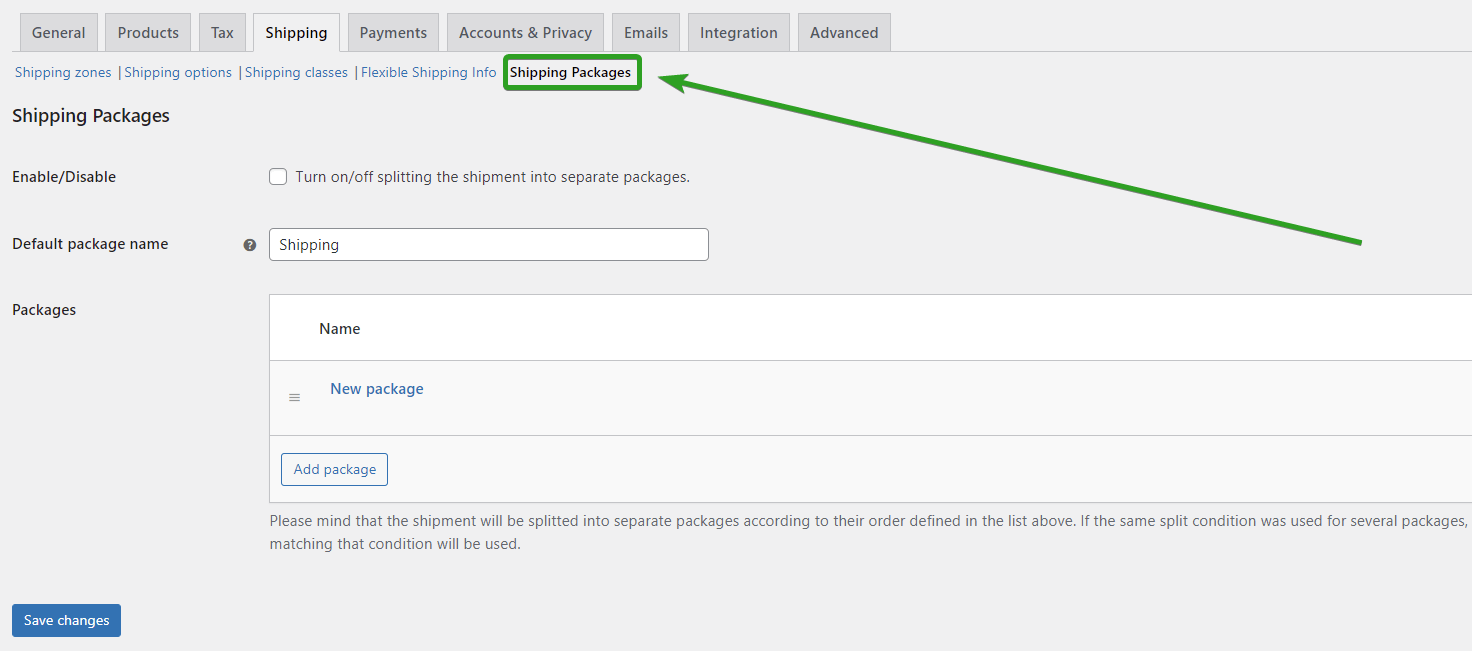
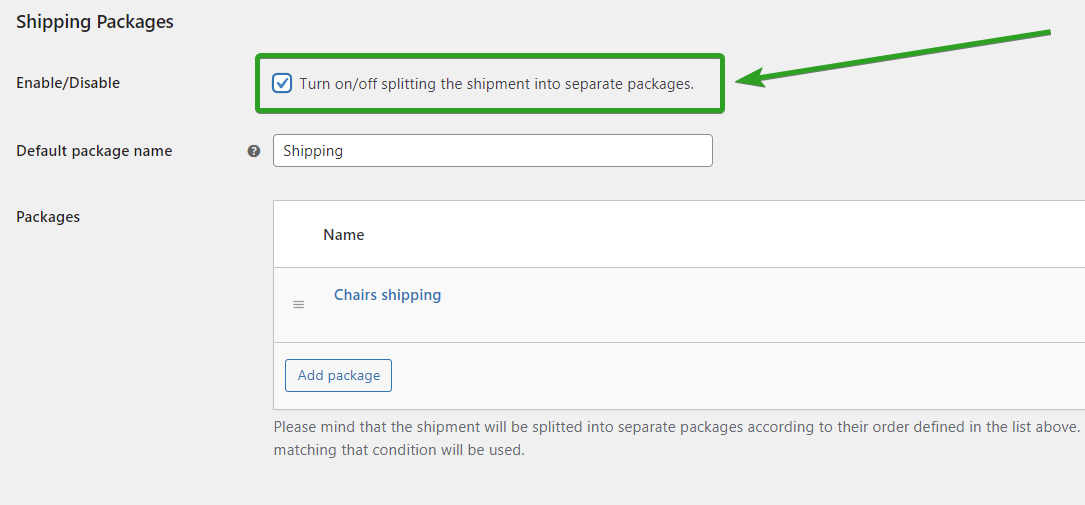
You’ll see the plugin configuration page. There you can enable splitting the shipment into separate packages – do that after setting all packages. Enter Default package name. It’s a name for the default package which will contain all the products not qualified for separate packing. Then, in the Packages table add a new package using the Add package button.
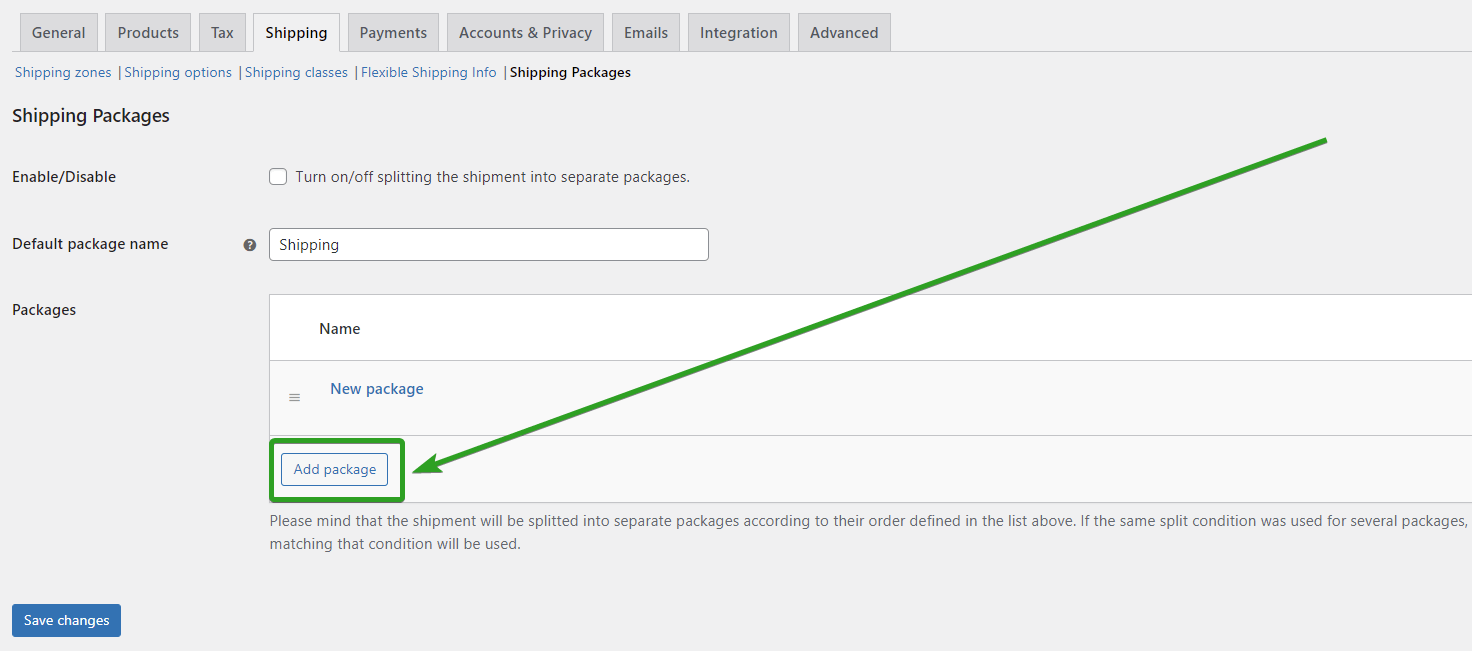
You’ll be redirected to the new package configuration screen.
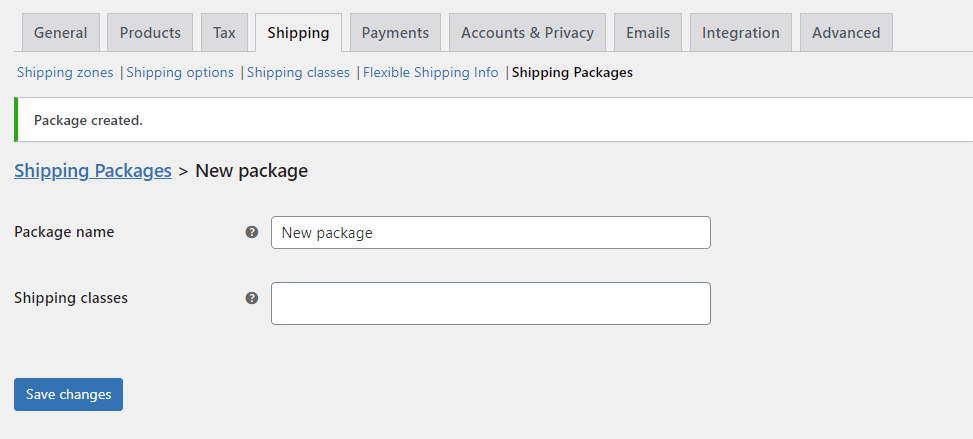
Fill in the Package name field with the unique title for easy identification. Note that this name is shown to customers on the checkout page, so use something they’ll understand (“Ships from main warehouse”), not an internal code.
Then, select the shipping class that will split cart items in the same order on WooCommerce.
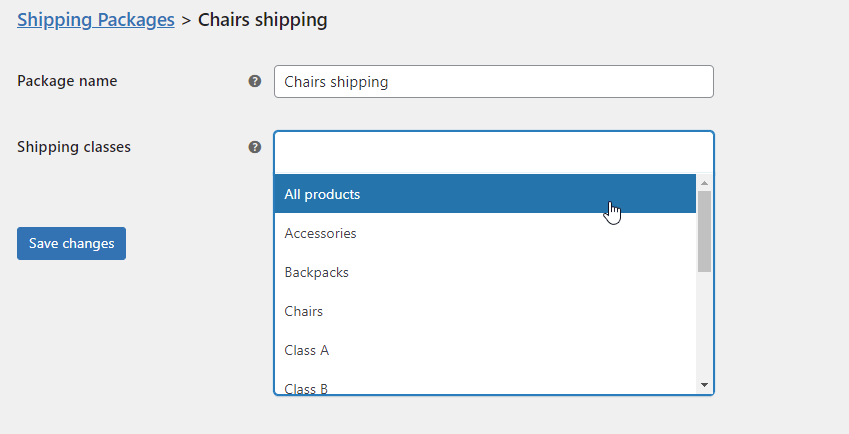
Confirm adding the new package with the Save changes button at the bottom.
Once everything’s saved use the Shipping Packages link to get back to the main configuration screen. The package you’ve just created should be visible now in the Packages table:
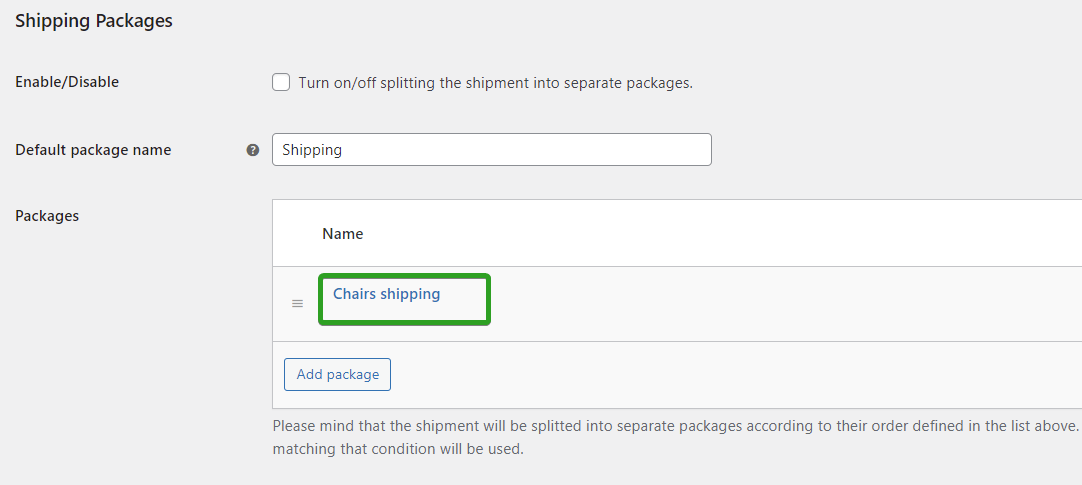
You can configure shipping package for other shipping locations in the same way.
Once every package and the default are set up, switch on Turn on splitting the shipment into separate packages and save the changes. From here, a mixed cart automatically breaks into the right packages, each ready for its own shipping calculation.
Splitting the cart creates the packages; now each one needs a price. We’ll do this using the Flexible Shipping PRO plugin. It’s a table-rate solution that calculates cost from a rules table, and it can read the shipping class of each package as a condition.

The best Table Rate Shipping for WooCommerce. Period. Create shipping rules based on weight, order totals, or item count.
View DetailsorAdd to cartTo do that, just simply go to WooCommerce → Settings → Shipping. There, select the WooCommerce shipping zone which you want to add the feature to.
Then, add a new WooCommerce shipping method in the shipping zone where you want to set shipping based on product category. Click the Add shipping method button:
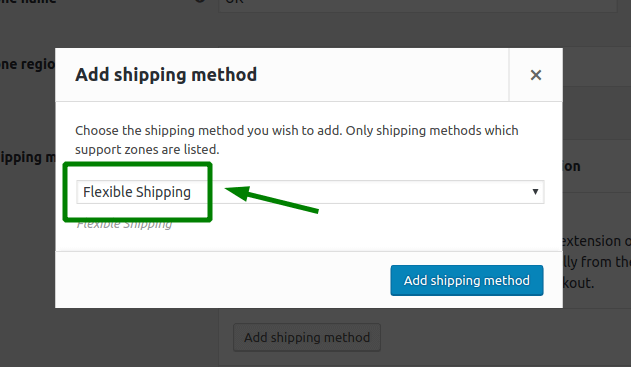
Choose the Flexible Shipping and again click the Add shipping method button.
Now, you should have your shipping method added and activated. It’s time to configure it.
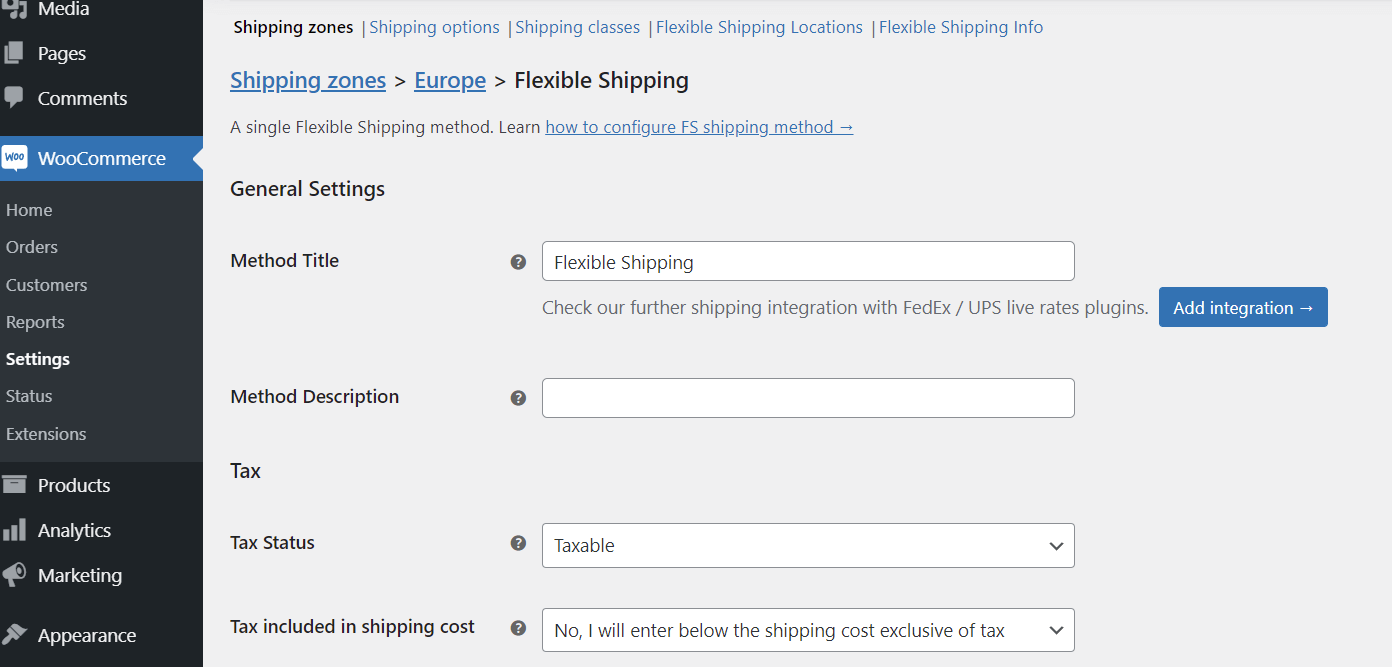
You can set it’s Title and Description and any other available feature like WooCommerce advanced free shipping over amount.
After you set that up, scroll down to the Shipping Cost Calculation Rules table.
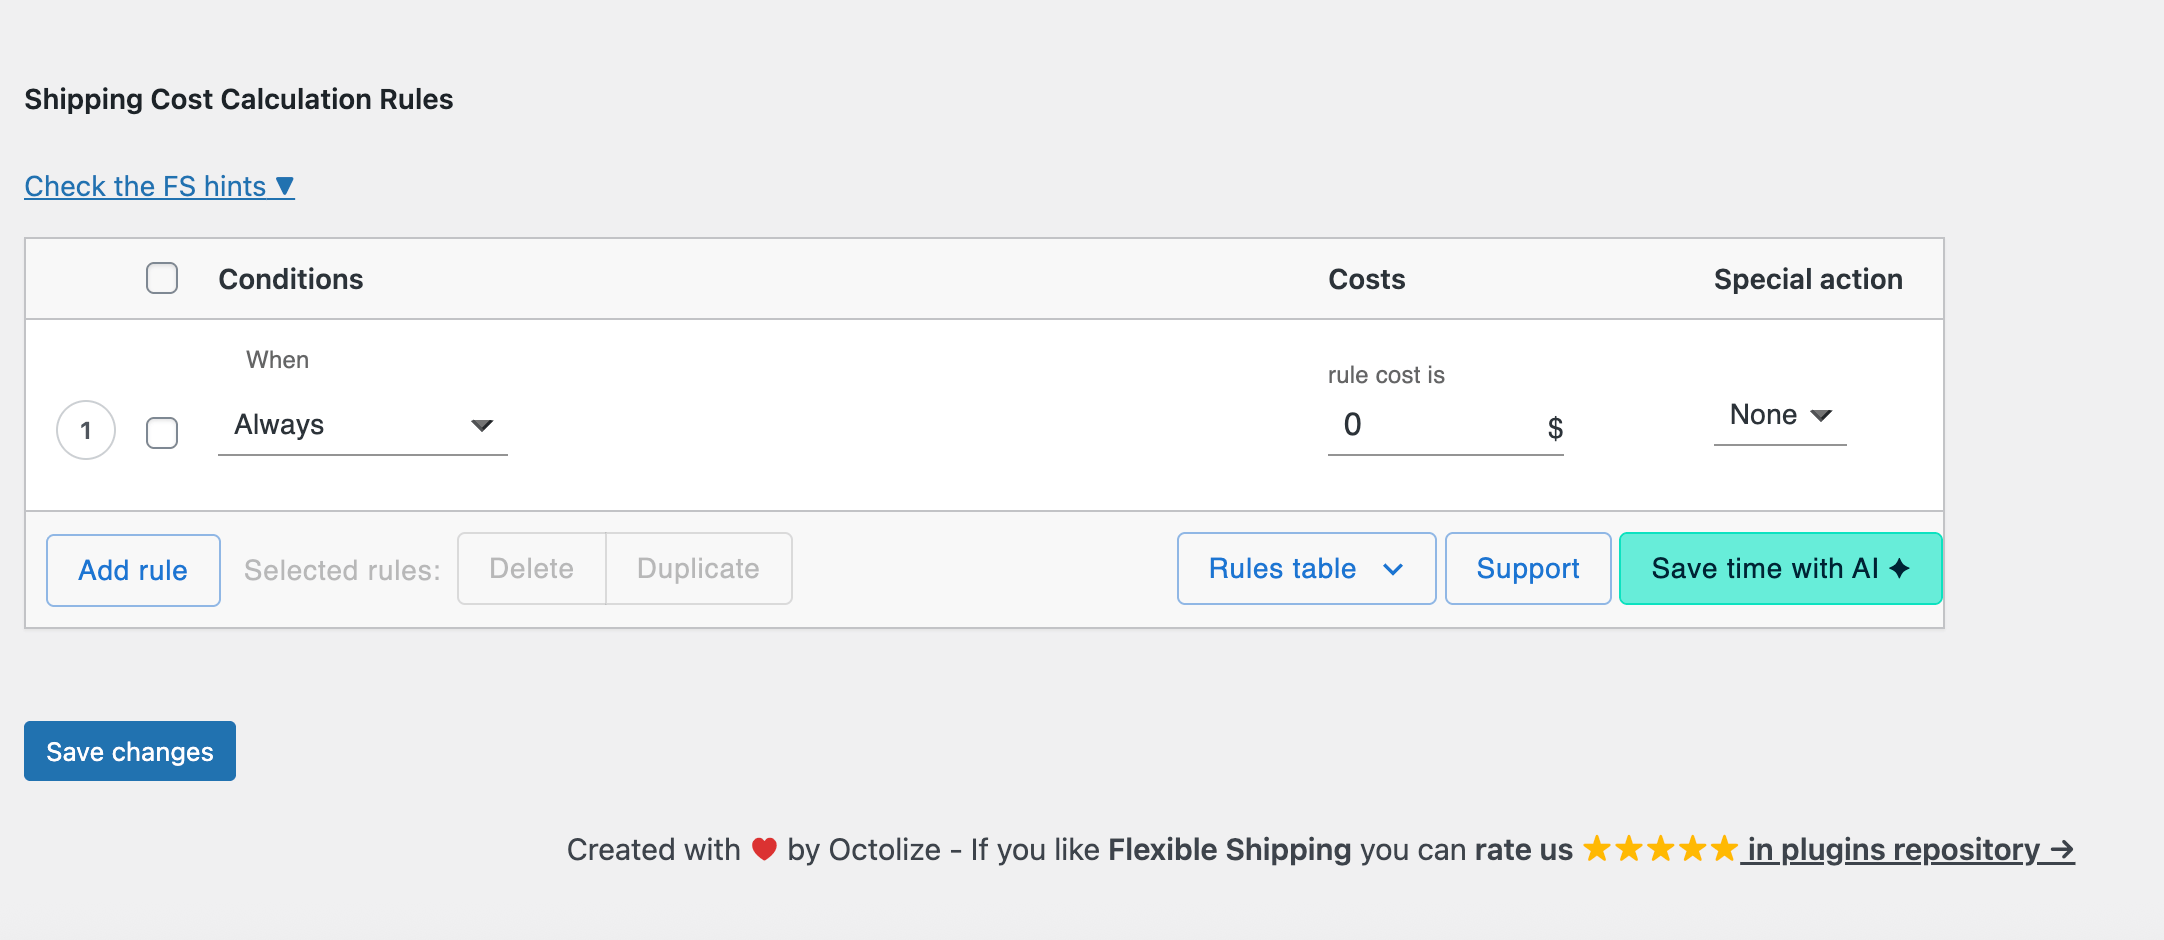
In the conditions field, select Shipping Class.
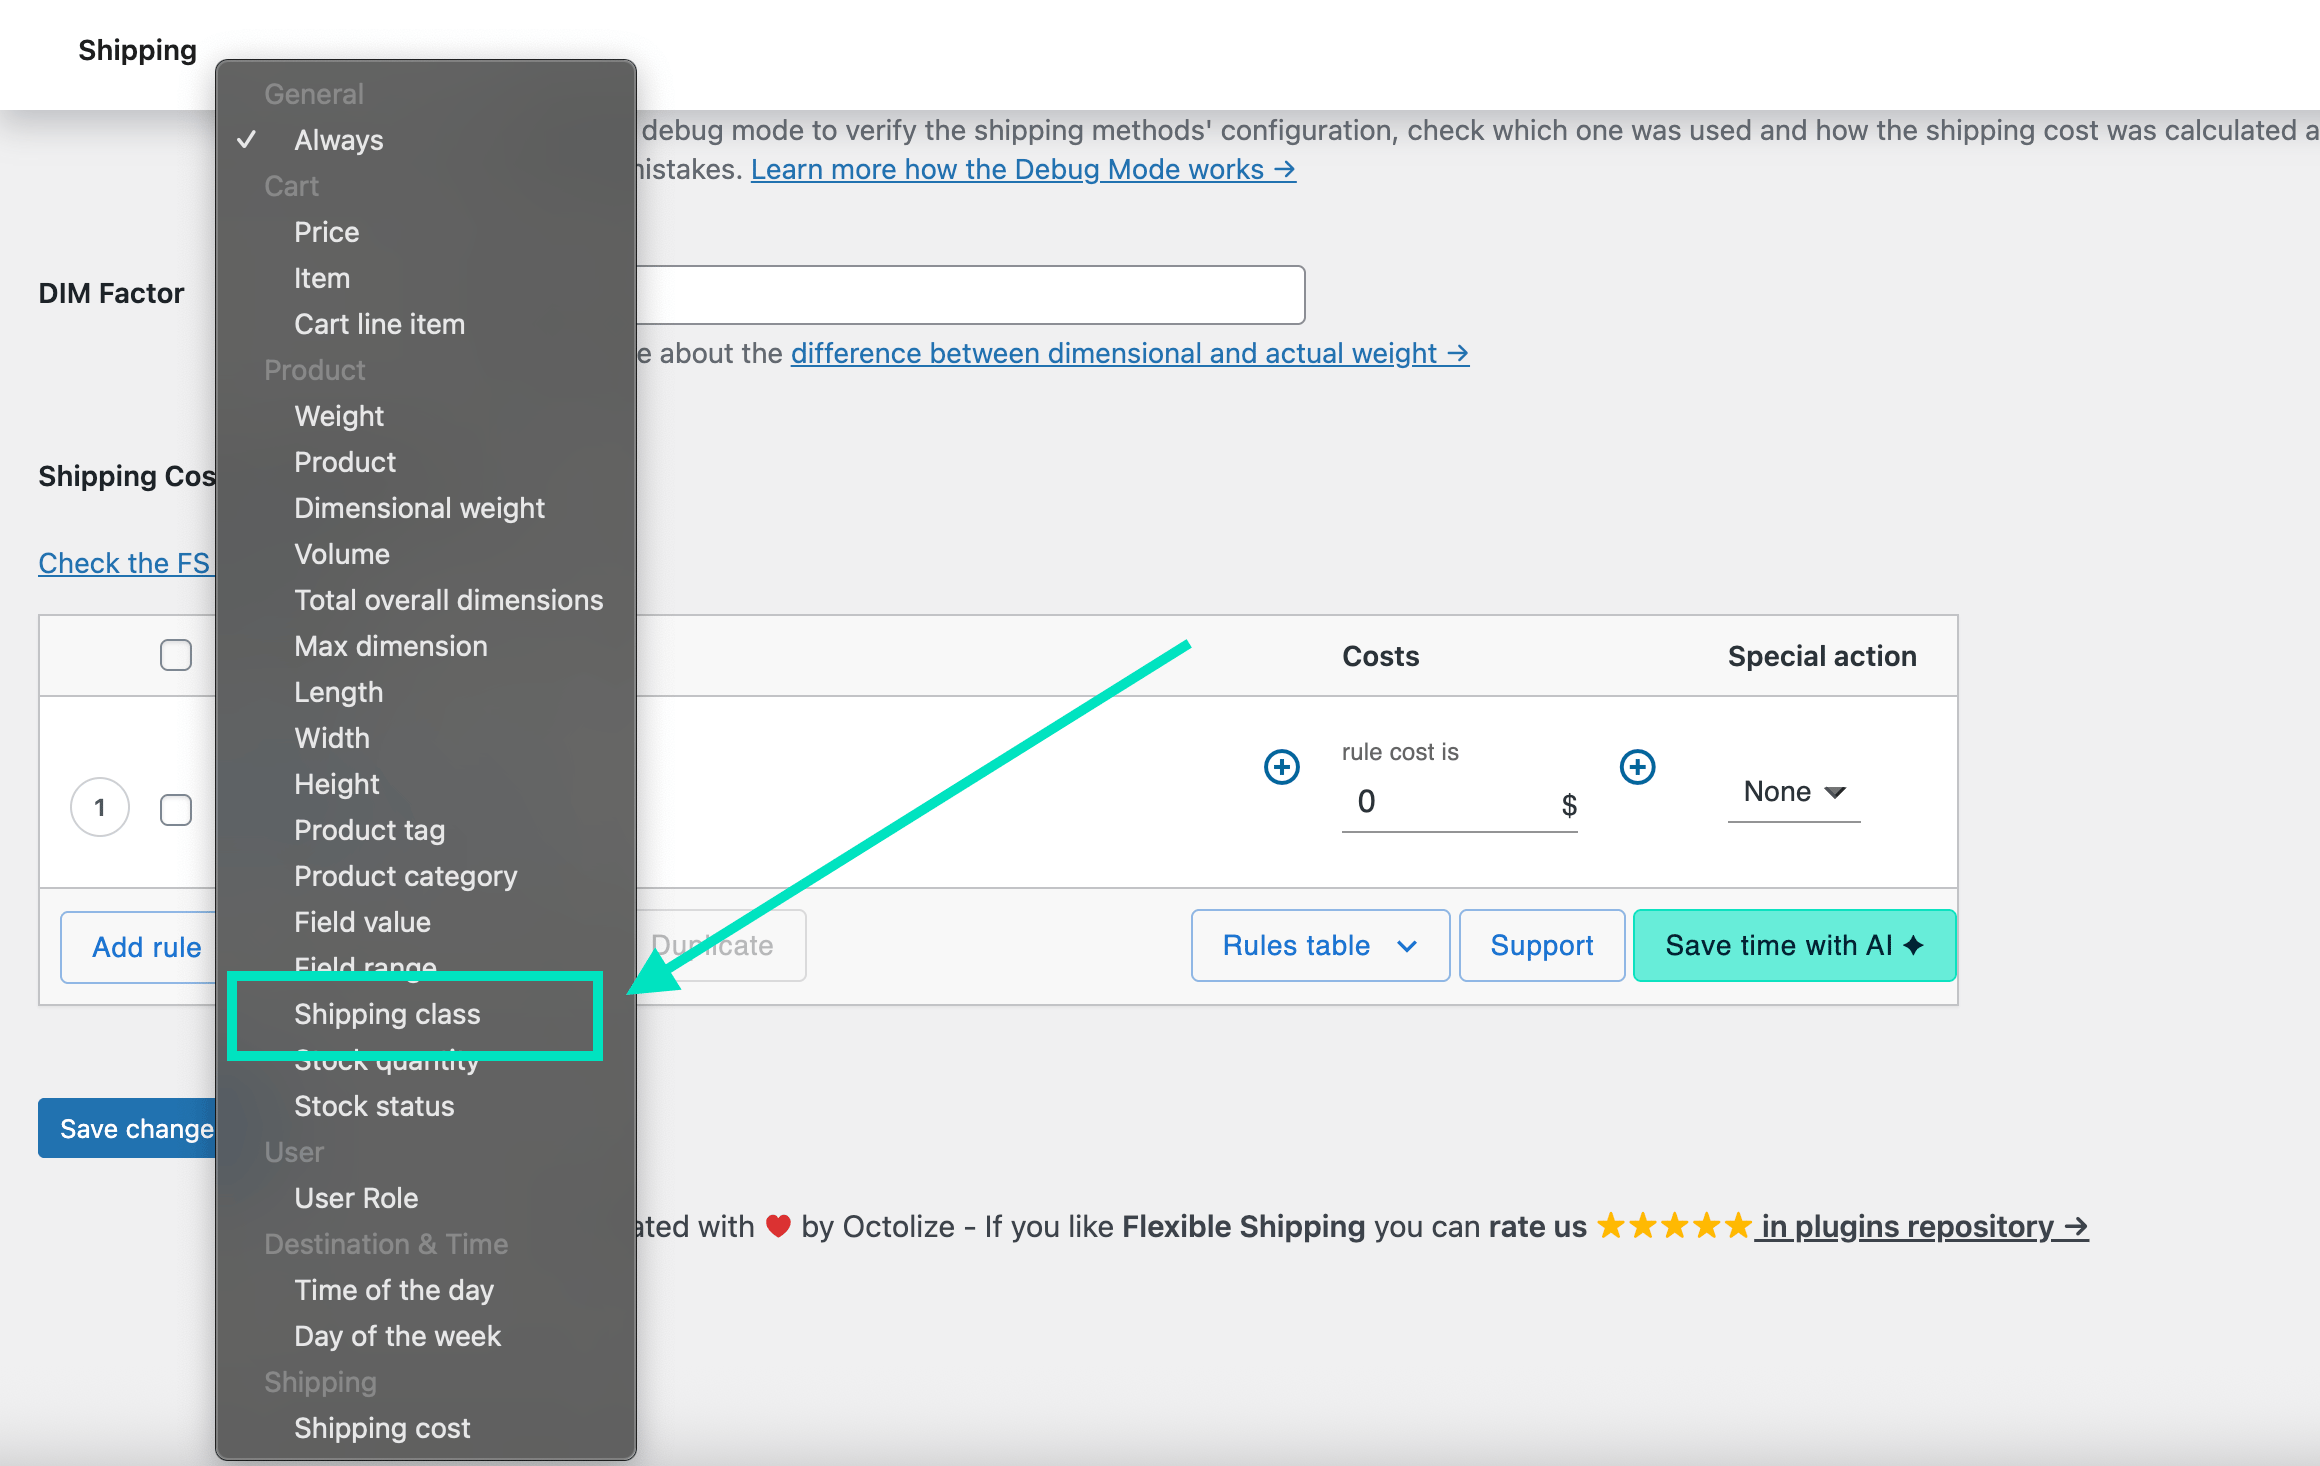
Then, select shipping class for your first location and set it’s cost.
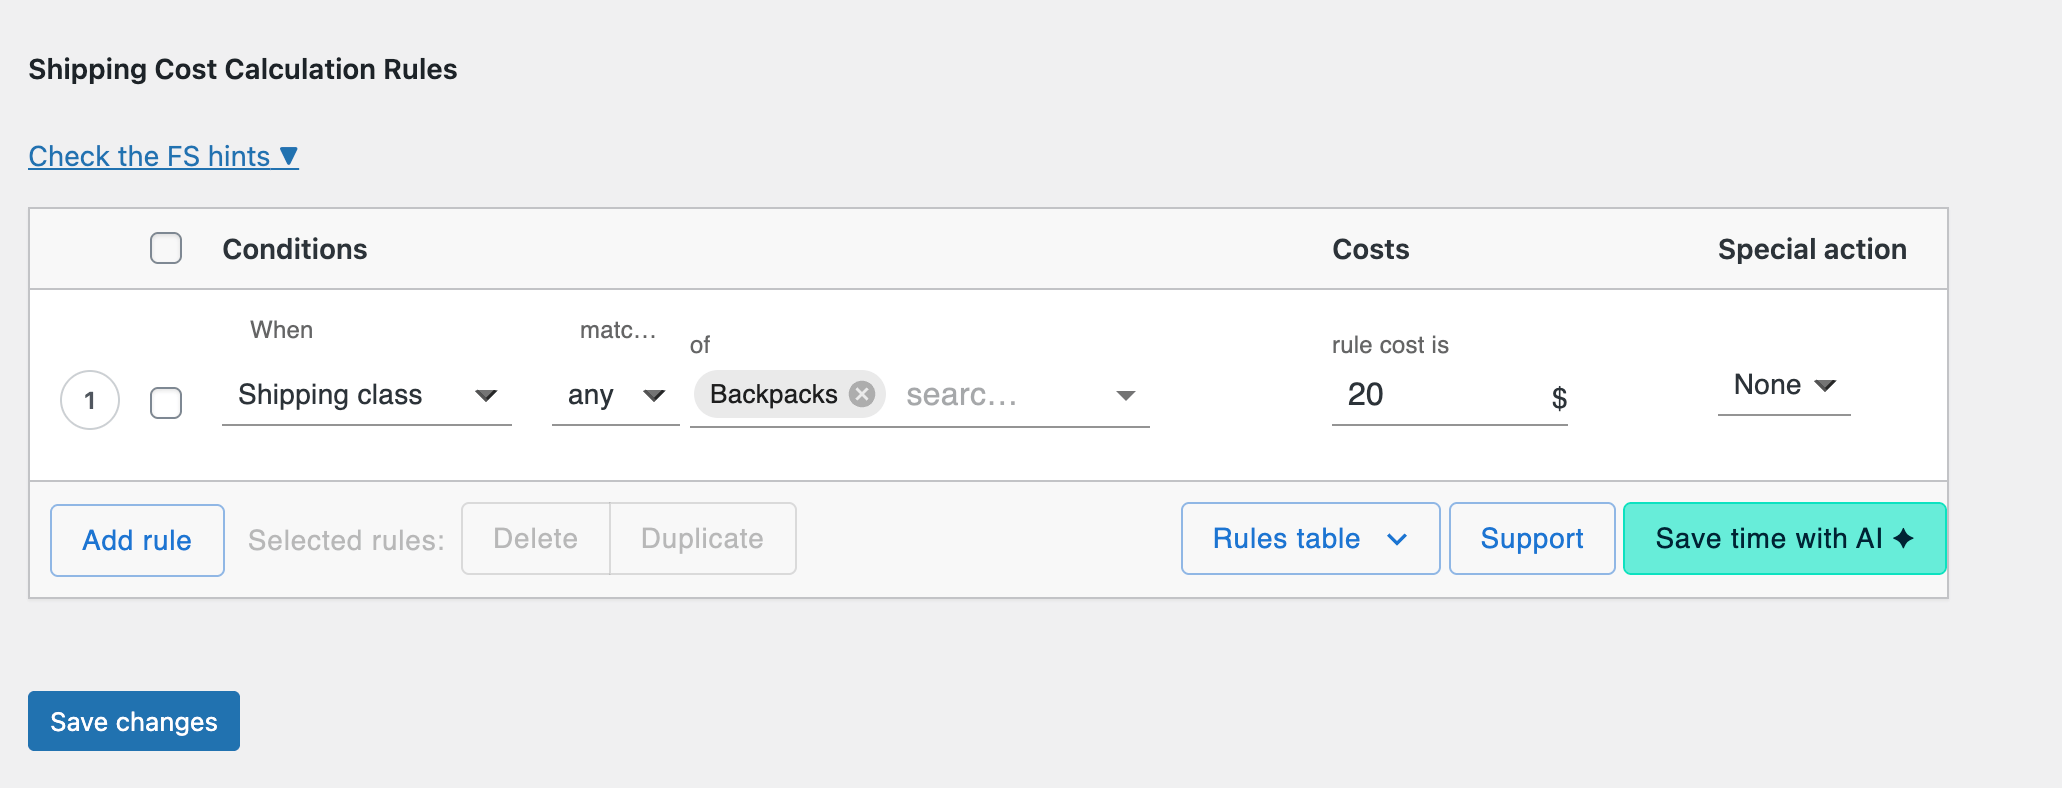
Do the same for each of your shipping location.
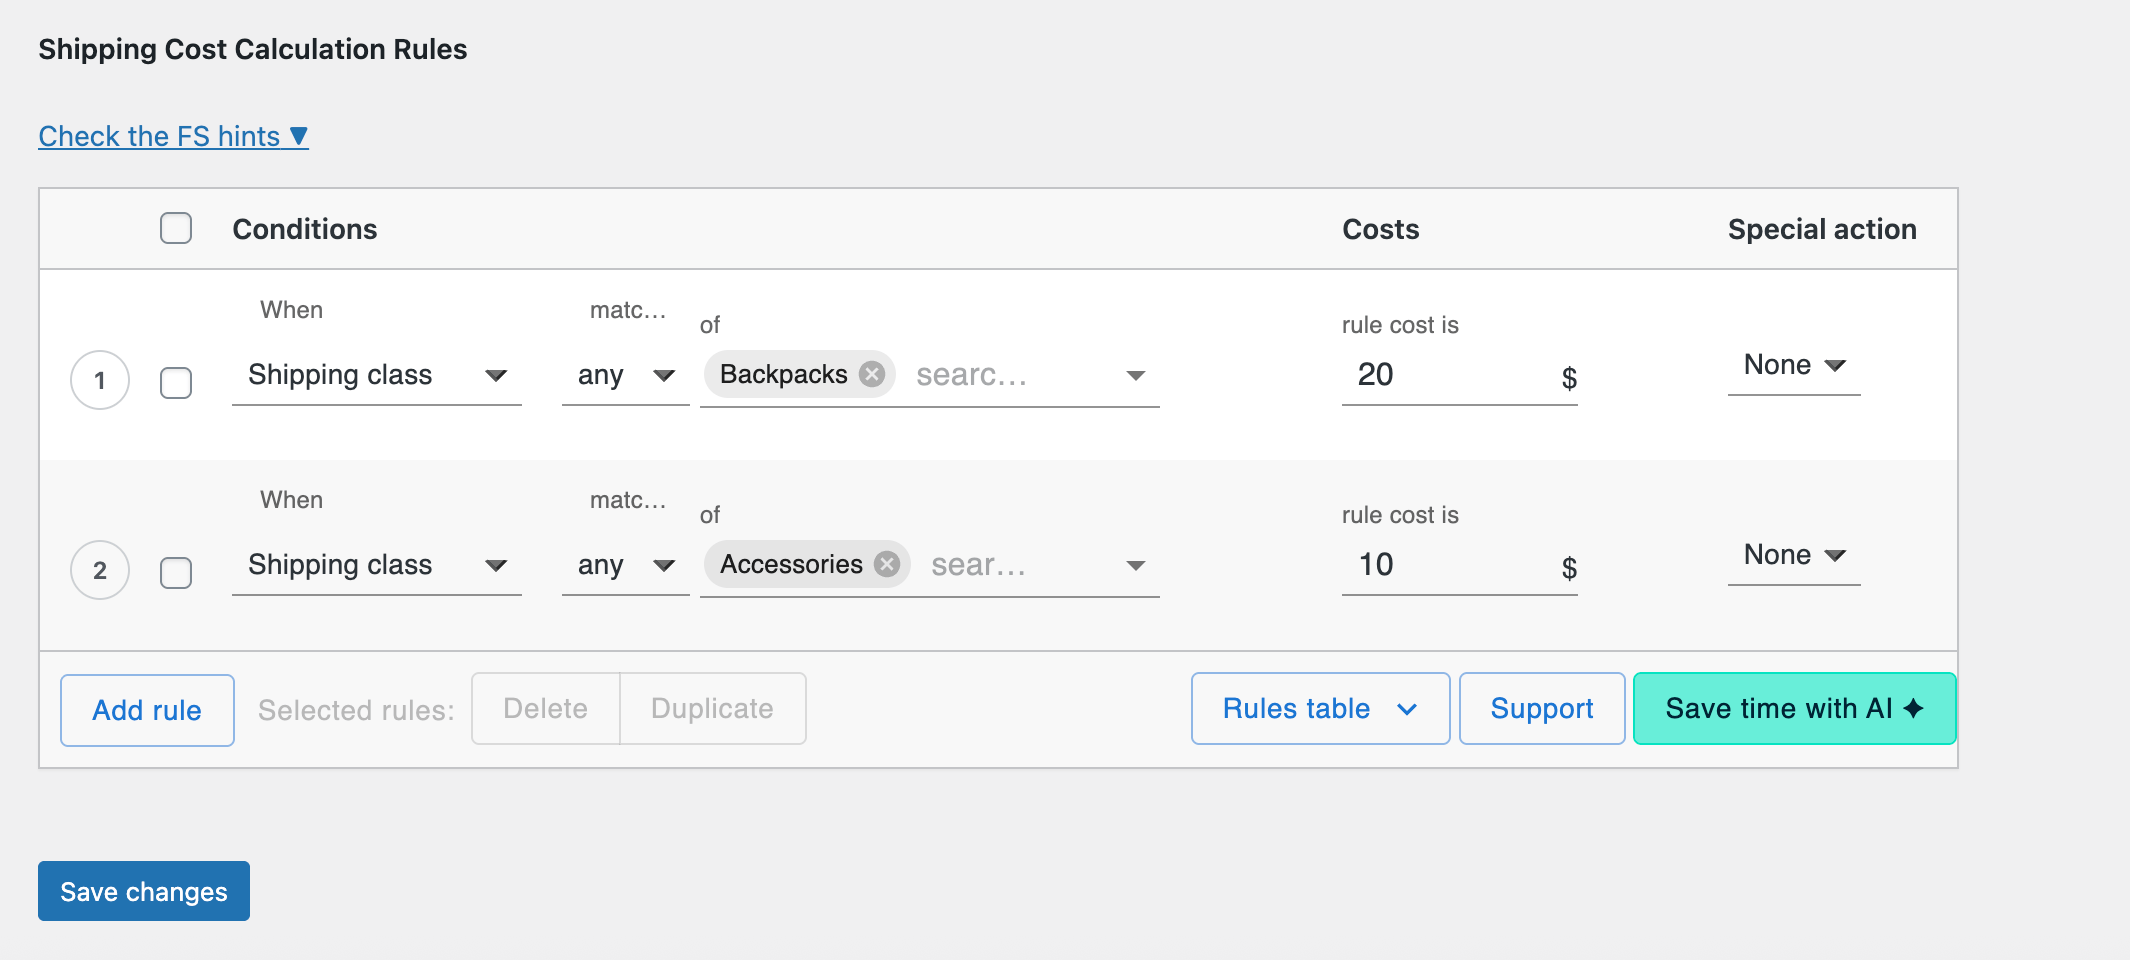
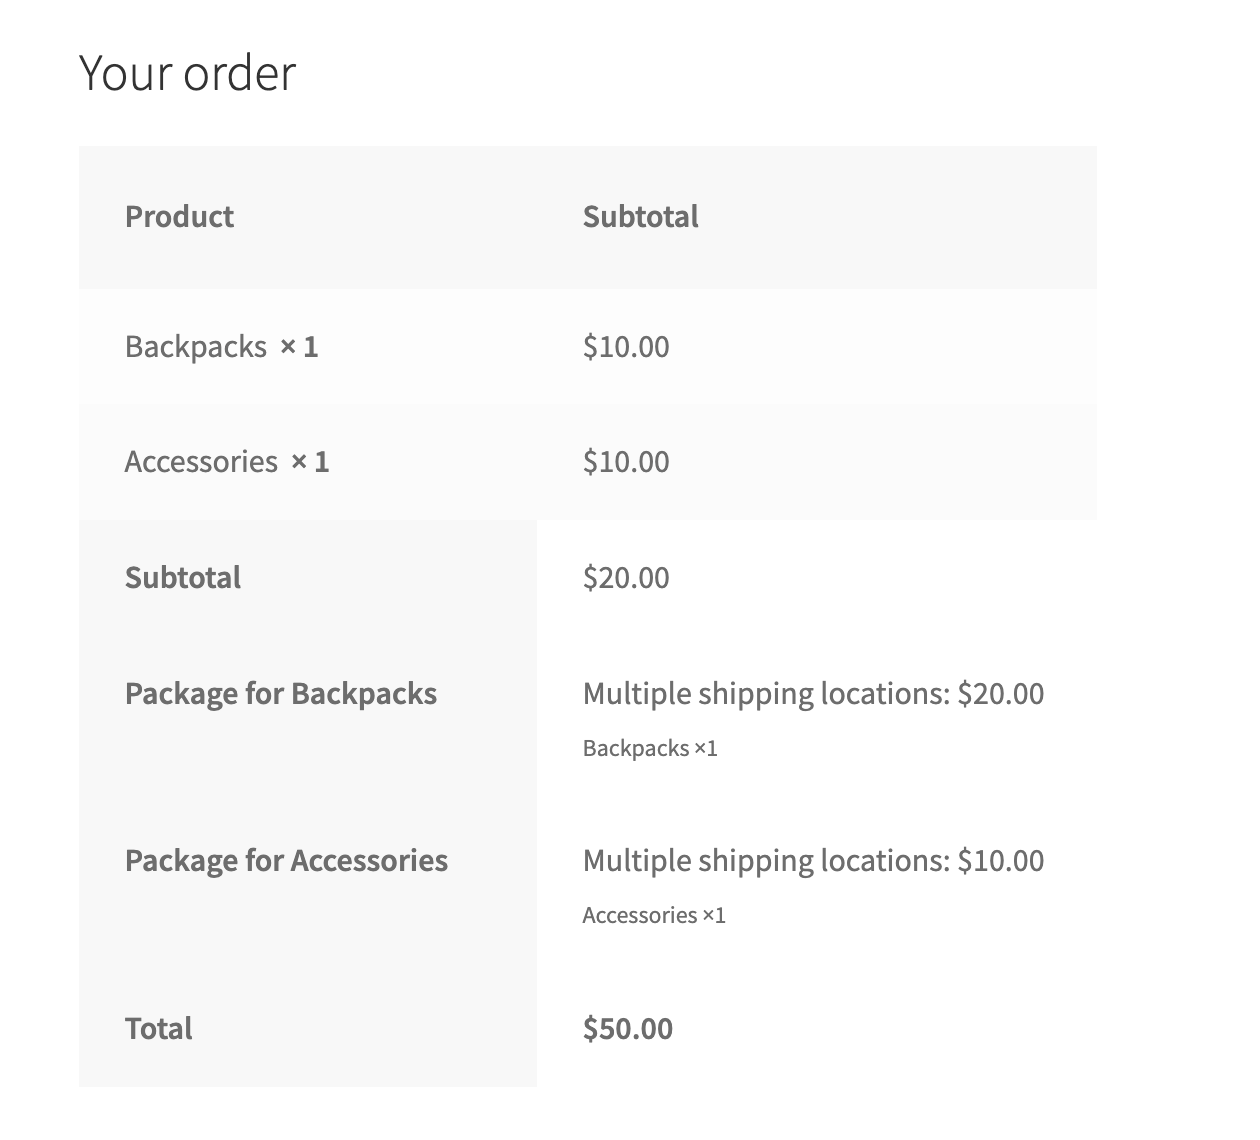
In my example store, backpacks are shipped from Warehouse A and cost $20, while accessories are shipped from Warehouse B and cost $10.
To complete the setup, you need to configure shipping cost calculations on a per-package basis. This way, a separate shipping cost will be calculated for each package (as configured in step 3).
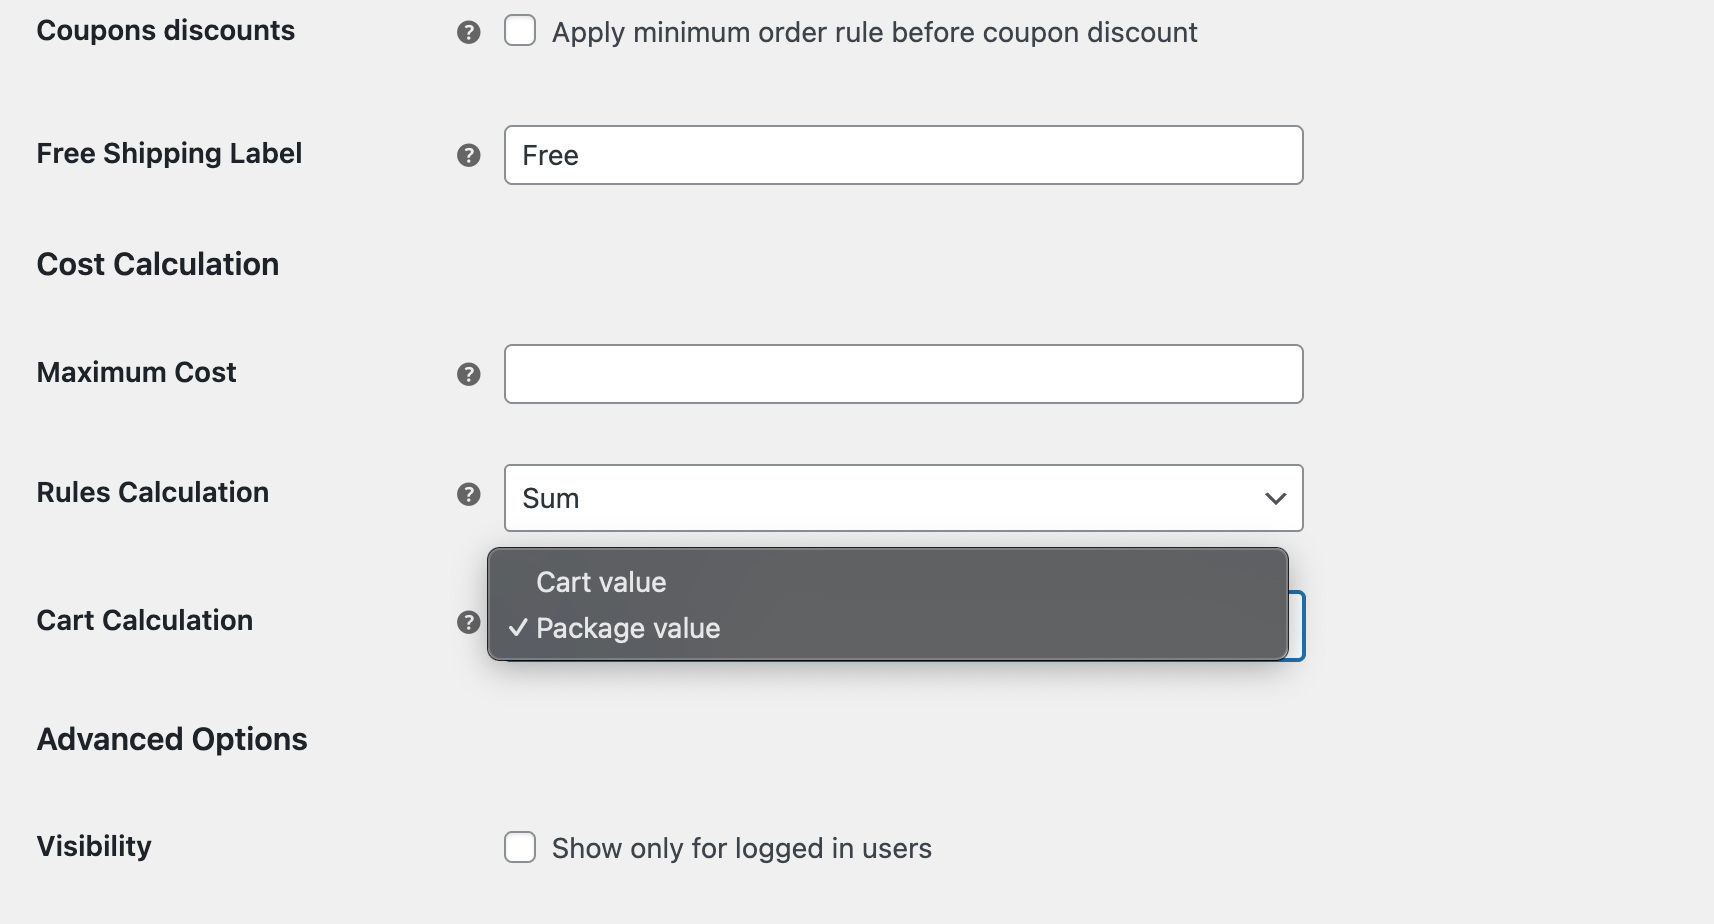
Finally, click on Save changes button and your configuration is complete!
Now let’s see how it works. After adding products from both shipping classes, the customer receives detailed information about the separate packages and their cost.
A few usage examples map directly to multi-location selling:
Two warehouses. Plenty of stores keep a main warehouse plus a second one for bulky or oversized items. When a customer orders from both, the available methods, rates, and delivery times legitimately differ by origin. Splitting the cart into a “standard” package and an “oversized” package lets each quote correctly instead of averaging into a rate that’s wrong for both.
Dropshipping from multiple suppliers. If you fulfill from several suppliers, each supplier becomes a package. The customer sees realistic shipping per supplier rather than one optimistic guess, and you stop subsidizing the gap.
Different carriers per package. Because each package calculates independently, you can mix pricing methods across origins, table-rate rules (Step 5) for one warehouse and real-time live carrier rates for another, so a domestic package and an international one each quote from the right source in the same checkout.
WooCommerce shipping from multiple locations isn’t something the platform does on its own, but it’s not as complicated as it might seem. By using package splitting and shipping costs based on shipping class, you can not only determine the correct shipping cost for multiple locations, but also clearly inform the customer of the estimated number of packages and their cost.
No. WooCommerce assumes a single store address and treats every cart as one shipment from that one origin. To ship from multiple locations you need to group the cart by origin first. It’s exactly what splitting the cart into packages by shipping class does.
A shipping zone describes where the customer is (the destination). A shipping origin is where the product ships from. WooCommerce supports multiple zones natively but only one origin, which is why multi-location selling needs an add-on approach.
Split the cart into a package per warehouse with Shipping Packages, then price each package with its own rules in Flexible Shipping PRO using the shipping class as the condition. Each package is calculated independently in the same checkout.
Yes. Treat each supplier like a warehouse: give its products a dedicated shipping class, create a matching package, and the customer sees realistic shipping per supplier instead of one blended estimate.
Our team usually replies within a few hours. Ask away — we'll help you find the right solution for your store.

Content Writer at Octolize
Bartosz Gajewski is a content and marketing specialist with a solid background in SEO, WordPress content strategy, and technical documentation for digital products. With years of hands-on experience in both in-house and freelance roles, he supports tech companies – especially in the SaaS and e-commerce space – by creating content that informs, engages, and drives results.
His approach blends storytelling with data-driven SEO, and he’s been involved in projects ranging from rebranding and product marketing to growth experiments and copywriting for complex software tools. On the blog, he shares actionable insights from his work across marketing teams, product documentation, and online store optimization.




Learn how Octolize helped Kurzgesagt, the online shop behind one of YouTube’s most popular science channels, set up conditional courier rules using the Shopify Shipping Rates Rules & Zones app.

Learn how Octolize solutions helped WooCommerce store based in the United Kingdom set up shipping scenarios.
Learn how Octolize helped Shopify store based in the USA set up distance based rates with a usage of Octolize Distance Based Rates.
 Pickup Points