
Subscribe to our newsletter

By assigning different shipping classes, you can easily manage costs and logistics, improving transparency for your customers at checkout. This organized approach not only enhances the shipping experience by providing clear expectations but also helps you optimize your shipping strategy, reducing the risk of damage and returns while boosting overall satisfaction. In this article I will teach you how to use WooCommerce shipping classes.
Prefer watching a video over reading? If so, this YouTube guide is for you! Learn step-by-step how to master WooCommerce Shipping Classes and start managing your delivery costs more efficiently:
WooCommerce shipping classes let you group products with the same properties. You can use them to group products that need to be handled with care. You could differentiate:
Such division comes in handy as it allows you to set specific shipping rates and shipping methods tailored to each product category, ensuring that customers are charged appropriately based on the nature of the items they are purchasing. For example, bulky items can have a higher shipping fee to cover the extra handling and transportation expenses, while light items can benefit from reduced rates, making them more attractive to buyers. Additionally, delicate products can be flagged for special handling, ensuring they receive the care they need during shipping.
If you prefer to use product categories instead of shipping classes, check out our guide on WooCommerce Shipping Based on Product Category.
You need to go to WooCommerce → Shipping → Shipping classes. You’ll find the Add shipping class button. Just click it to add a new one.

New fields will pop up. You need to enter:
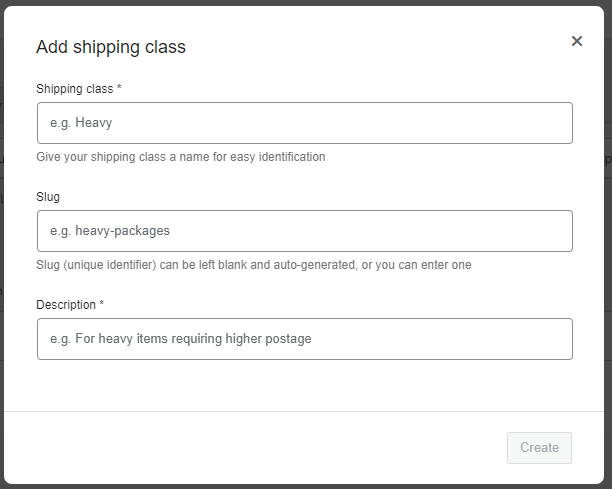
You can use the slug as a reference to the shipping class in your database. For example you will see a slug while filtering products by shipping class in your store. In most cases you won’t be using them anyway.
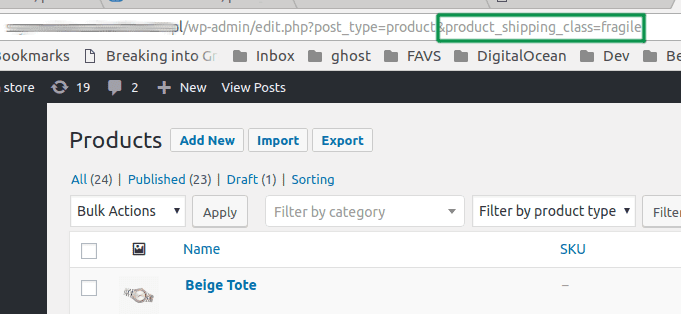
That’s how I configured the shipping class:
Once you have a shipping class or classes configured, you have to assign a shipping class to products. You can make it manually per product or you can edit a few products in bulk. I’ll show you both options.
Go to the edit screen of a product simply by clicking the product name on the product list. Next go to the Product data metabox, click the Shipping tab and select the shipping class you want to assign.
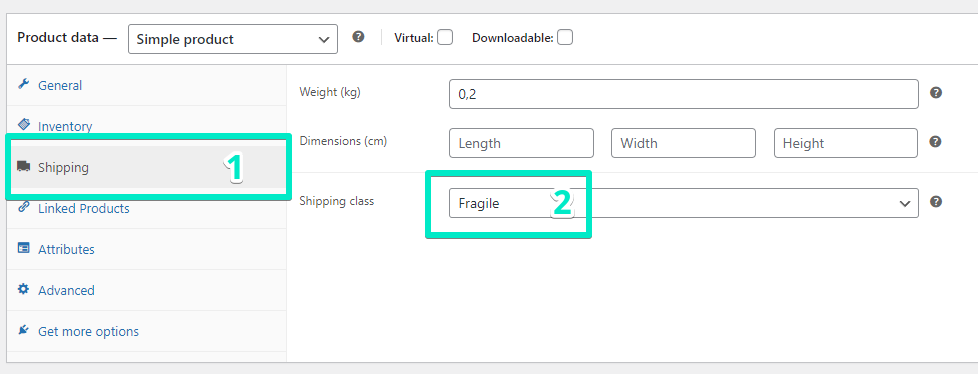
You have to save the changes. That’s all!
Do you want to assign more than one product to a shipping class? Simply select the products (first step), select an Edit option (second step) and Apply the operation (third step).
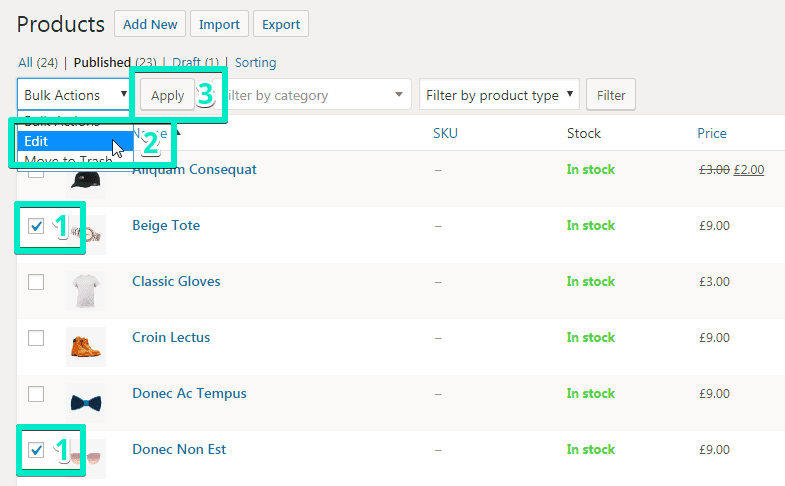
The new box will pop up. You have to select the shipping class you want your products to be assigned to.
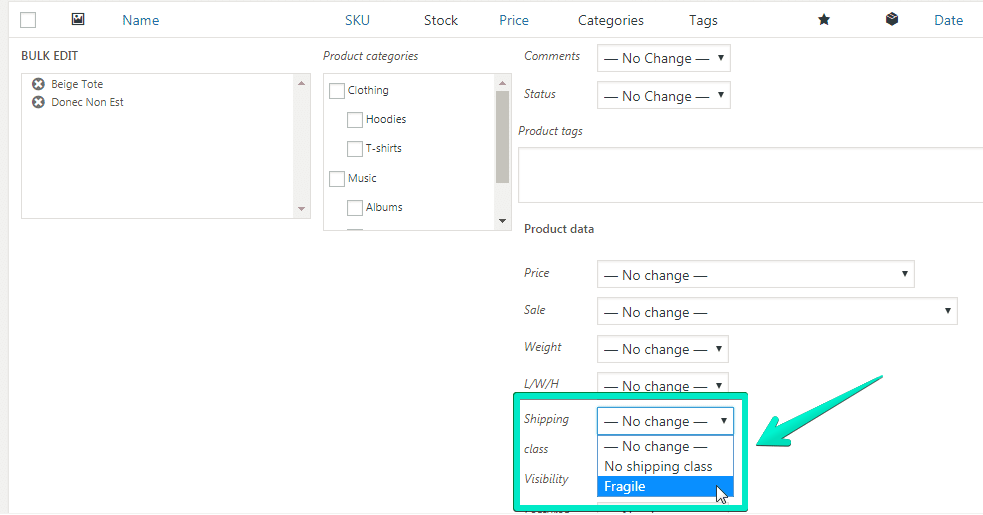
Save the changes and you’re ready to go next.
You wanted to configure WooCommerce shipping classes in your store for the purpose. You want the shipping cost to depend on the shipping classes of products in the customer’s cart. I’ll show you how to do it.
Once you configure WooCommerce shipping classes in your store, then a new section shows up on the Flat rate settings screen. It is called Shipping class costs and you can see this section on the screenshot below:
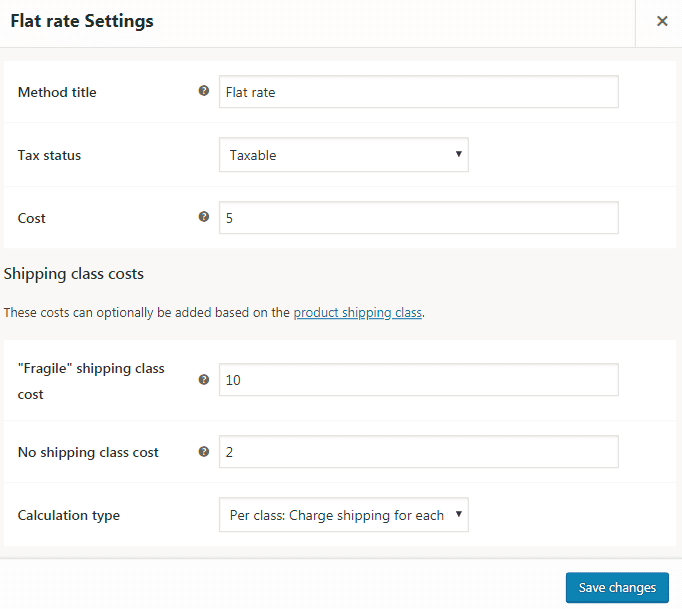
You can set any cost for different shipping classes. The key option is the calculation type. I think that learning by example is the best way so I will show you how it works in practice.
I added two products to the cart. One of them is assigned to the Fragile shipping class, while the other isn’t assigned to any shipping class:
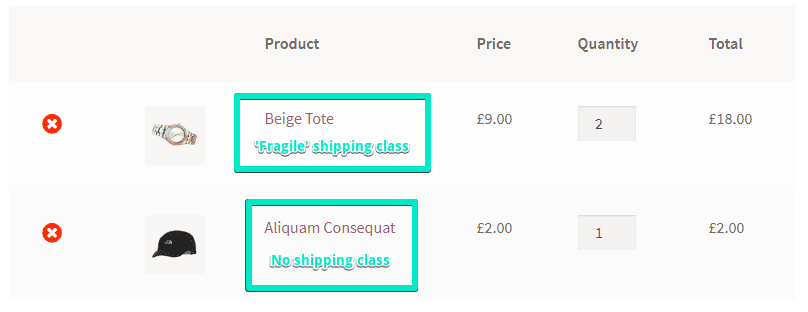
I will use this cart set as a reference.
If you choose this option, you will charge for each shipping class individually. This means £5.00 base cost, £10.00 for a Beige Tote (Fragile shipping class) and £2.00 for Aliquam Consequat (no shipping class).
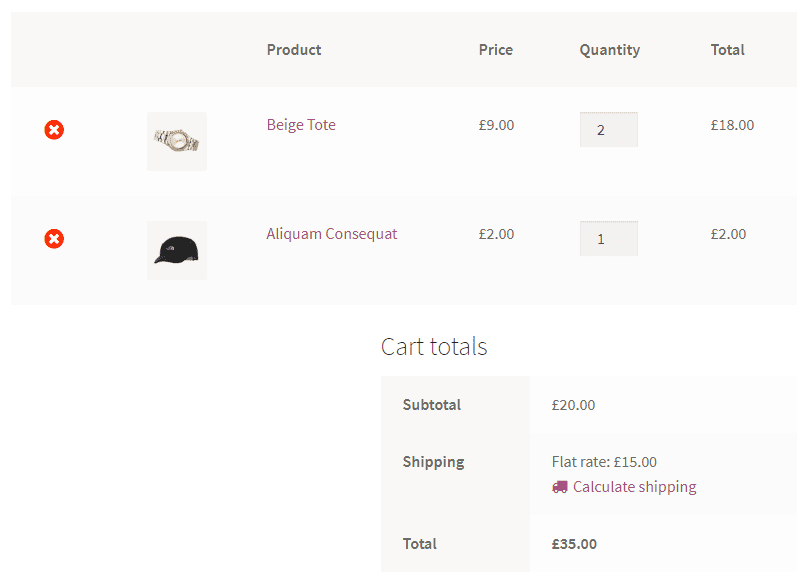
Do you see the calculation? The flat rate shipping method costs £17.00.
If you choose this option, you will charge for the most expensive shipping class. This means £5.00 base cost and £10.00 for a Beige Tote (Fragile – the most expensive shipping class). The £2.00 cost for Aliquam Consequat will not be added to the calculation.

The Flat rate shipping method costs £15.00 now.
That’s all you have to know about Flat rate configuration. Set your prices and you’re ready to sell!
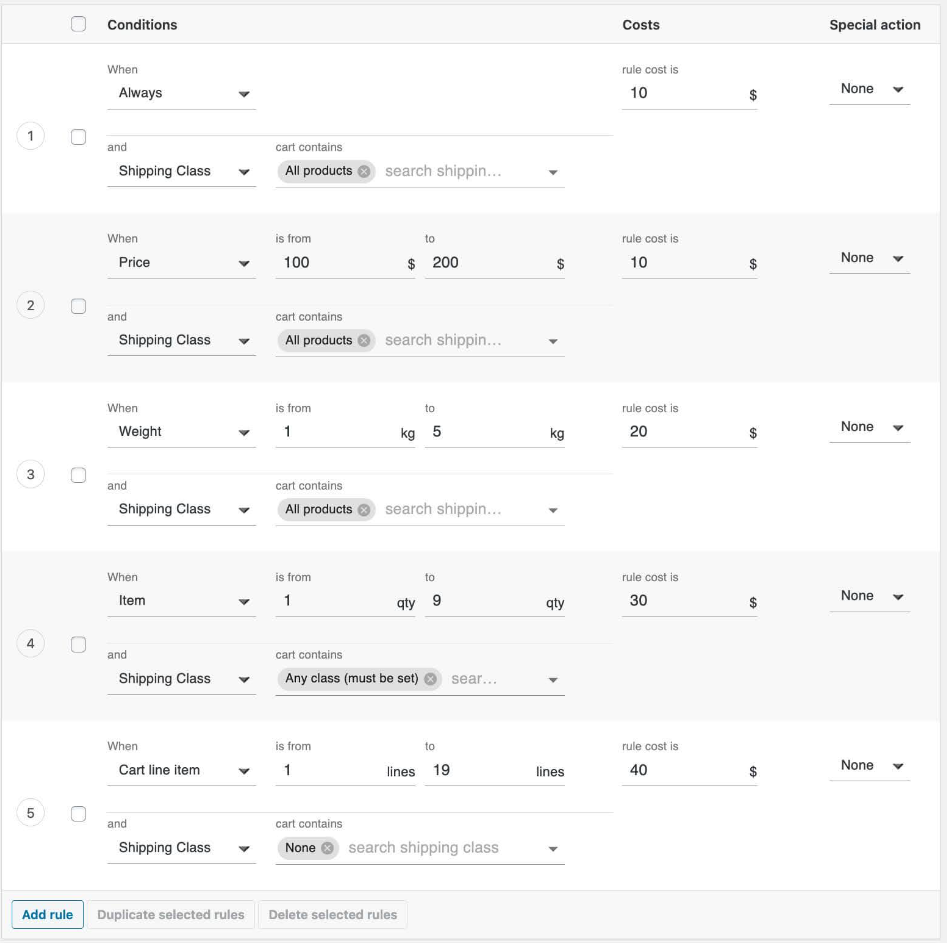
Flat rate is not the only option. You can also use table rate shipping. In short, the table rate shipping method is very useful when you sell products of different sizes and weights. Then, the final cost of a shipment is based on these factors. It is the most flexible way to manage shipping methods and costs.
The best Table Rate Shipping for WooCommerce. Period. Create shipping rules based on weight, order totals, or item count.
View Details or Add to cartTable rate looks like on the screenshot below:
Look at this video if you have never heard of Table Rate Shipping plugin:
In this article you have learned how to configure WooCommerce shipping classes in your store. I hope this knowledge will help you! If you have any concerns, just let us know in the comment section below!
To learn more about WooCommerce shipping, please make sure to read our Ultimate Guide to WooCommerce Shipping.
Hello, interested but do you know how I can ship or not the product regarding a zone : Example ? I want that product class (A) are not deliverable for this region (A) … ?
Hi Olivier, if the product you don’t want to be delivered in the certain shipping zone has the A shipping class assigned, you should add this rule at the very top of the shipping cost calculation rules table for all the shipping methods available within this zone:
[Image no longer available]
Please mind that selecting the Cancel special action is essential in such case. It will result in hiding the shipping methods if the product with A shipping class is in the cart.
This is using Flat Rate. How can I implement this using Flexible Shipping?
NVM, saw the option 🙂 using Pro
Can you use shipping classes to make certain shipping unavailable to certain products – for example could this be used to make a product only available for click and collect (not available for ‘royal mail shipping’ or ‘local home delivery’ if these are set as shipping methods)
Hi Kerryn, to cut the story short – yes, it is possible to achieve with our Flexible Shipping PRO plugin. I believe that in your case you should have the Royal Mail shipping and Local home delivery methods handled by Flexible Shipping and Click & Collect e.g. by WooCommerce default Local Pickup. Then you need to assign e.g. the Unshippable shipping class to the products which are not supposed to be shipped. Once it is done, you should add the rule using the Special Action: Cancel hiding the methods handled by Flexible Shipping if the product with Unshippable shipping class is in the cart. It will result in showing only the Local Pickup if your customer puts in the cart a product which cannot be shipped. Here you can find a detailed guide how to set it up step-by-step: https://octolize.com/docs/article/45-flexible-shipping-disable-hide-shipping-method.