
Subscribe to our newsletter

When a customer reaches your checkout page, every word matters. Yet, many store owners overlook a silent conversion killer: generic, confusing shipping text. If you are looking to change shipping text in WooCommerce, you are in the right place.
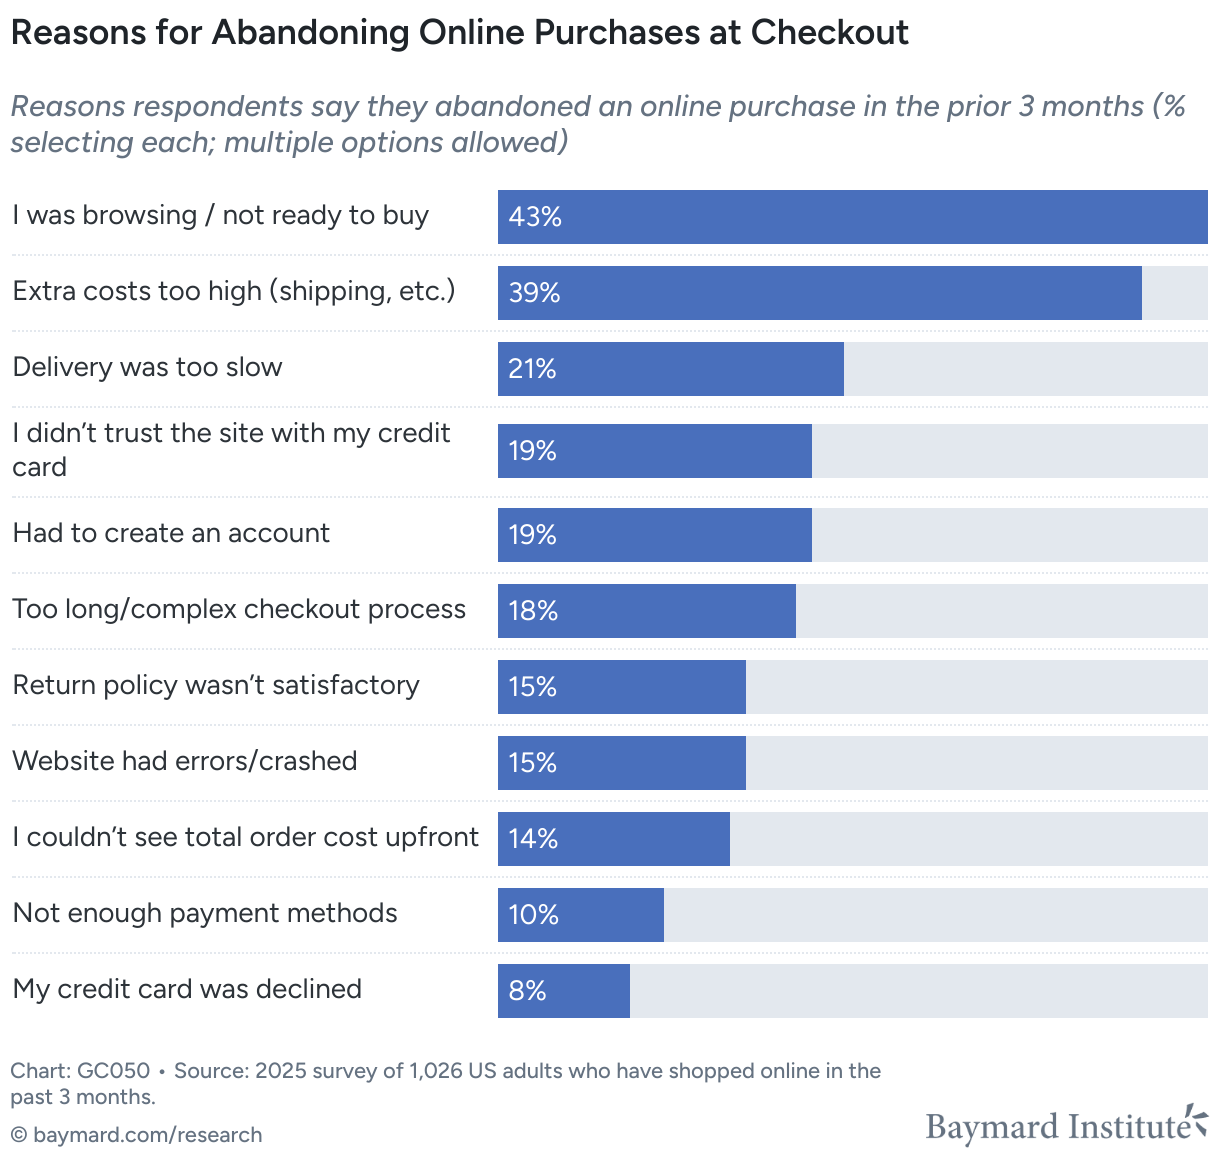
According to a comprehensive study by Baymard Institute, 48% of users abandon their carts due to high extra costs like shipping and taxes. However, it isn’t just the price that scares them away; it’s the lack of clarity. If a shopper sees a vague “Flat rate” instead of “Insured Courier Delivery (2-3 Business Days),” the resulting “sticker shock” or uncertainty often leads to a dropped session.
To build trust and lower your abandonment rate, you need to know how to WooCommerce rename shipping text to match your brand voice and logistics reality. Whether you want to edit free shipping text to sound more premium or provide specific delivery estimates, customizing these strings can be crucial for a professional WooCommerce Checkout Optimization strategy.
In this guide, we will walk you through three methods to modify your shipping communication:
To effectively change shipping text in WooCommerce, you first need to identify which part of the interface you are targeting. In WooCommerce, shipping communication is built on three layers.
The Title is the primary label your customer sees next to the radio button during checkout. By default, WooCommerce uses generic terms like “Flat rate,” “Free shipping,” or “Local pickup.”
By default, WooCommerce doesn’t always show a description field under the title, but many premium Best WooCommerce Shipping Plugins allow you to add “micro-copy.”
Beyond the methods themselves, there are various instructional strings on the checkout page that guide the user. These include the “Shipping to [Address]” text, the “Shipping” table header, and the “No shipping methods available” warning.
If your goal is a quick fix, such as changing the generic “Flat rate” to “Courier Delivery”, you don’t need to install any additional software. WooCommerce allows you to rename shipping methods directly within its core settings. Of course, this only applies to shipping methods available in WooCommerce itself. If you use other WooCommerce shipping plugins, you will need to change the name in them. However, the procedure is basically the same.
While the native method handles titles, it lacks the space for the “why” and “when.” To change shipping text in a way that truly converts, you need to add context. As we discussed, modern buyers want to know the delivery speed and any other useful information about their order. Adding short, clear details such as “Delivered within 2–3 business days” next to your shipping options provides exactly the kind of reassurance buyers look for. It reduces hesitation and helps customers make faster decisions when comparing delivery speeds vs. cost.
The easiest way to achieve this level of detail is by using the free Flexible Shipping plugin.
The best Table Rate Shipping for WooCommerce. Period. Create shipping rules based on weight, order totals, or item count.
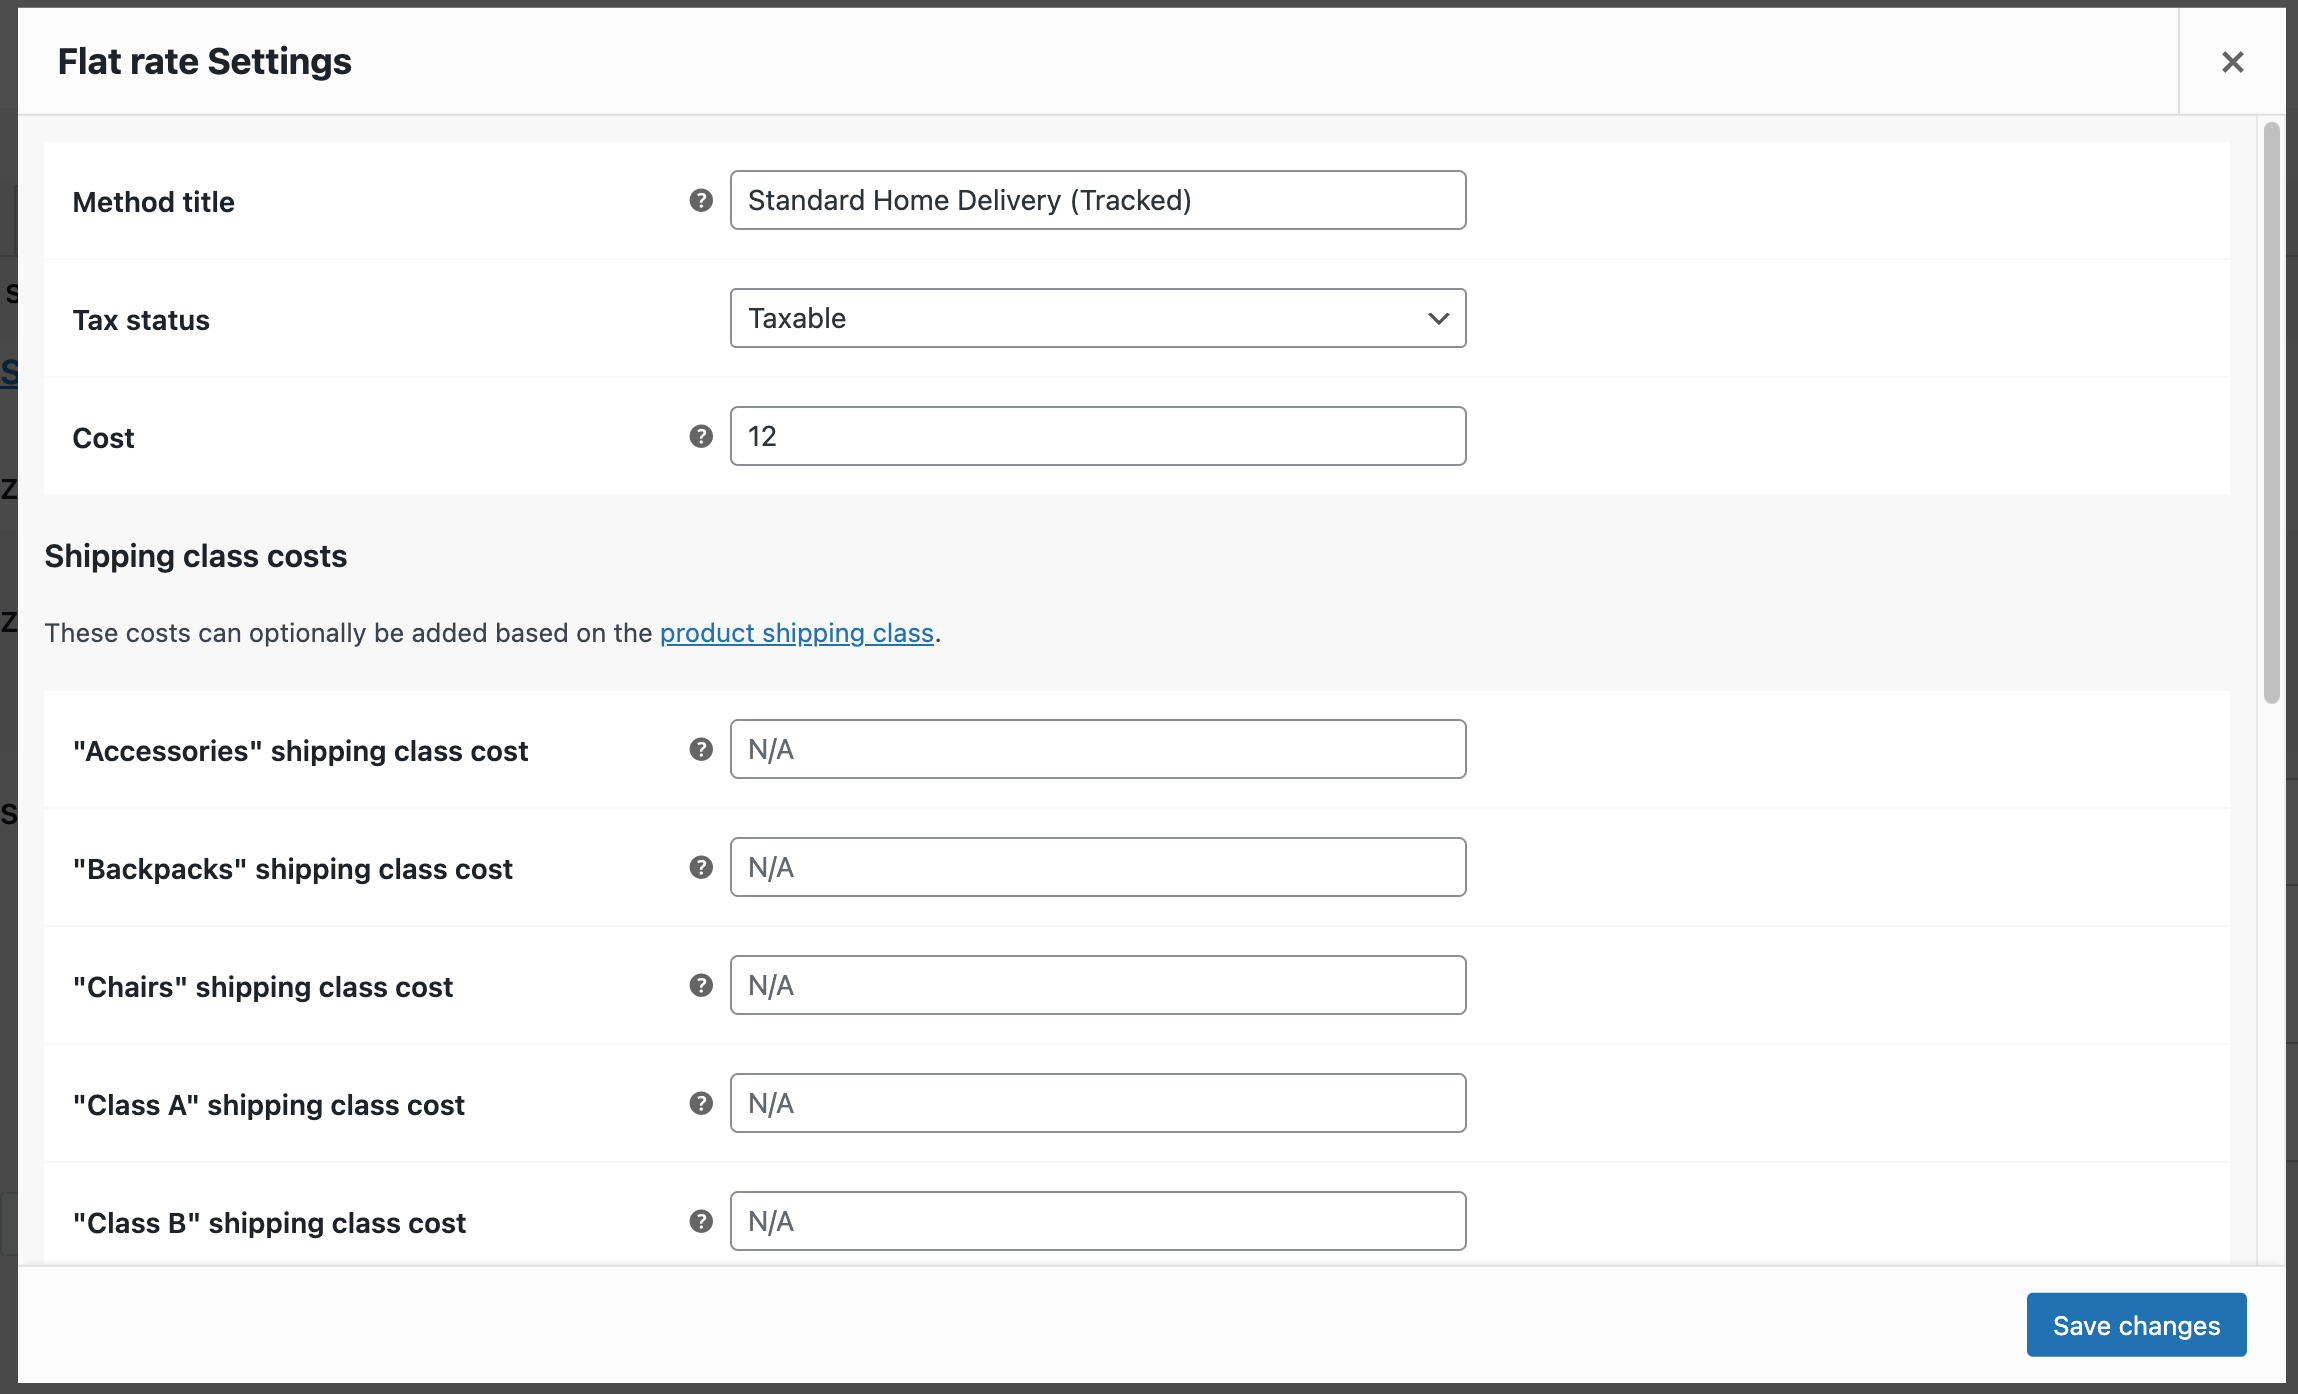
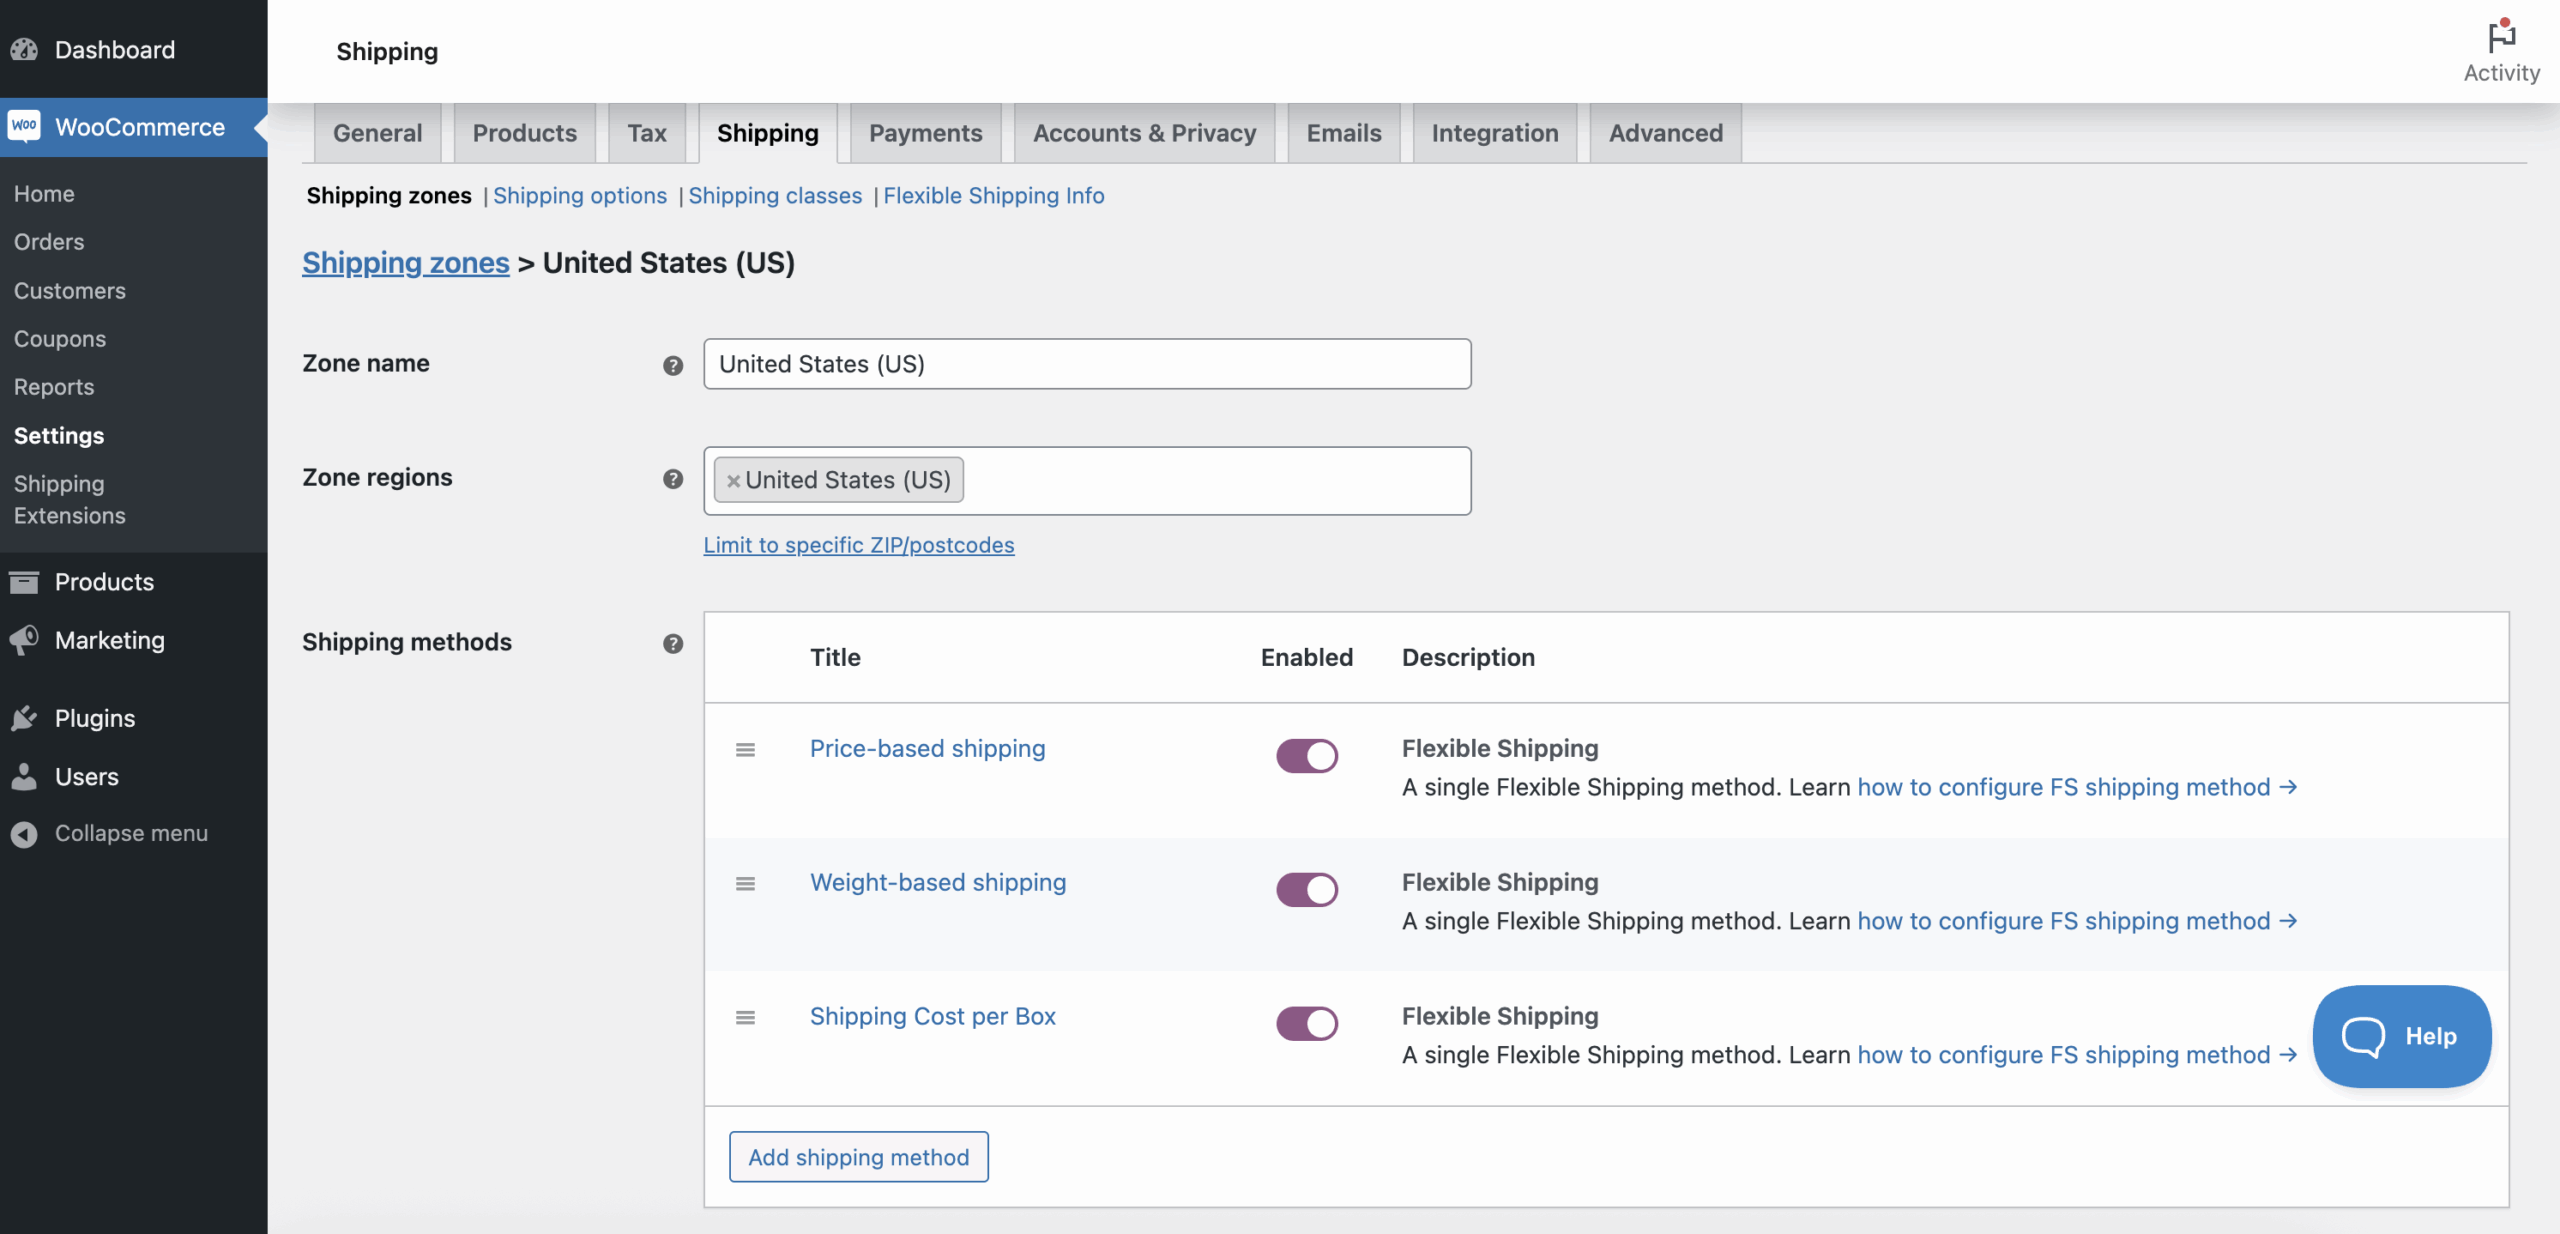
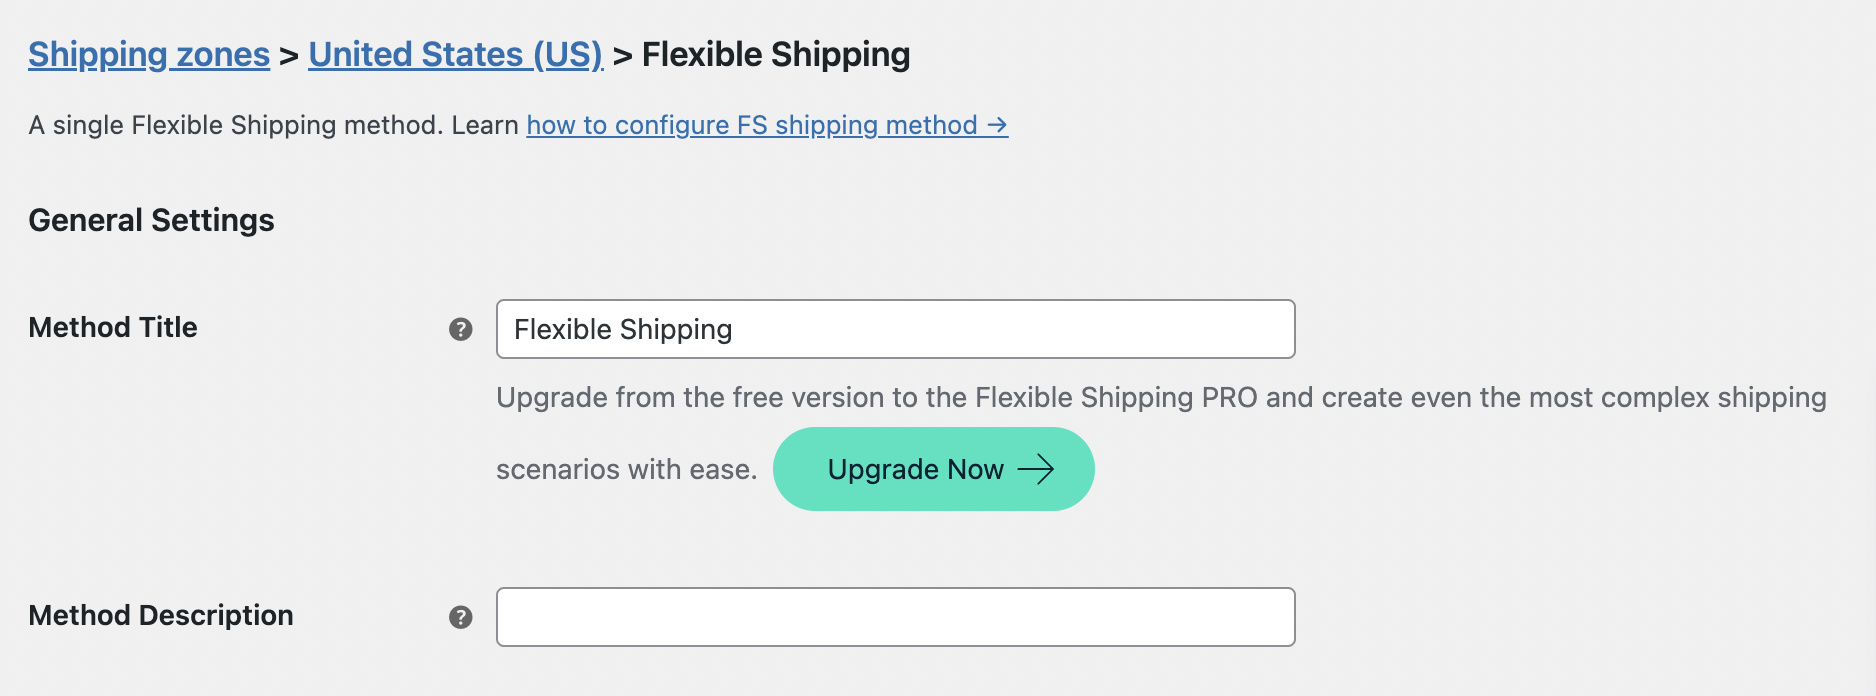
Go to WordPress.org or Download for freeHaving the plugin installed and activated, open your Shipping Method: Go to your Shipping Zone and create or edit a Flexible Shipping method.
Then, locate the Method Description field. This field is specifically designed for that extra layer of communication.
Add your content in the Method Description field. Enter details like the carrier name or estimated arrival. With Flexible Shipping plugin, you can use HTML for better UX. It allows to format the text or even add visuals. For example:
To display estimated time:Delivered within 2–3 business days
To add a carrier logo:<img src="https://yourdomain.com/logo-dhl.png" alt="DHL">
To link to your shipping policy:<a href="https://yourstore.com/shipping-policy">See full shipping terms</a>
By providing this data directly at the point of purchase, you significantly lower the chance of the customer leaving the site to look for shipping information elsewhere.
The most dangerous text on your checkout page is the one that says: “No shipping options were found.” When a customer sees this, they assume you cannot help them, and they close the tab. To keep these customers in your sales funnel, you should use the Shipping Notices plugin.
Get Free Shipping Notices Plugin →
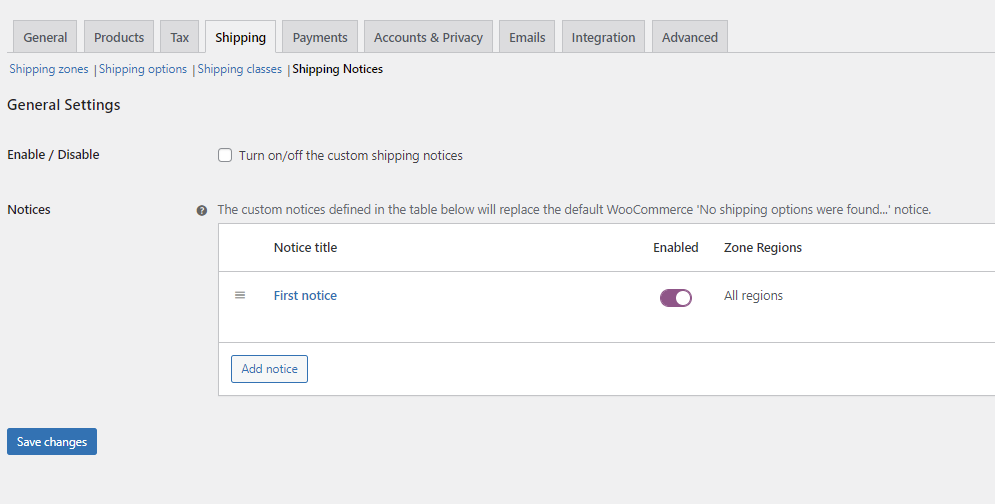
To add shipping notice, first, make sure you have activated the plugin and go to the settings page: WooCommerce > Settings > Shipping > Shipping Notices.
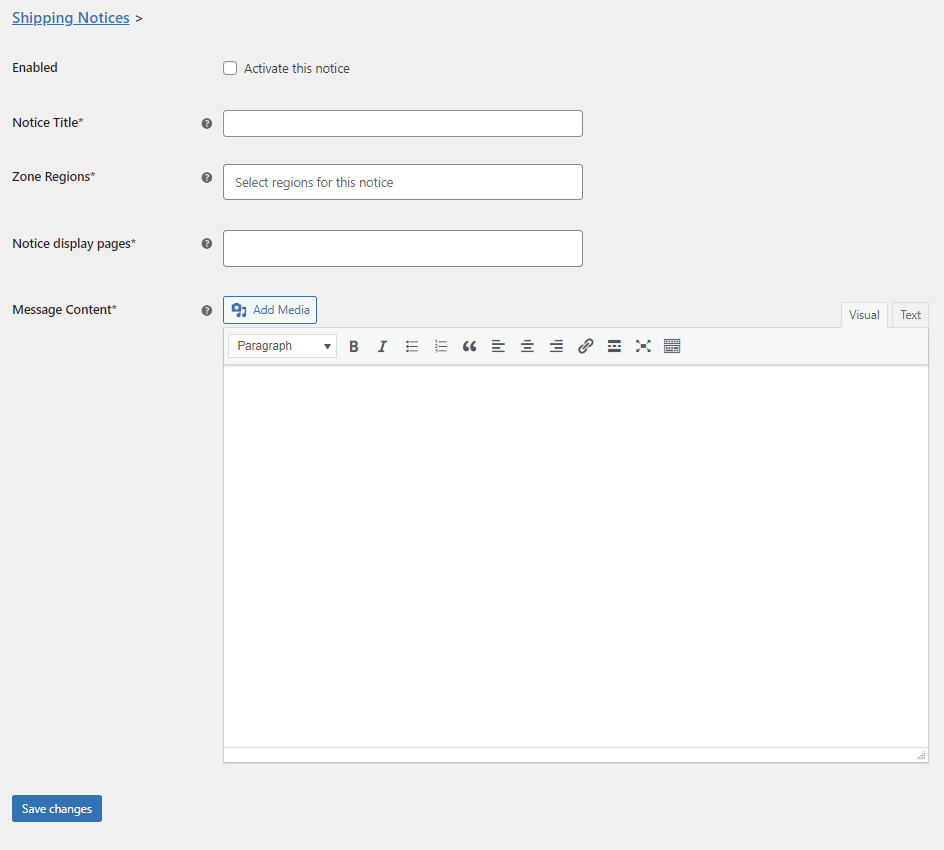
There you have the list of all your custom shipping notices. As you can see, as default there are no notices. To change that, click on the Add notice button. The new notice creation page will appear.
Tick the Enabled box to activate this notice. Next, fill in the Notice Title field with the unique title for easy identification – it will display only on the plugin’s settings.
Then, you can select Zone Regions for which the plugin should display the notice. It is useful if you intend to show that notice only for specific addresses. This solution will work great if individual shipping pricing is needed for specific regions. Otherwise, just select All regions. And lastly, determine where the notice will display in the Notice display pages field. You can display it on the cart or checkout or even on both of them.
After configuration, you can add the content of your notice. To do that, use the visual or text editor. You can use standard WordPress formatting, including adding media files. Make sure you have configured the notice and click on the Save changes button. Now in the list of all notices you should see the one you just added.
Now, enable it using the Turn on/off the custom shipping notices checkbox and click on the Save changes button.
This approach ensures that even when the “system” fails, your brand’s voice remains helpful and proactive.
Simply knowing how to change shipping text in WooCommerce is only half the battle. To truly lower your abandonment rate, you must apply UX writing principles to your shipping labels. Remember, at the checkout stage, your customer is looking for two things: Certainty and Speed.
Here are four best practices to ensure your shipping communication converts:
Vague terms like “Standard Shipping” or “Express” are common culprits for cart abandonment. Remember, based on the Baymard Institute findings, customers crave predictability.
Using the Flexible Shipping plugin mentioned earlier, you can add micro-copy that reinforces security. Shipping is the moment the customer “hands over” their money and waits for a physical result.
When you edit free shipping text, don’t just leave it as a checkbox. Make it feel like a benefit.
As we discussed in the Shipping Notices section, technical errors are conversion killers.
You can change the “Flat rate” text natively without any plugins. Go to WooCommerce > Settings > Shipping, click on your Shipping Zone, and then click Edit on the Flat Rate method. Simply update the Method Title field and save your changes.
Yes. To edit free shipping text, navigate to your Shipping Zone settings in WooCommerce. Editing the “Free shipping” method allows you to change the title to something more engaging, like “Complimentary Standard Shipping” or “Free Tracked Delivery.”
The most reliable way to add delivery estimates (e.g., “2-3 business days”) is by using the Flexible Shipping plugin. It provides a Method Description field that supports plain text and HTML, allowing you to display clear timeframes directly under the shipping method name at checkout.
Instead of the default error, you can use the Shipping Notices plugin to create a custom message. This allows you to provide a helpful alternative, such as a link to your contact form or a phone number, preventing the customer from abandoning their cart when no automated shipping is found.
Mastering how to change shipping text in WooCommerce can be a powerful tool for building trust. By moving away from generic labels and implementing the three methods we’ve discussed, you directly address the “extra cost” anxiety that causes 48% of shoppers to leave their carts behind. By using clear language and the right tools, you transform your checkout from a point of friction into a professional, transparent experience. For more ways to streamline your store, check out our ultimate guide on WooCommerce Shipping or explore the official WooCommerce Documentation for deeper technical insights.

Content Writer at Octolize
Bartosz Gajewski is a content and marketing specialist with a solid background in SEO, WordPress content strategy, and technical documentation for digital products. With years of hands-on experience in both in-house and freelance roles, he supports tech companies – especially in the SaaS and e-commerce space – by creating content that informs, engages, and drives results.
His approach blends storytelling with data-driven SEO, and he’s been involved in projects ranging from rebranding and product marketing to growth experiments and copywriting for complex software tools. On the blog, he shares actionable insights from his work across marketing teams, product documentation, and online store optimization.


The Neurodivergence Project uses the ocean and the natural world to empower neurodivergent people to build confidence, lasting friendships and help them achieve their goals.

Dominican Liturgical Center is based in Cracow and focused on promoting the learning of traditional music and singing. They also run a smaller publishing house and a webshop that is focused on selling mainly books and CDs.

Established in 2017. SGL is focused on selling gas bottles and non-gas products. Formerly, the company offered payment by card on delivery. For now, the SGL started online payments and they launched a webstore.