
- Home
- WooCommerce
- What plugin are you looking for?
- Shopify
- What Do I Need?
- About us
- Blog
- Docs
- Contact us
- What can we help you with?

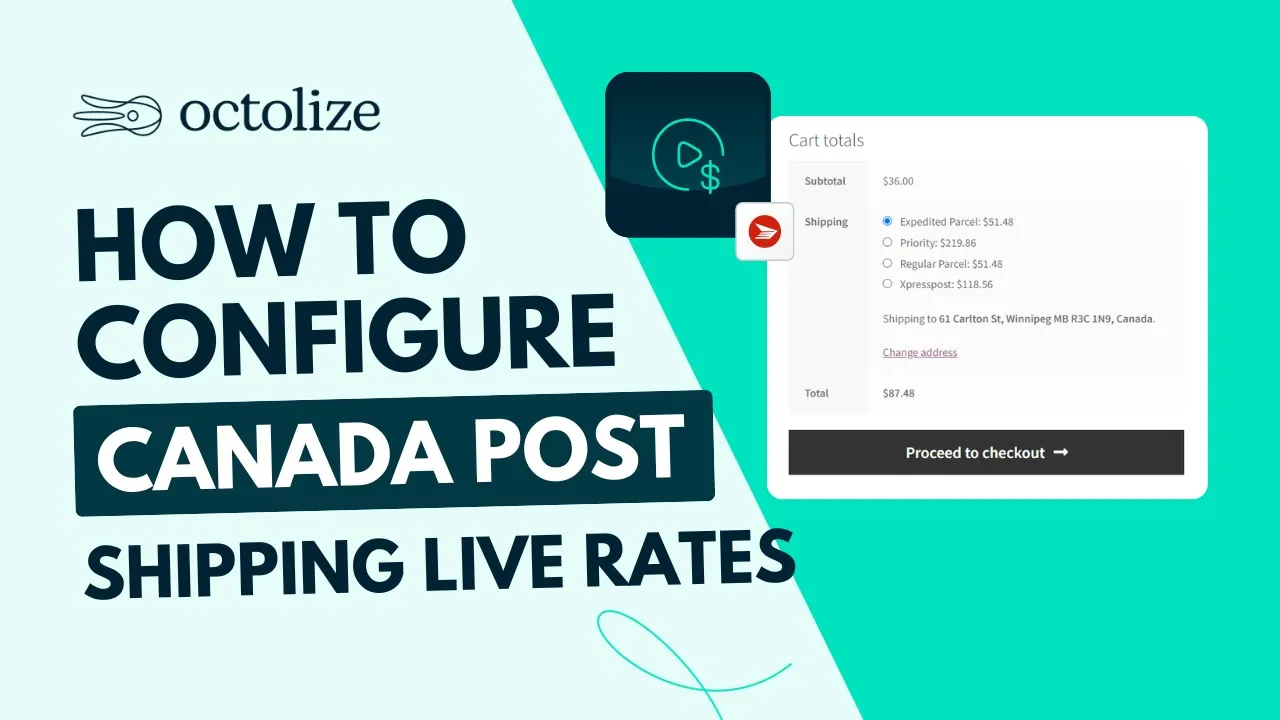
In this guide, I’ll walk you through the steps to set up the Canada Post Live Rates for WooCommerce. You will learn how to configure Canada Post shipping methods with real-time shipping rates, ensuring that the shipping cost displayed in the cart matches what Canada Post would charge.
For store managers, it’s crucial to charge the correct amount for shipping. Overcharging can make your store less competitive, while undercharging can affect your profits. Ideally, the shipping cost for your customer should mirror the Canada Post charges.
Canada Post Live Rates PRO connects your store to the Canada Post API so customers see the carrier’s real prices at checkout. Add your credentials, drop the method into a shipping zone, then tune it: pick which services to offer, set a fallback for failed API calls, choose how items are packed, and apply a fee or discount across the returned rates. Custom origin per method covers multi-warehouse setups, and pairing it with Flexible Shipping adds conditional rules on top.
If you’re setting up Canada Post rates this year, the carrier’s own situation is worth knowing. In its 2025 Annual Report, Canada Post describes itself as having become the country’s top parcel delivery company, but says intensified competition in ecommerce delivery has eroded its parcel volumes and revenue, producing financial losses it calls unsustainable. Volumes tell the same story: Canada Post handled roughly 286 million parcels in 2022, around 20% fewer than the previous year, after peaking at 389 million in 2020.
The market keeps growing: the Canadian courier, express and parcel market is projected at USD 16.10 billion in 2026, growing at 5.12% annually to USD 20.67 billion by 2031.
Rates from a carrier under this much operational pressure make two settings below more important than they look. Set a Fallback cost so your checkout still works if the API returns nothing during a disruption, and consider running a second carrier alongside Canada Post in the same shipping zone so customers always have an option.
Sources: Canada Post 2025 Annual Report; Mordor Intelligence; Stallion Express. Figures current as of September 2026.
To configure Canada Post Live Rates for WooCommerce, you’ll need the Canada Post Live Rates PRO plugin for WooCommerce.

Display automatically calculated Canada Post live rates for your customers. Add the handling fees, insurance and more.
View DetailsorAdd to cartOnce installed, this plugin offers a comprehensive range of Canada Post shipping options. Integration is swift, and your customers will see all available Canada Post shipping options with real-time rates during checkout. The rates are derived from the Canada Post API, considering factors like the shipping address, store’s origin, and product dimensions.
I’ll guide you through the setup process of the plugin. By following these steps, you can showcase real-time Canada Post Shipping Rates on your WooCommerce platform.
Start by downloading, installing, and activating the Canada Post Live Rates plugin for WooCommerce. Access the plugin settings by navigating to WooCommerce → Settings → Shipping → Canada Post Live Rates on the sidebar.
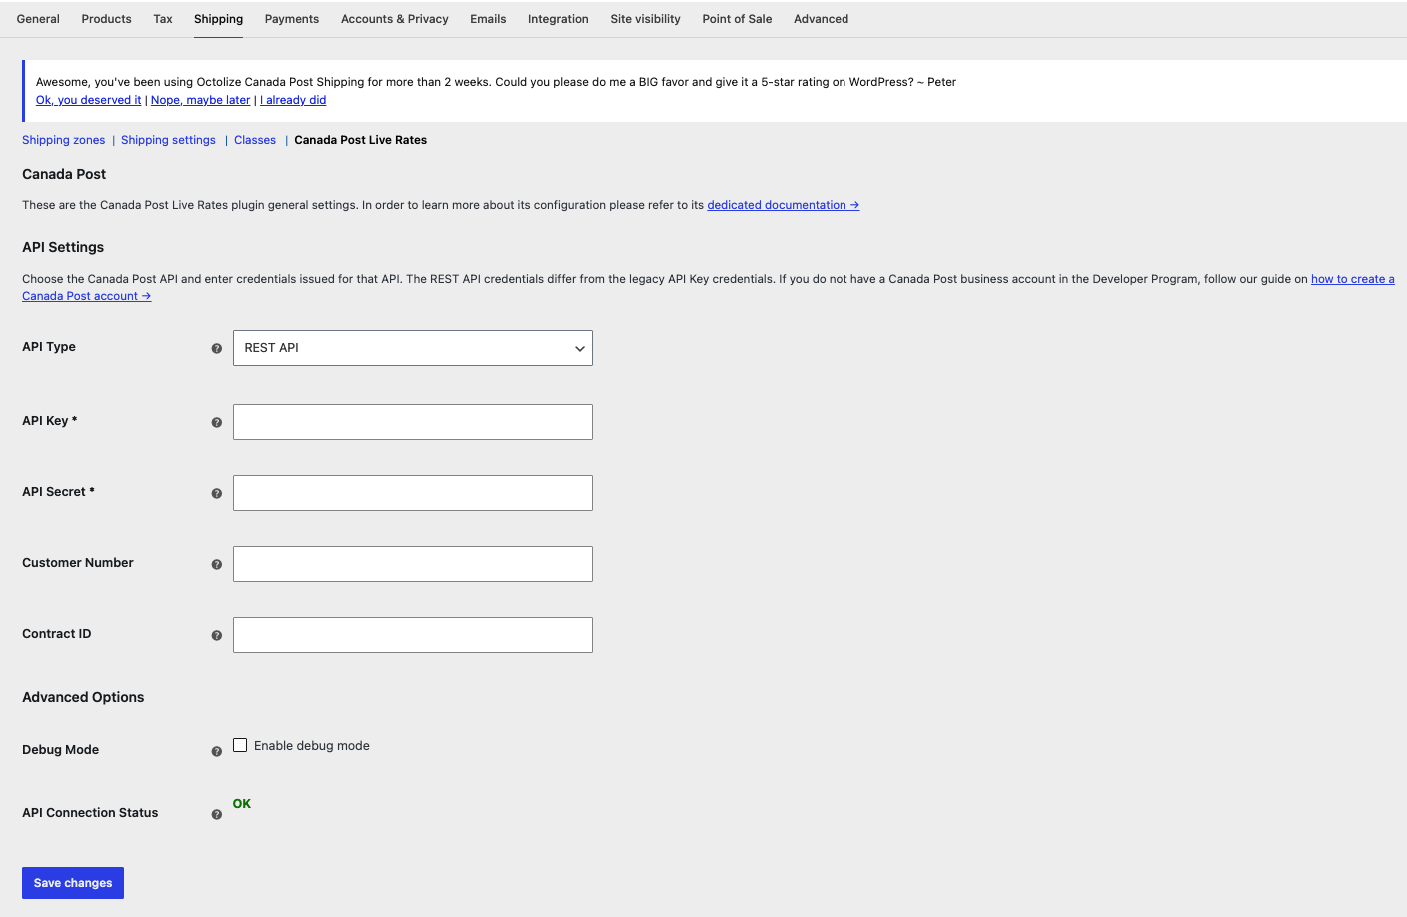
To provide Canada Post shipping options to your customers, you must have a Canada Post account. Use the credentials (API Key, API Secret, Customer Number, and Contract ID) you received during sign-up.
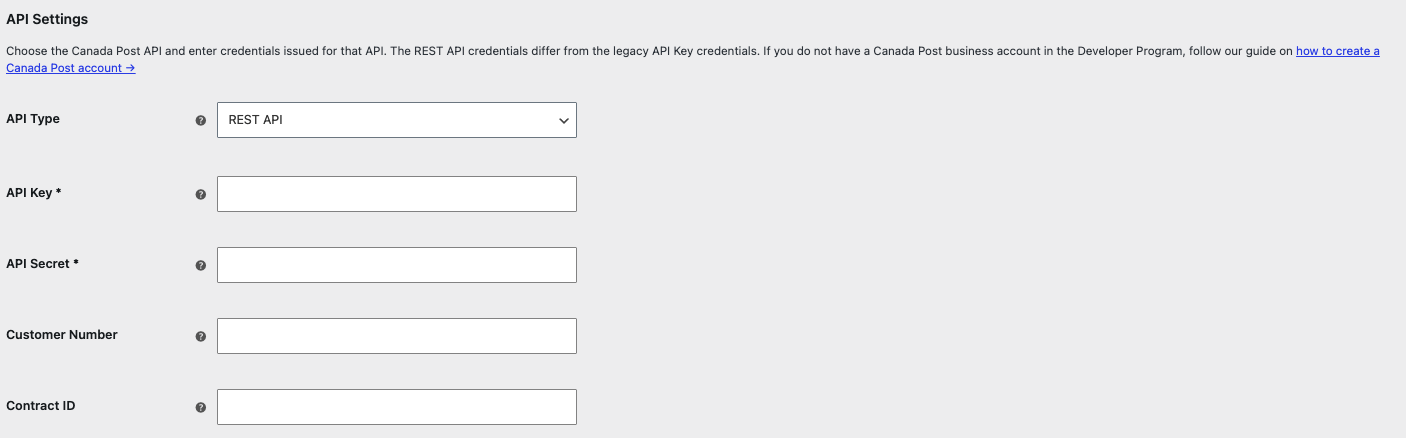
After inputting your login details, hit the Save Changes button. If successful, the API Connection Status will turn green and display OK. If there’s a connection issue, an error message detailing the problem will appear.
Once connected to the Canada Post API, move on to the subsequent step: setting up the Canada Post shipping method.
The Canada Post Live Rates shipping method mirrors the default WooCommerce shipping methods. To initiate a new Canada Post Live Rates shipping method, navigate to WooCommerce → Settings → Shipping:
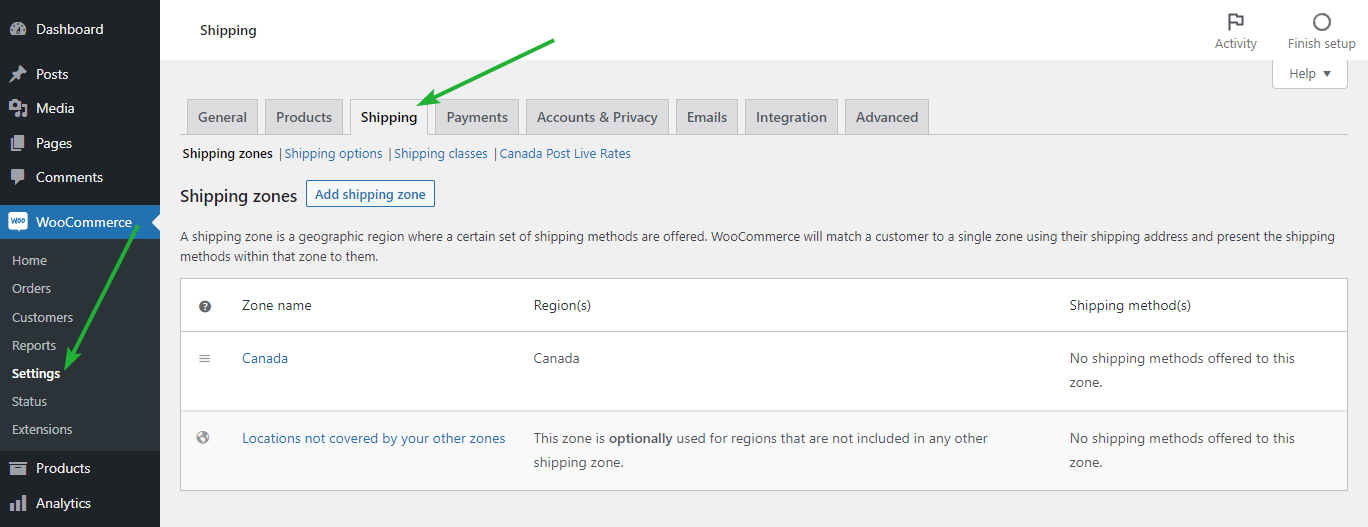
Select the shipping zone where you intend to incorporate the Canada Post Live Rates. Typically, this will be a zone that includes Canada.
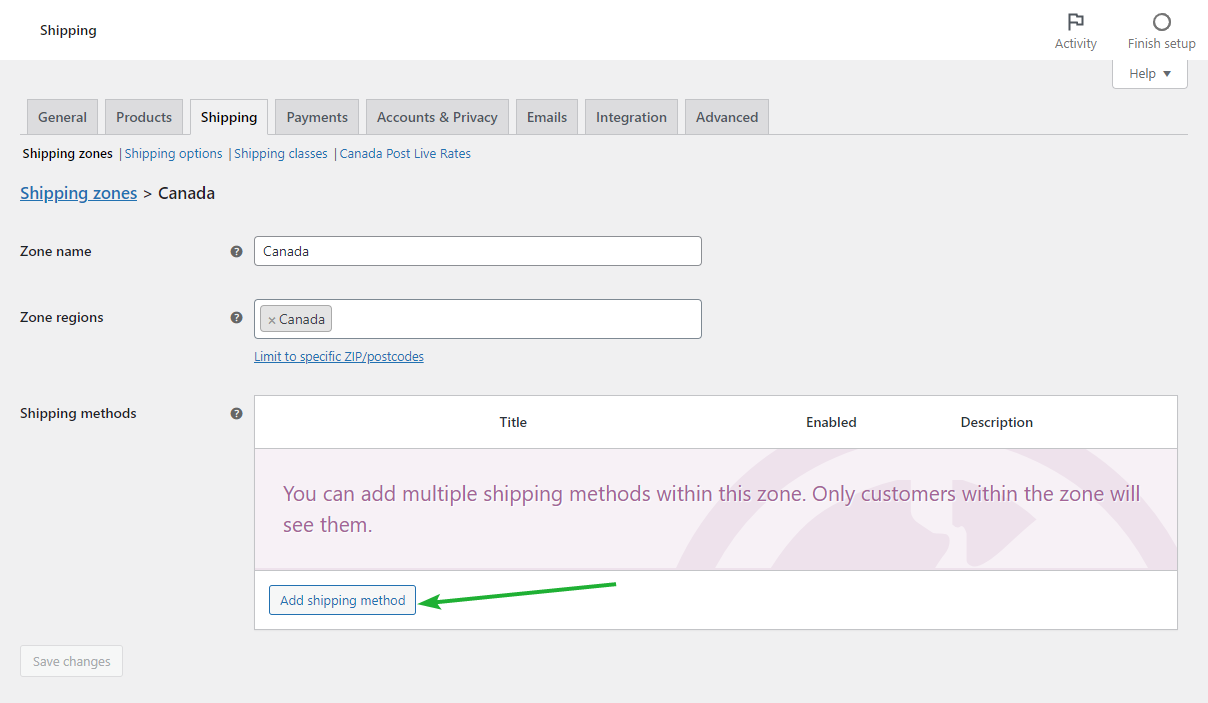
Click the Add shipping method button at the table’s base inside your chosen Shipping Zone.
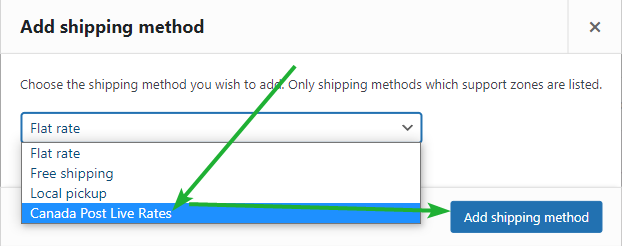
A window will pop up. Pick Canada Post Live Rates from the dropdown and confirm by clicking the Add shipping method button.
Now, the Canada Post Live Rates shipping method is integrated.
It’s time to personalize the Canada Post shipping method.

You can set the Method Title, which will be visible to customers during checkout. The plugin also offers a Fallback feature, a set shipping cost if the Canada Post API doesn’t provide any rates. Another beneficial feature is the Free Shipping over a certain amount. Activate this by checking the Enable the free shipping over amount box and inputting the desired threshold.
A vital setting is choosing the Canada Post services you wish to offer. By default, all services are active. However, if you want to restrict particular services, select the Services checkbox.
In the package setting, you can define the parcel packing method and the package details.
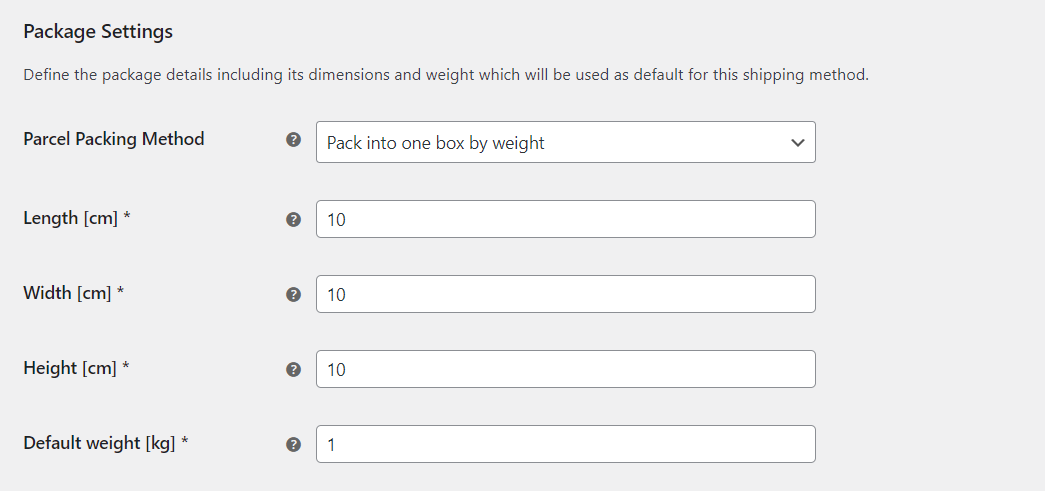
You can choose one of the available packing options. Please mind that, changing your choice here might affect the rates.
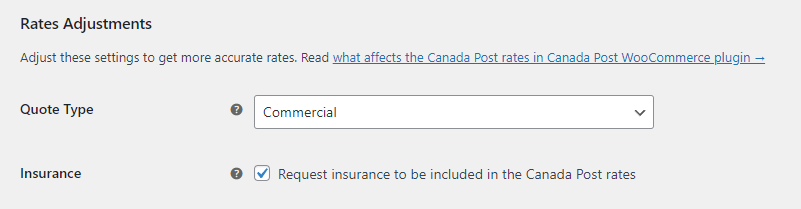
Another available shipping options are Quote Type and Insurance. You can choose between Commercial or Counter rates, depending on your contract with the carrier. The insurance will be included only for services which it is available for.
You can also add a fixed or percentage fee or discount for the returned Canada Post live rates. The setting works globally, which means that the fee or discount you set here will be applied to all Canada Post rates displayed in the cart or checkout for a specific shipping zone. To apply the discount, please enter the negative value in the Fee value field.
Last option to configure in this section is the Tax configuration. By ticking the Tax box you can strip the GST, HST and PST tax value from the shipping rates coming from the Canada Post API.

The Canada Post Live Rates PRO plugin allows you also to set the custom origin for each of the shipping methods. It’s very useful if you have multiple warehouses. With the plugin’s setting, you can configure custom origin for each shipping region. To do so, just check the Enable custom origin for this shipping method checkbox and enter the custom origin address.
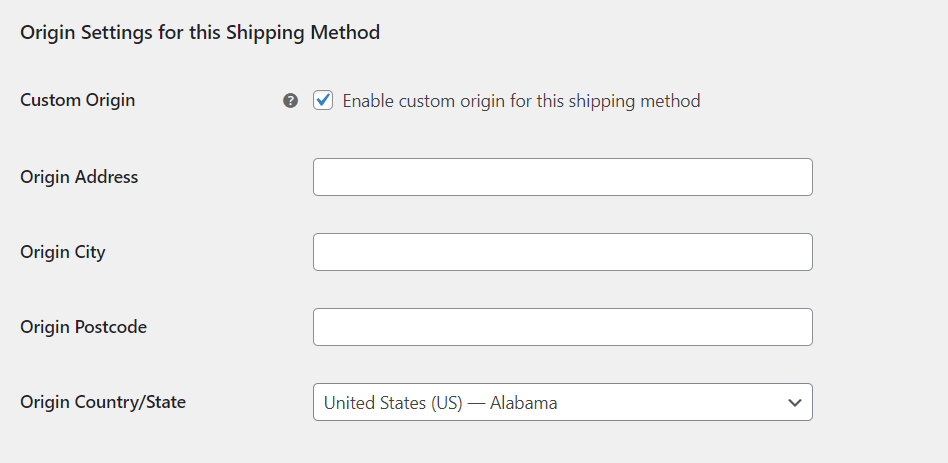
When are all done with the configuration, click on Save changes button. Now, the shipping method should be available for all the customers matching that shipping zone. In the same way, you can add more shipping methods for each shipping zone that you want to use.
Did you know that you can combine a type of live rates plugin with a table rate one? If you need to add additional cost or hide specific live rates method, there’s a solution for you. Find out more in our article New Feature: Connect Live Rates and Table Rate in WooCommerce with Flexible Shipping.
This guide has provided a step-by-step process to set up the Canada Post Live Rates PRO. If you have any queries, feel free to drop them in the comments below!

Content Writer at Octolize
Bartosz Gajewski is a content and marketing specialist with a solid background in SEO, WordPress content strategy, and technical documentation for digital products. With years of hands-on experience in both in-house and freelance roles, he supports tech companies – especially in the SaaS and e-commerce space – by creating content that informs, engages, and drives results.
His approach blends storytelling with data-driven SEO, and he’s been involved in projects ranging from rebranding and product marketing to growth experiments and copywriting for complex software tools. On the blog, he shares actionable insights from his work across marketing teams, product documentation, and online store optimization.





Learn how Octolize helped Kurzgesagt, the online shop behind one of YouTube’s most popular science channels, set up conditional courier rules using the Shopify Shipping Rates Rules & Zones app.

Learn how Octolize solutions helped WooCommerce store based in the United Kingdom set up shipping scenarios.
Learn how Octolize helped Shopify store based in the USA set up distance based rates with a usage of Octolize Distance Based Rates.
 Pickup Points