- Home
- WooCommerce
- What plugin are you looking for?
- Shopify
- About us
- Blog
- Docs
- Contact us
- What can we help you with?

Subscribe to our newsletter

Setting different shipping rates by city in WooCommerce is one of the most effective ways to offer accurate delivery costs and improve the checkout experience. In this guide, you’ll learn how to configure WooCommerce shipping by city using a plugin that lets you manage all locations inside a single shipping zone. By the end, you’ll be able to set different courier prices for any city and avoid creating dozens of separate shipping zones.
Why is this worth your time? Because shipping cost surprises are one of the main reasons for cart abandonment. According to the Baymard Institute, the average cart abandonment rate across online stores is about 70.22%. The surprise shipping cost is a major driver. Also, a survey of over 9,000 shoppers by Sendcloud found that 73% abandoned a cart because delivery charges were too high or unexpected. If you allow shipping costs to vary by city, you can pass realistic courier fees to your customer, build trust and reduce those surprises.
By the end of this guide you will be able to configure your store so that each of the four cities has its own shipping rate.
Shipping Zones are the core of how WooCommerce decides which shipping methods and rates are available for a customer. You can manage them in: WooCommerce → Settings → Shipping → Shipping Zones
A Shipping Zone is a geographic area where you want to offer specific shipping options. You assign:
Once a customer enters their address at checkout, WooCommerce finds the first zone that matches their location and displays the methods available in that zone.
If you want a deeper explanation, you can read our detailed guide explaining WooCommerce Shipping Zones.
WooCommerce does include city-based targeting, but with a limitation: To set different costs for different cities, you need to create a separate zone for each city. Each zone must then include its own shipping method and rate.
For example, if your store sells furniture within the UK and you want different courier prices for:
You would need four shipping zones and four separate courier method configurations. Instead of handling city-based shipping through multiple zones, you would end up duplicating almost the same setup several times. Every update, such as changing a courier price or adding a new delivery option, would require editing each zone separately. As the list of supported cities grows, maintaining the configuration becomes time-consuming and increases the risk of errors.
If your business grows and you add more cities, the complexity increases even faster. Later in this article, I’ll show you a better options that allows you to configure it all in one Shipping Zone and even one shipping method.
Shipping is one of the few things your customers experience before the product even arrives. They judge your store the moment they see the delivery price, and it can immediately change their buying decision.
When shipping costs feel unclear or unfair, shoppers often walk away. The Baymard Institute analysed dozens of studies and found that around 70.22% of online shopping carts are abandoned. Behind many of these abandoned carts is one simple frustration: price surprises.
Shipping charges are one of the biggest contributors. In a Sendcloud survey of more than 9,000 online shoppers in 2023, 73% said they abandoned a purchase because delivery costs were too high or unexpected. Customers want to know what they will pay – not discover hidden fees at the last step.
This becomes even more important for businesses where courier costs vary by distance. Delivering a large furniture item to central London is not the same as driving to Leeds or Liverpool. If you set one flat rate for the entire country, you face a choice between:
A 2025 McKinsey report confirms this pressure: more than 90% of customers are likely to abandon a cart if standard-shipping costs are high. This shows how sensitive shoppers are to delivery pricing, especially for bulky or heavy items.
City-based shipping pricing solves this tension. Customers in each delivery area see a fair price that reflects the real courier cost. This builds trust. It reassures the shopper that your store is reliable and transparent. And it has a direct impact on revenue: every cart you save is a potential sale you would otherwise lose.
If your business operates in a selected group of cities, accurate pricing helps you compete locally, improve your profit margins and meet customer expectations at the same time.
Below, I will walk you through exactly what you need to configure in WooCommerce to get everything working.
The whole process is not complicated and can be achieved in just three steps:
By the end of the next section, your WooCommerce checkout will automatically show the correct price when a customer enters their city.
To set different shipping costs for each city, you will need two two plugins that work together:
Extend Flexible Shipping with custom locations and create shipping costs based on weight, order totals or item count.
View Details or Add to cartTo make this guide practical, here’s the exact setup we will achieve:
The goal is to keep your configuration clean. Instead of four zones and four shipping methods, you’ll manage everything inside one shipping method with four conditions.
Before you create your shipping method and add rules, you need to define the cities inside the Flexible Shipping Locations settings. These locations act as reusable conditions you will later apply to your shipping rules.
Here’s how to set them up:
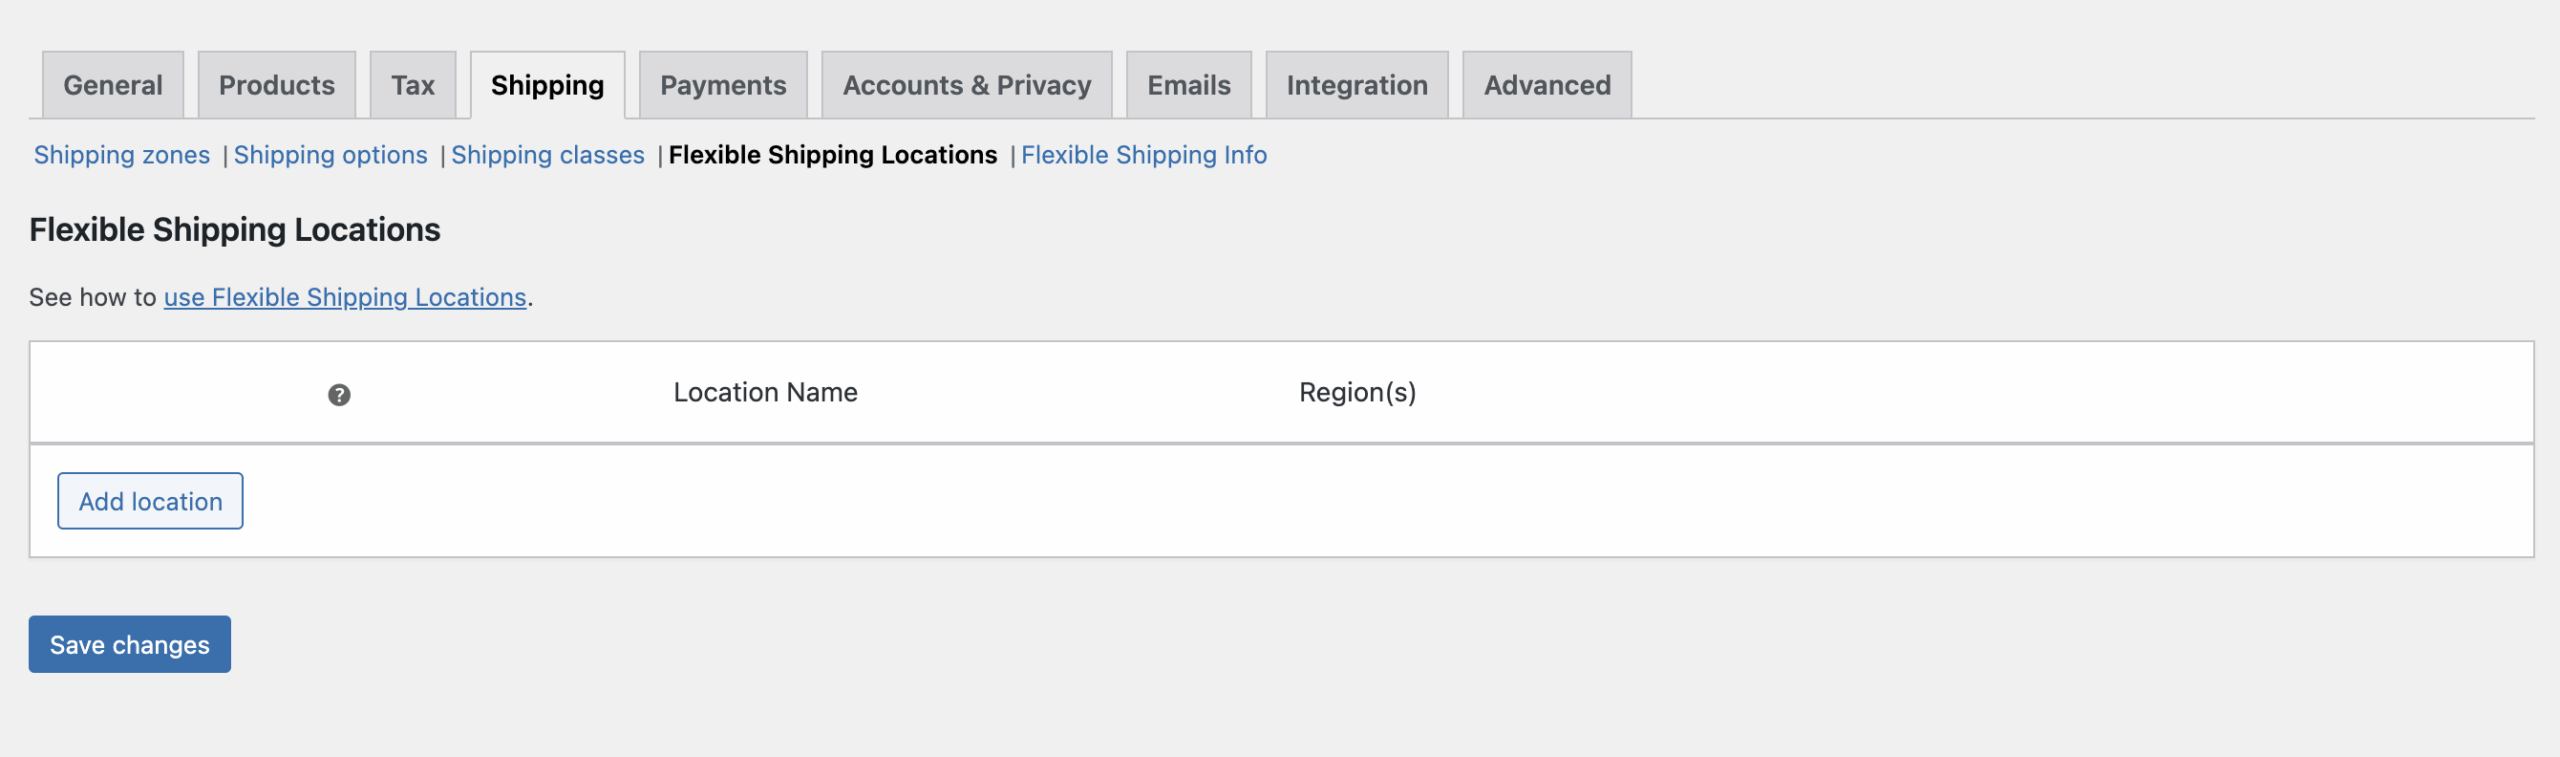
Open the Locations settings. To do so, just go to WooCommerce → Settings → Shipping → Flexible Shipping Locations.
There, you will see the Locations list, which at first will be empty.
To add a City location, click Add Location button. Now, you can name the location, and configure it. In my case, I’ll name it London, and set region as United Kingdom. But, to limit it only to London, click on the Limit to specific ZIP/postcodes.
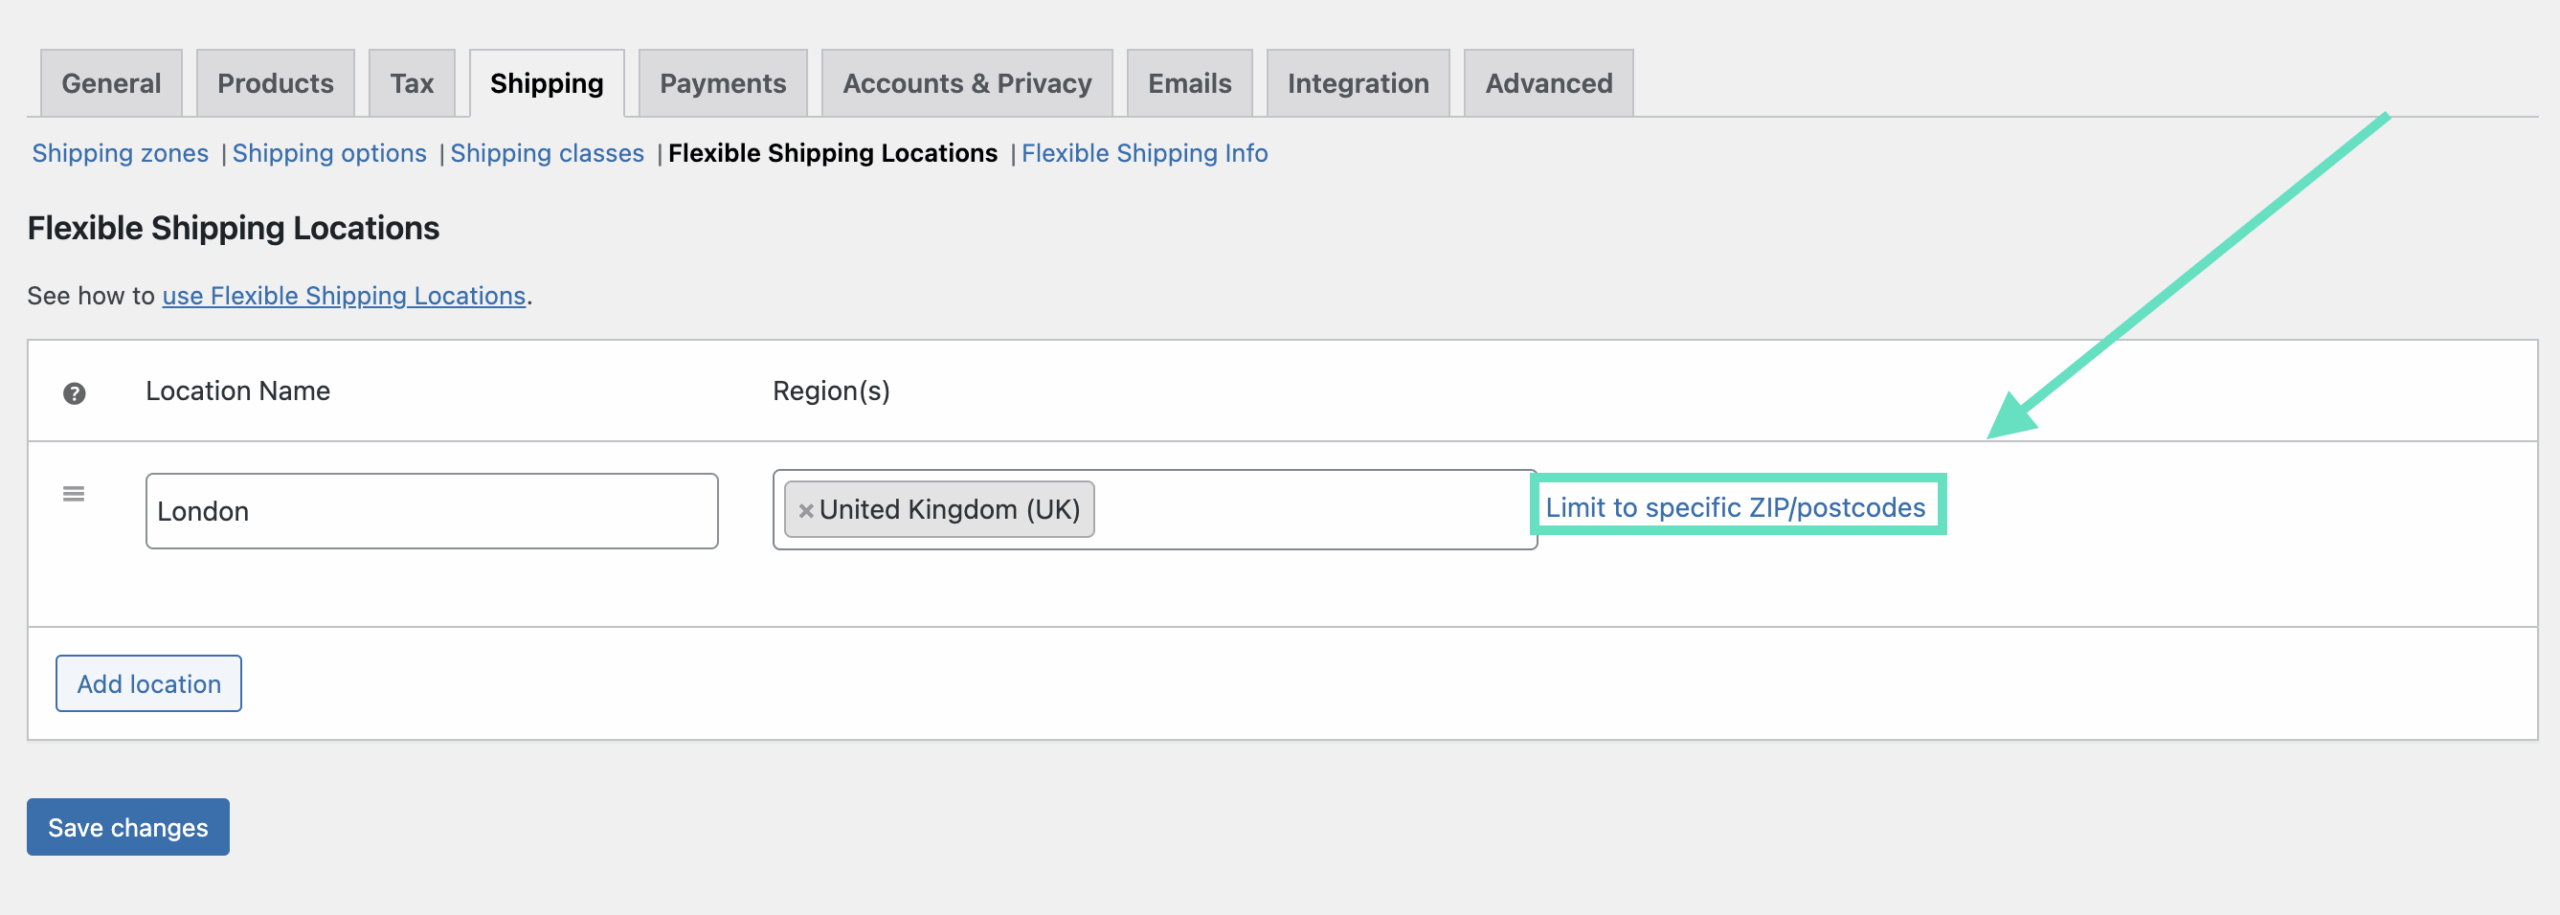
In the new field, you can enter all the London postcodes. The Flexible Shipping Locations plugin, similar to WooCommerce Shipping Zones, allows you to use wildcards, so you can specify only ranges of postcodes.
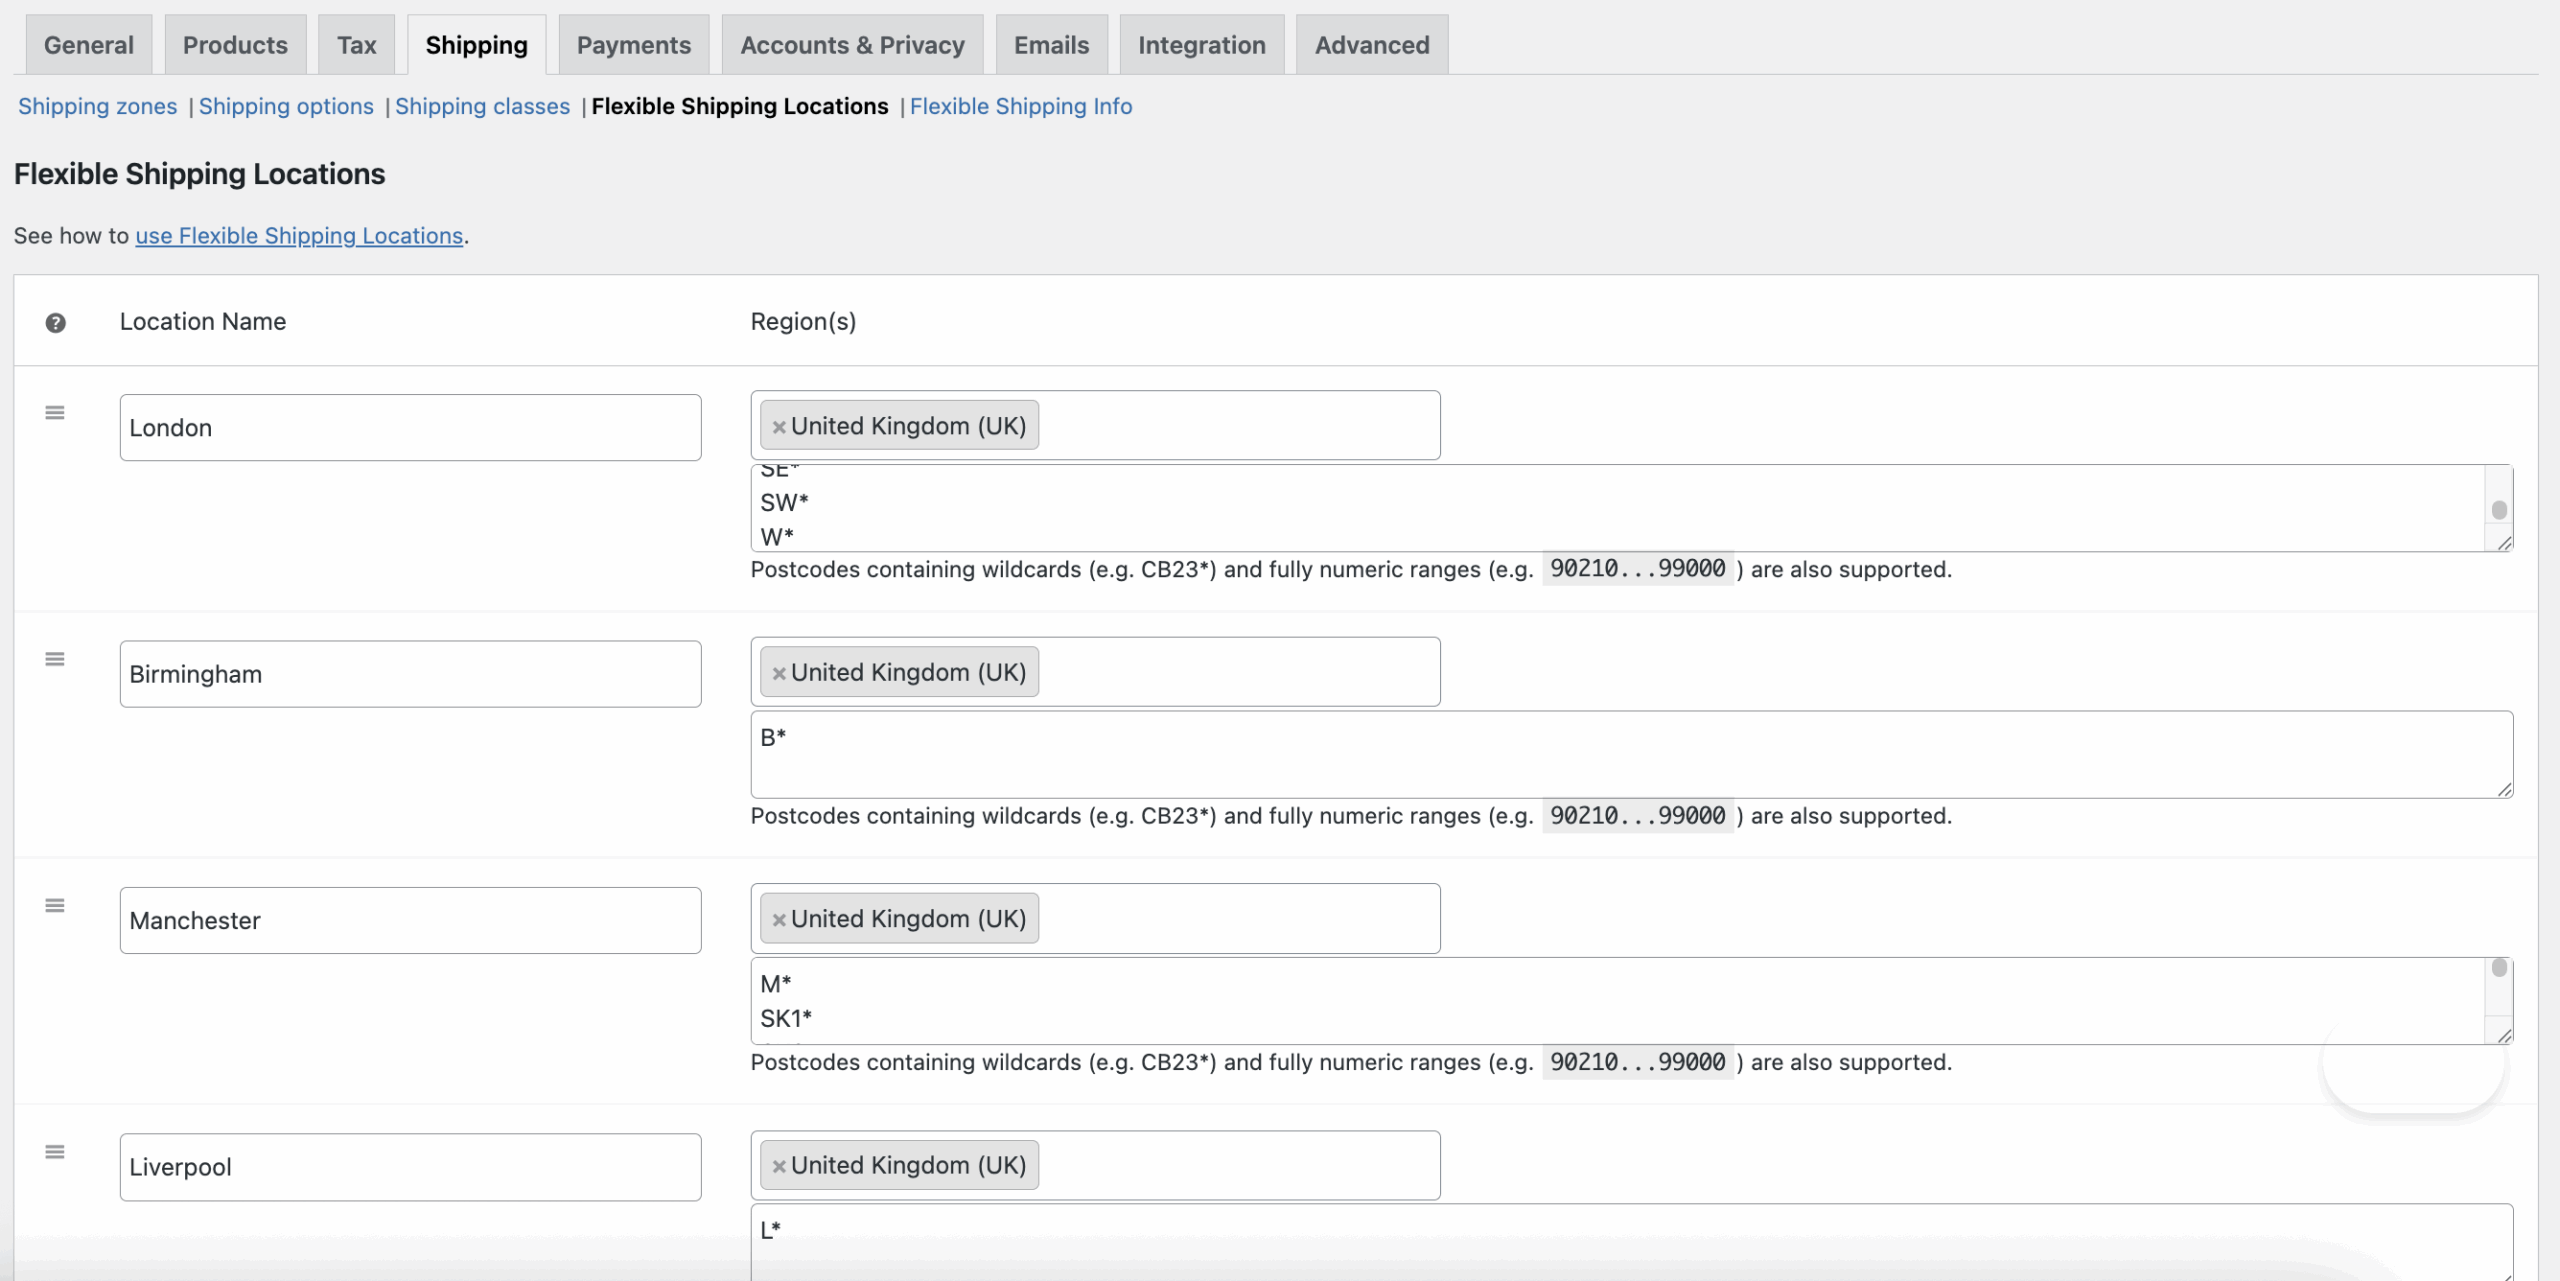
For example, to cover Greater London, use all major postcode prefixes:
EC*

WC*

E*

N*

NW*

SE*

SW*

W*

After that, click on Add location button and repeat this for all the cities you want to support.
Finally, remember to save your changes.
Now it’s time to add a shipping zone where you can configure WooCommerce Shipping by City. As promised earlier, you can complete the entire configuration in just one shipping zone.
To create the United Kingdom shipping zone go to WooCommerce → Settings → Shipping → Shipping Zones.
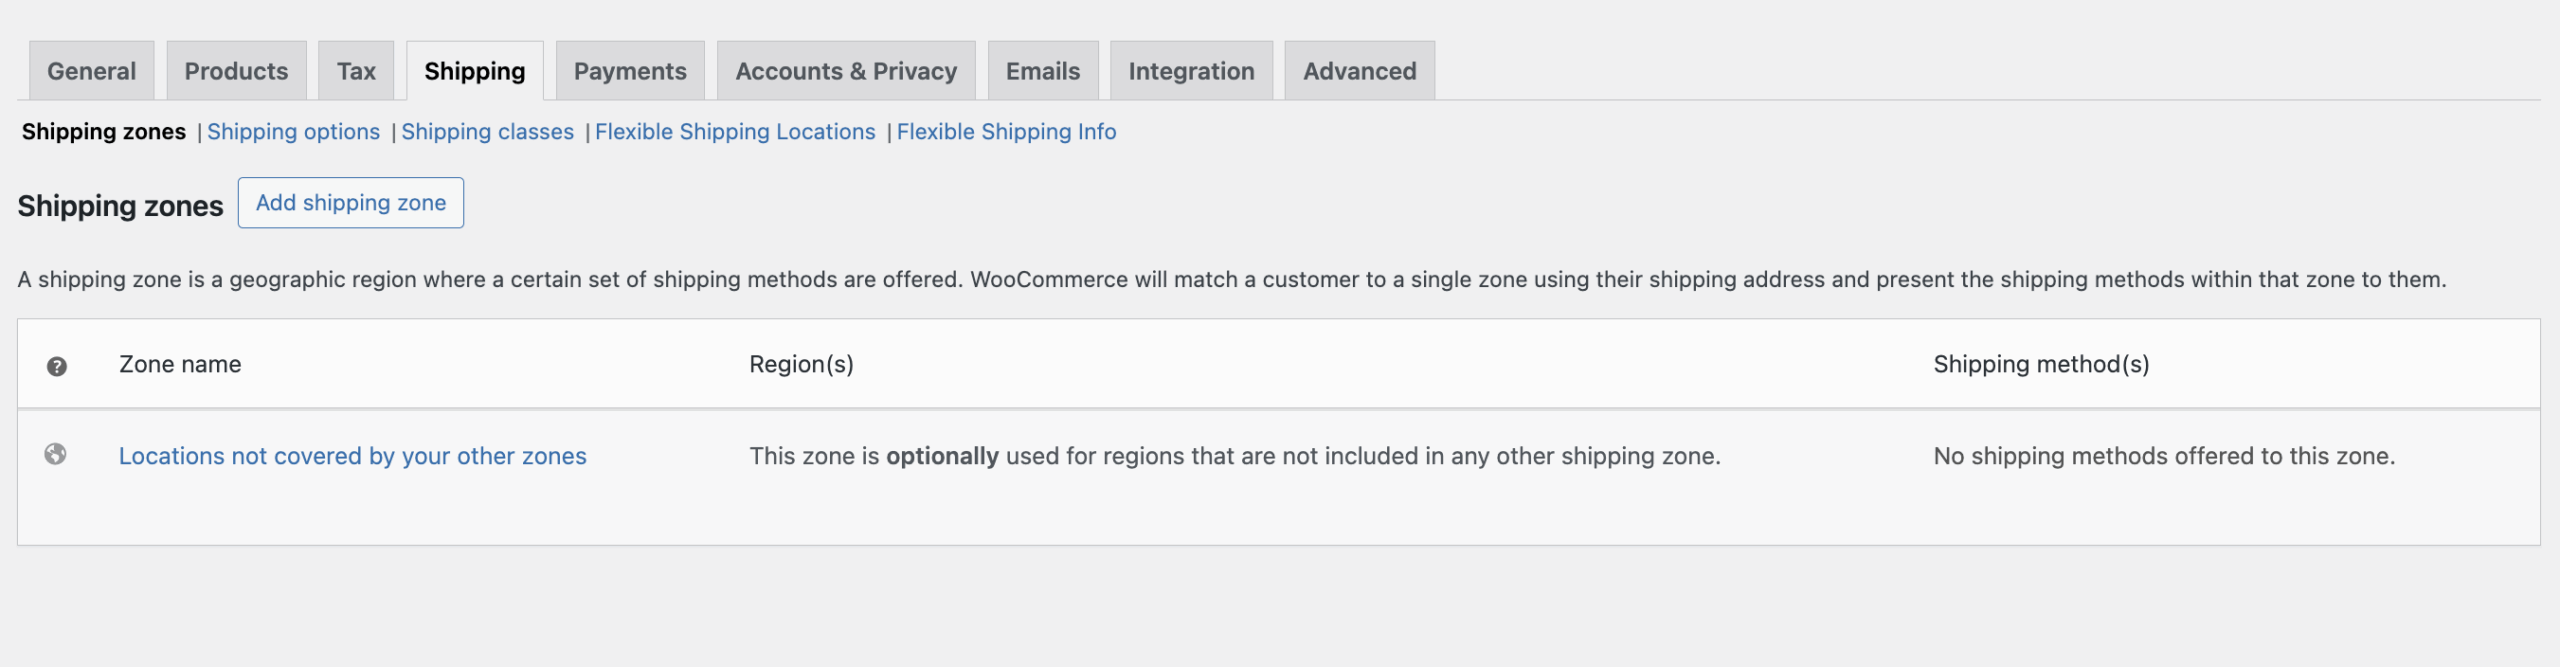
Click Add shipping zone and set Zone name: for example United Kingdom. In Zone regions, select United Kingdom and click Save changes.
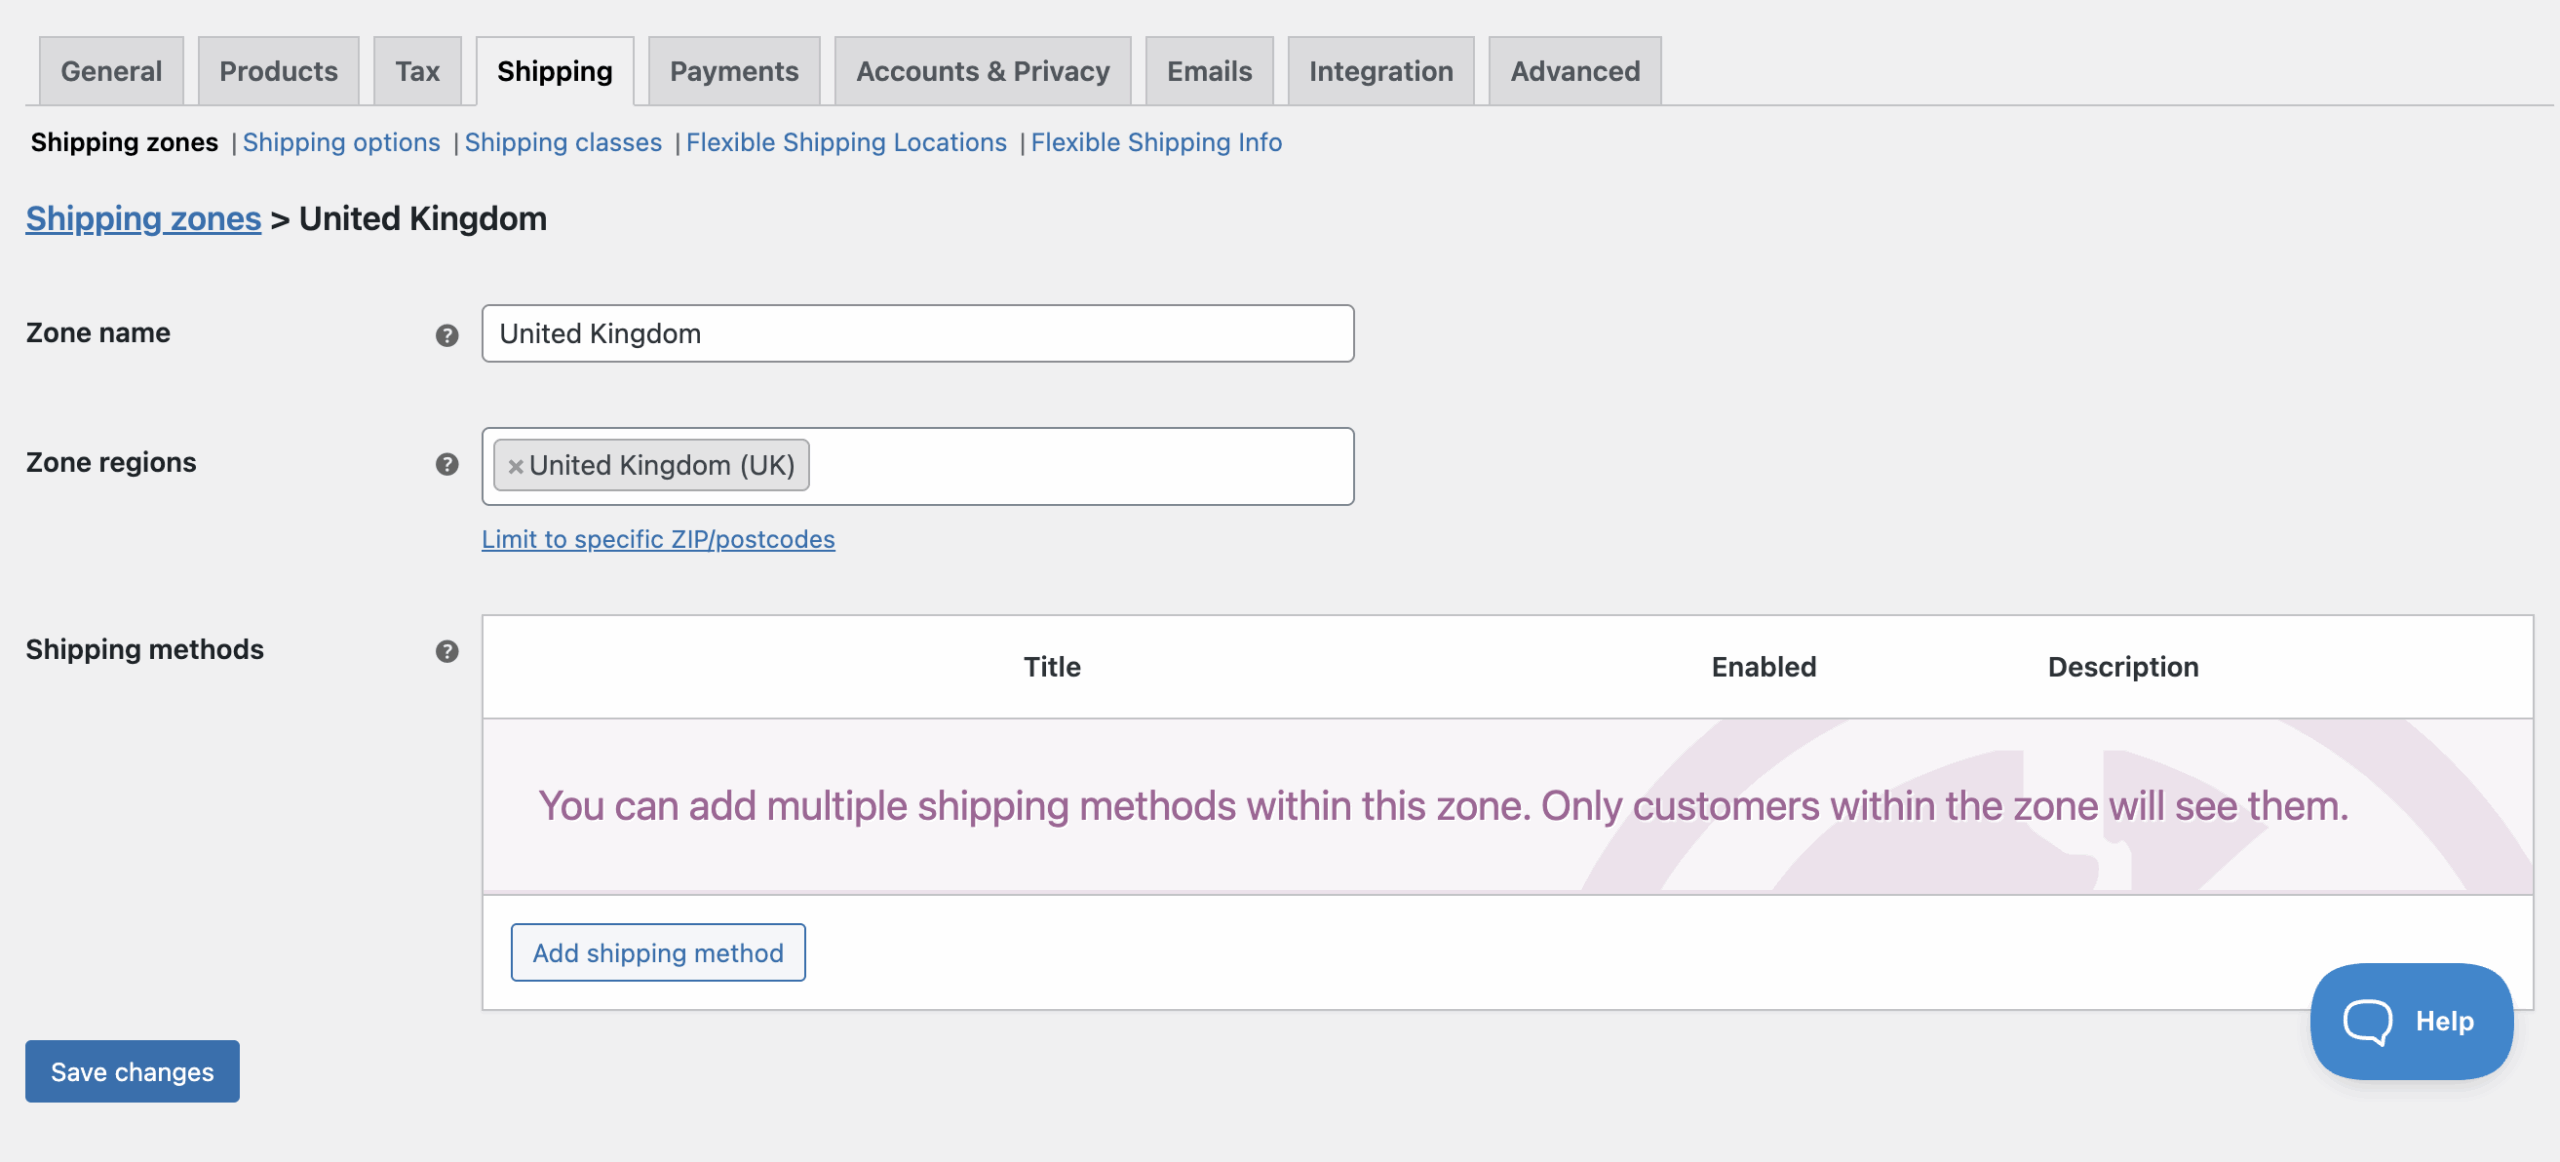
Now we have one zone covering the entire country. All city-based conditions will be configured in this single zone.
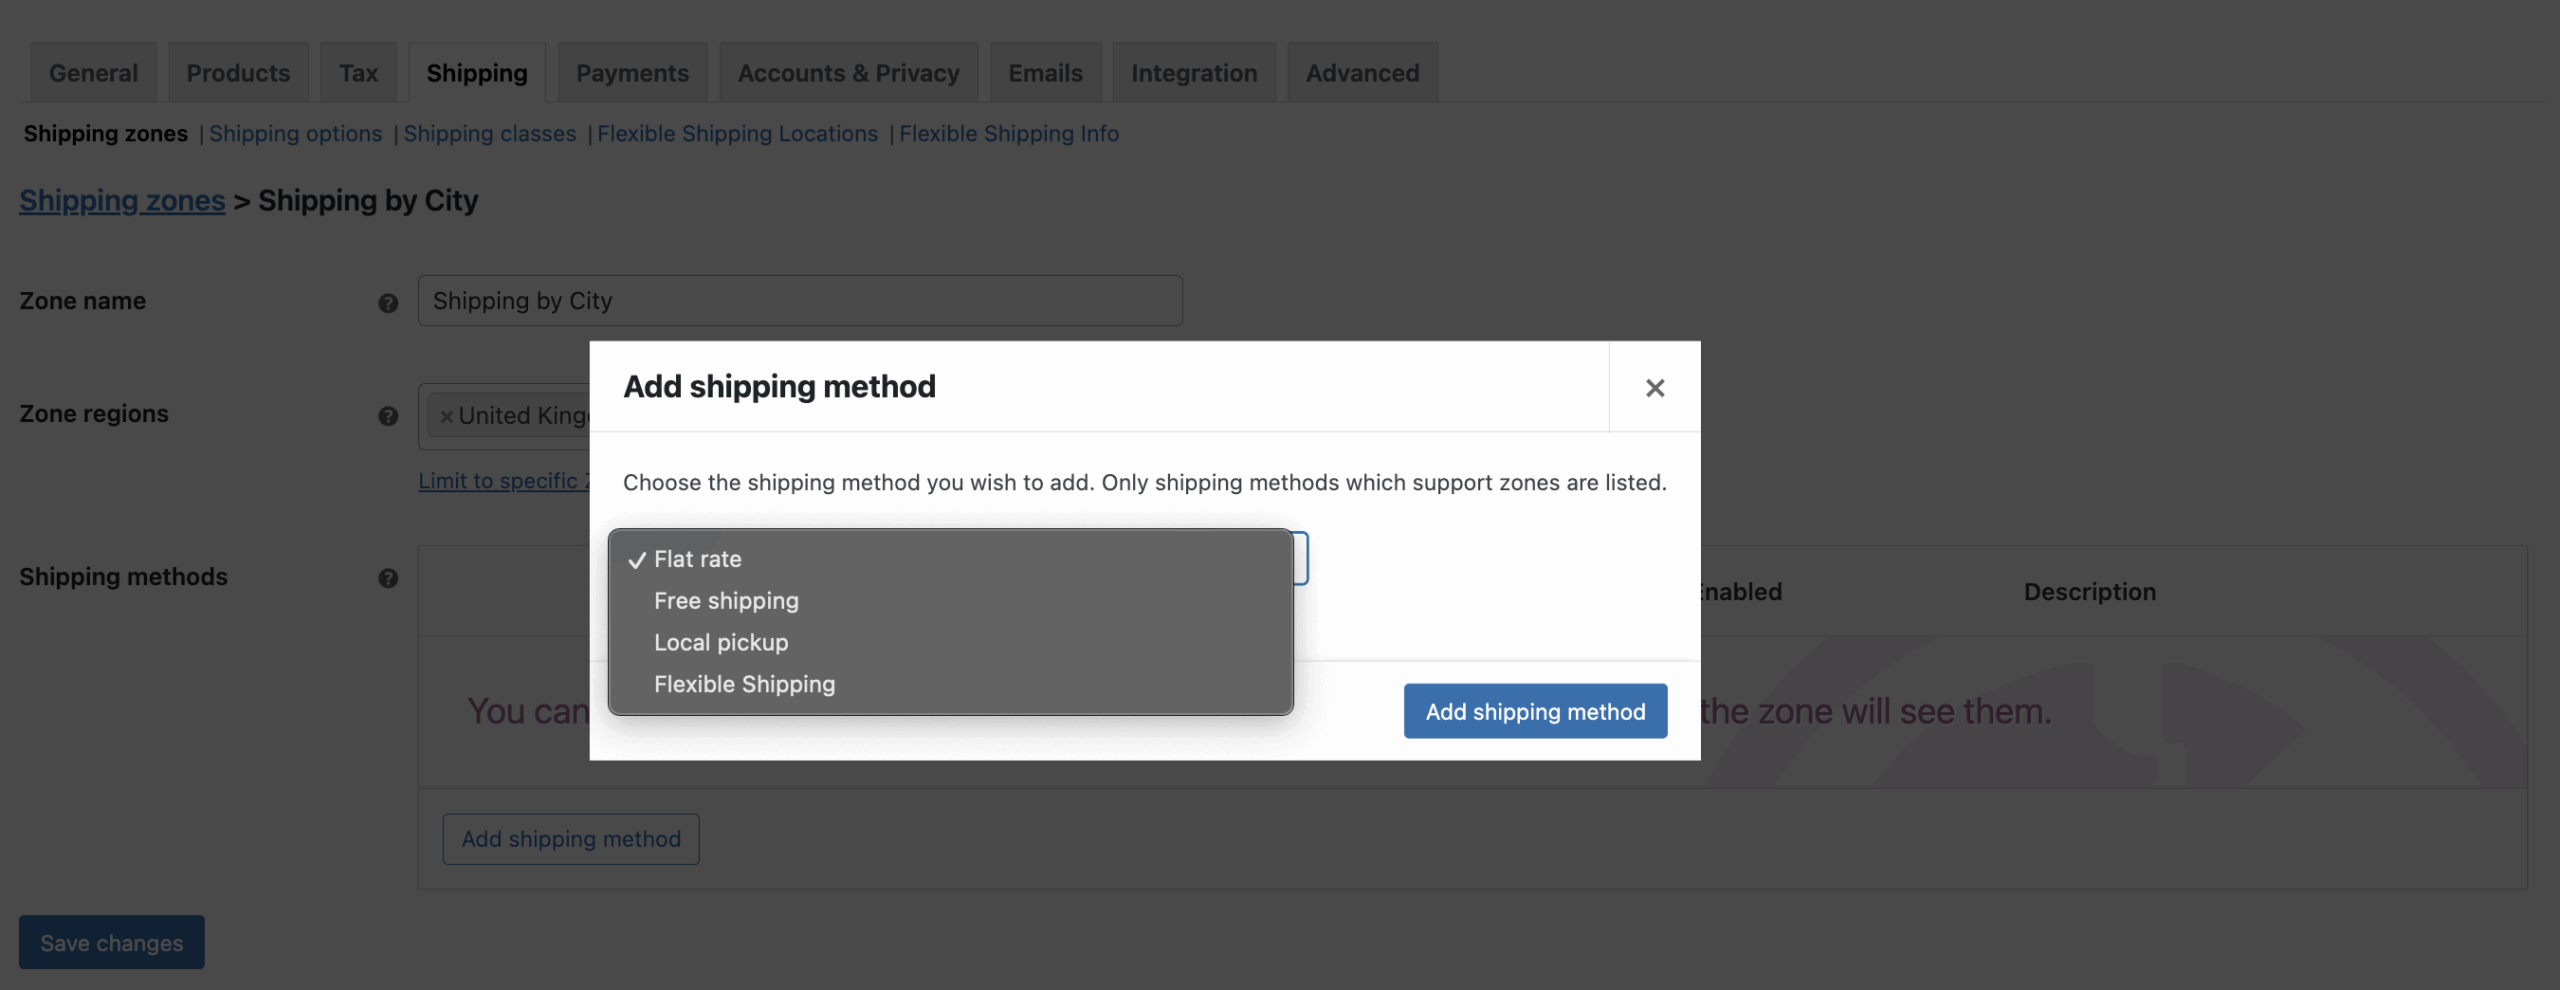
To do so, click on Add shipping method button and choose Flexible Shipping.
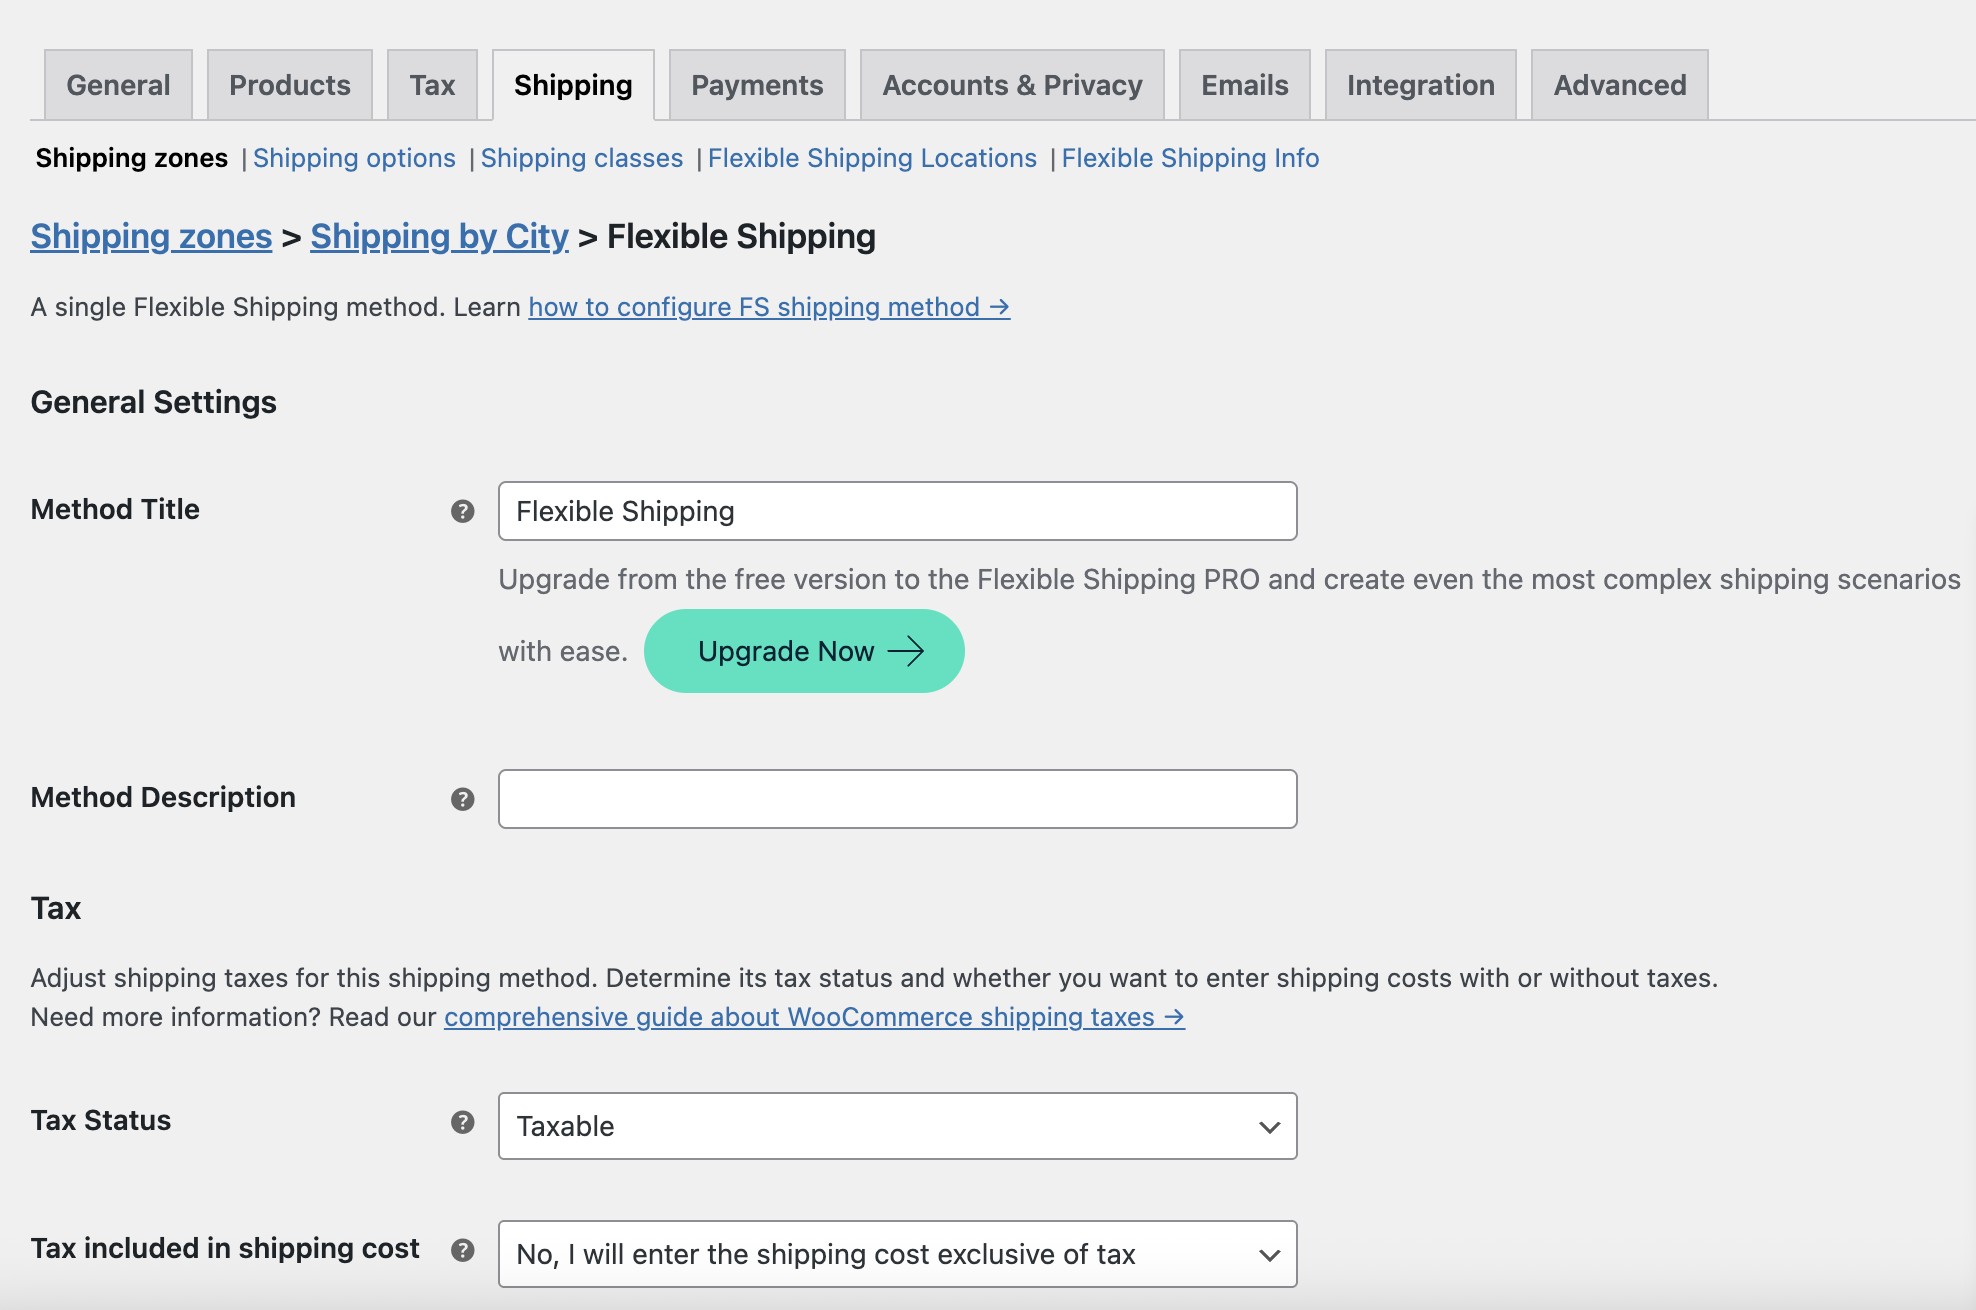
In the new shipping method, you can configure it’s basic setting like shipping method name and description. Of course, you can also use all of other useful features available in the free version of the Flexible Shipping plugin like displaying free shipping bar in your store.
However, the most important element is the shipping cost calculations rules table. You can find it at the bottom of the shipping method’s configuration page. There, you can add rules based on previously created locations. First, choose Location from the available conditions.
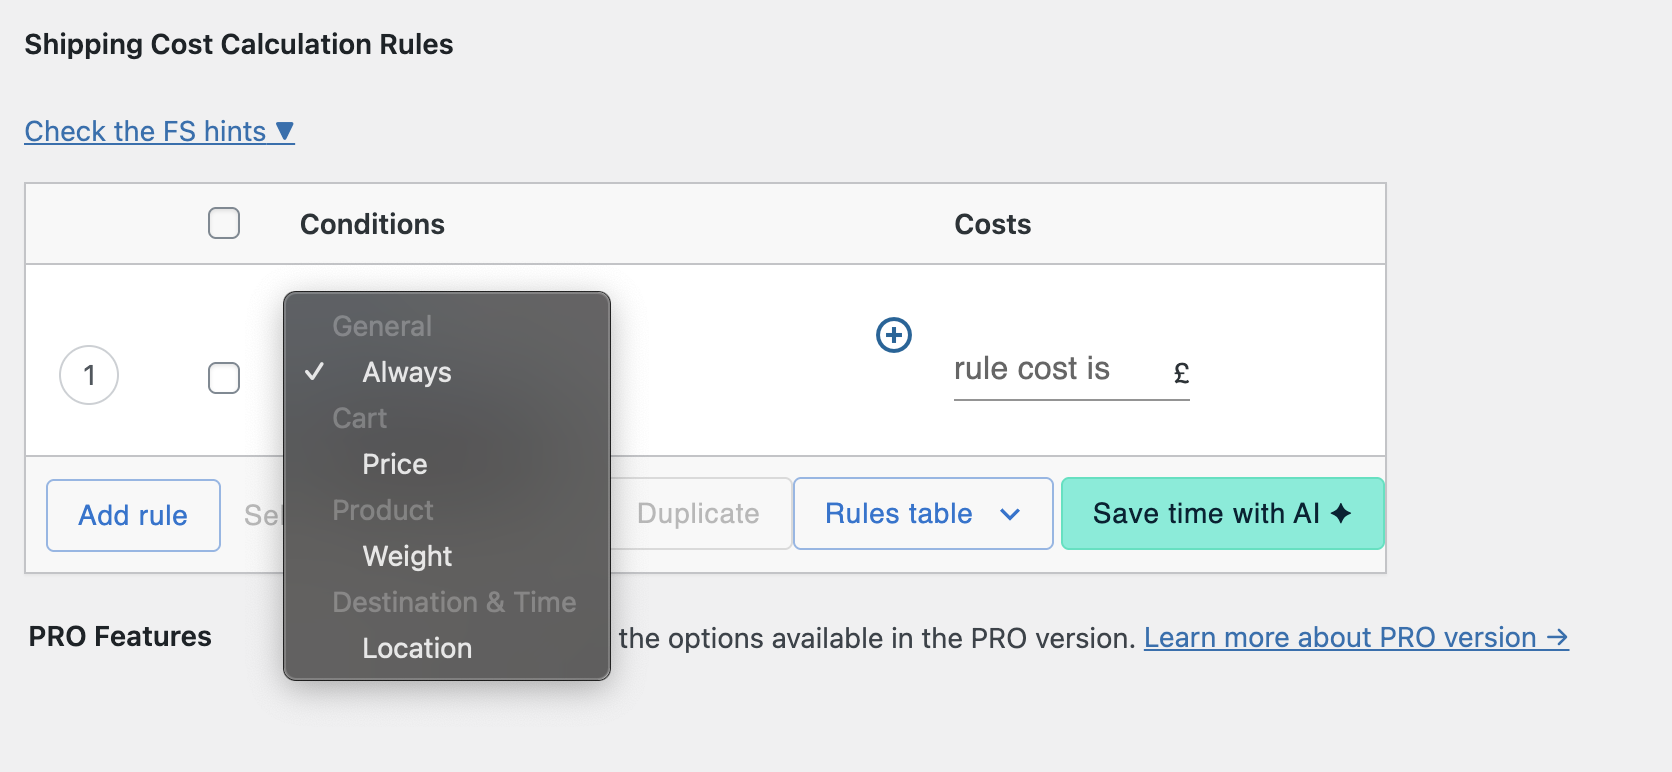
Then, select location by clicking the search location placeholder. The custom locations you added earlier should appear at the top of the list, as in my case.
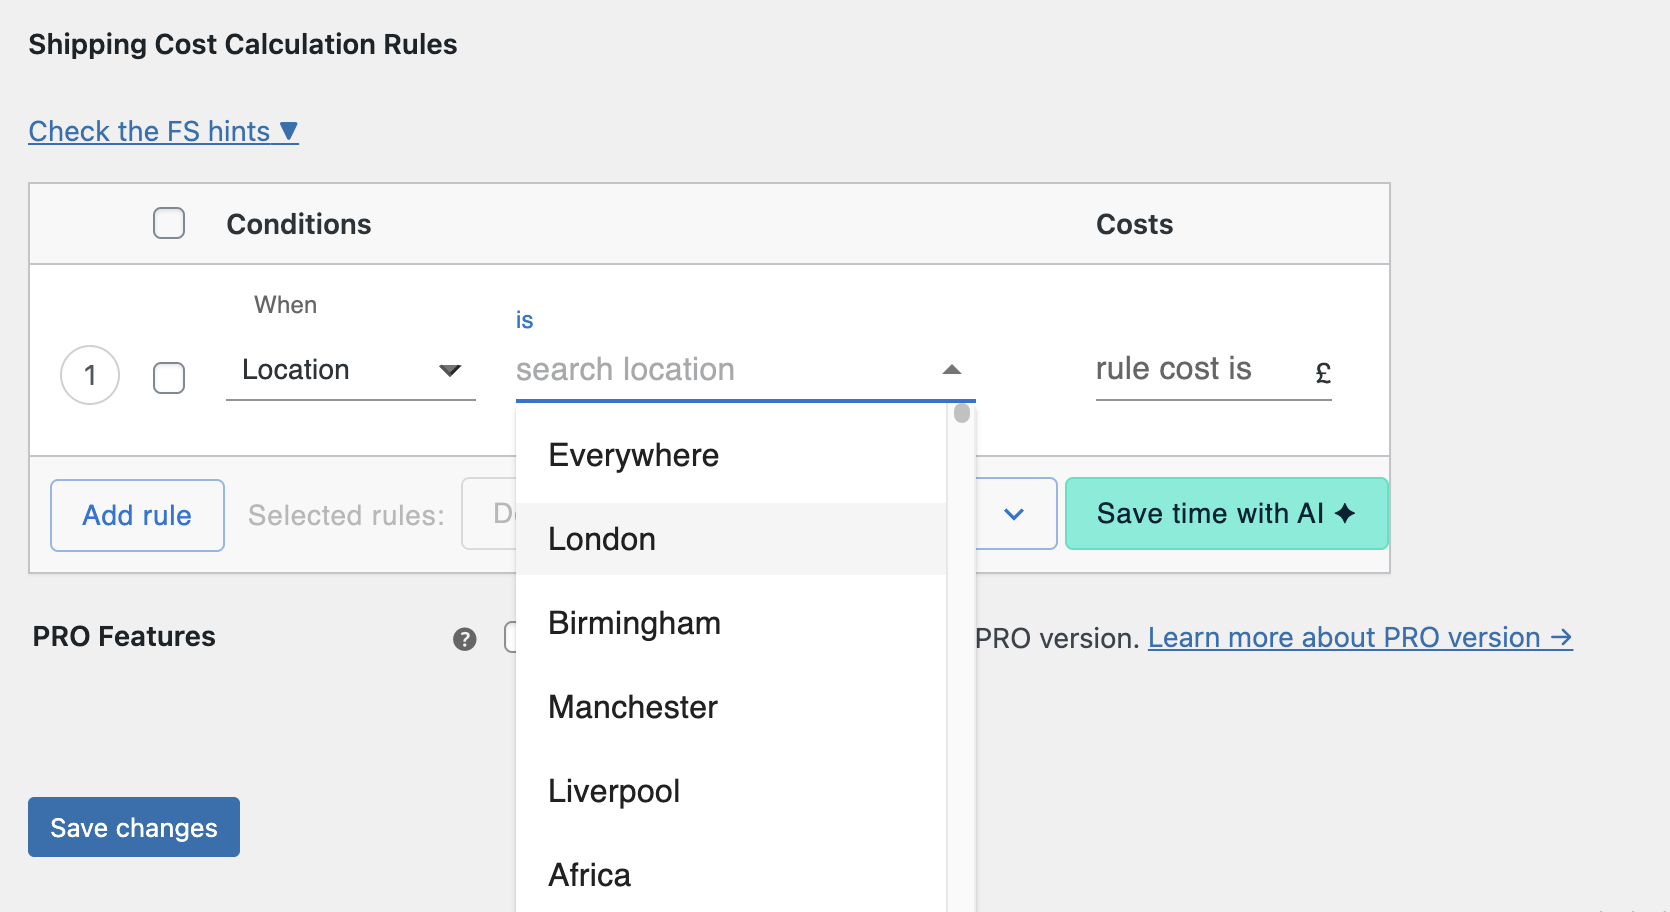
Lastly, set the shipping cost in the Costs.
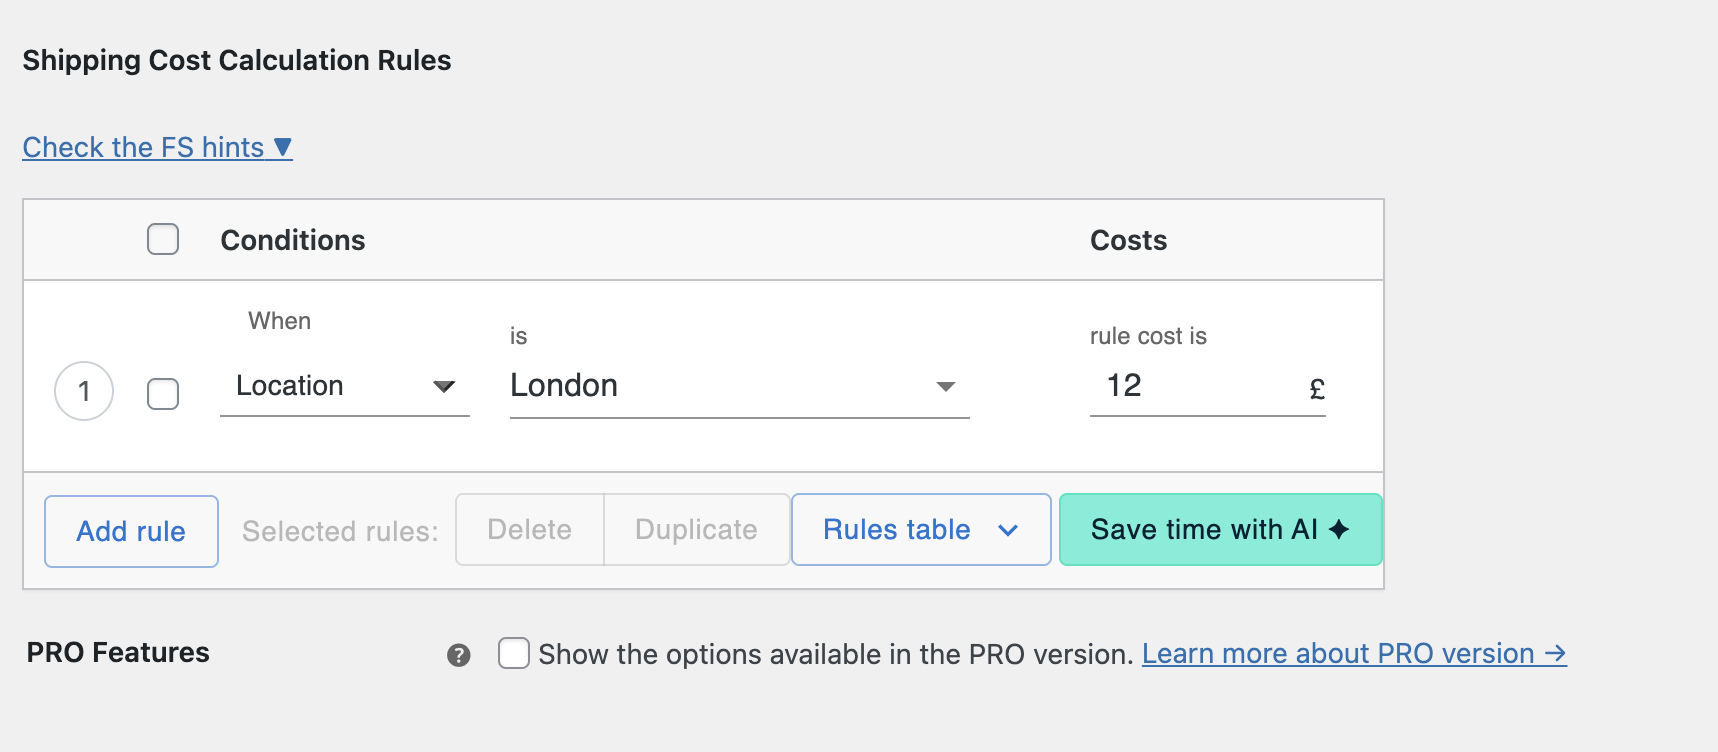
Now you can repeat this step for each of the cities you have created. In the scenario I am describing, the configuration looks like this.
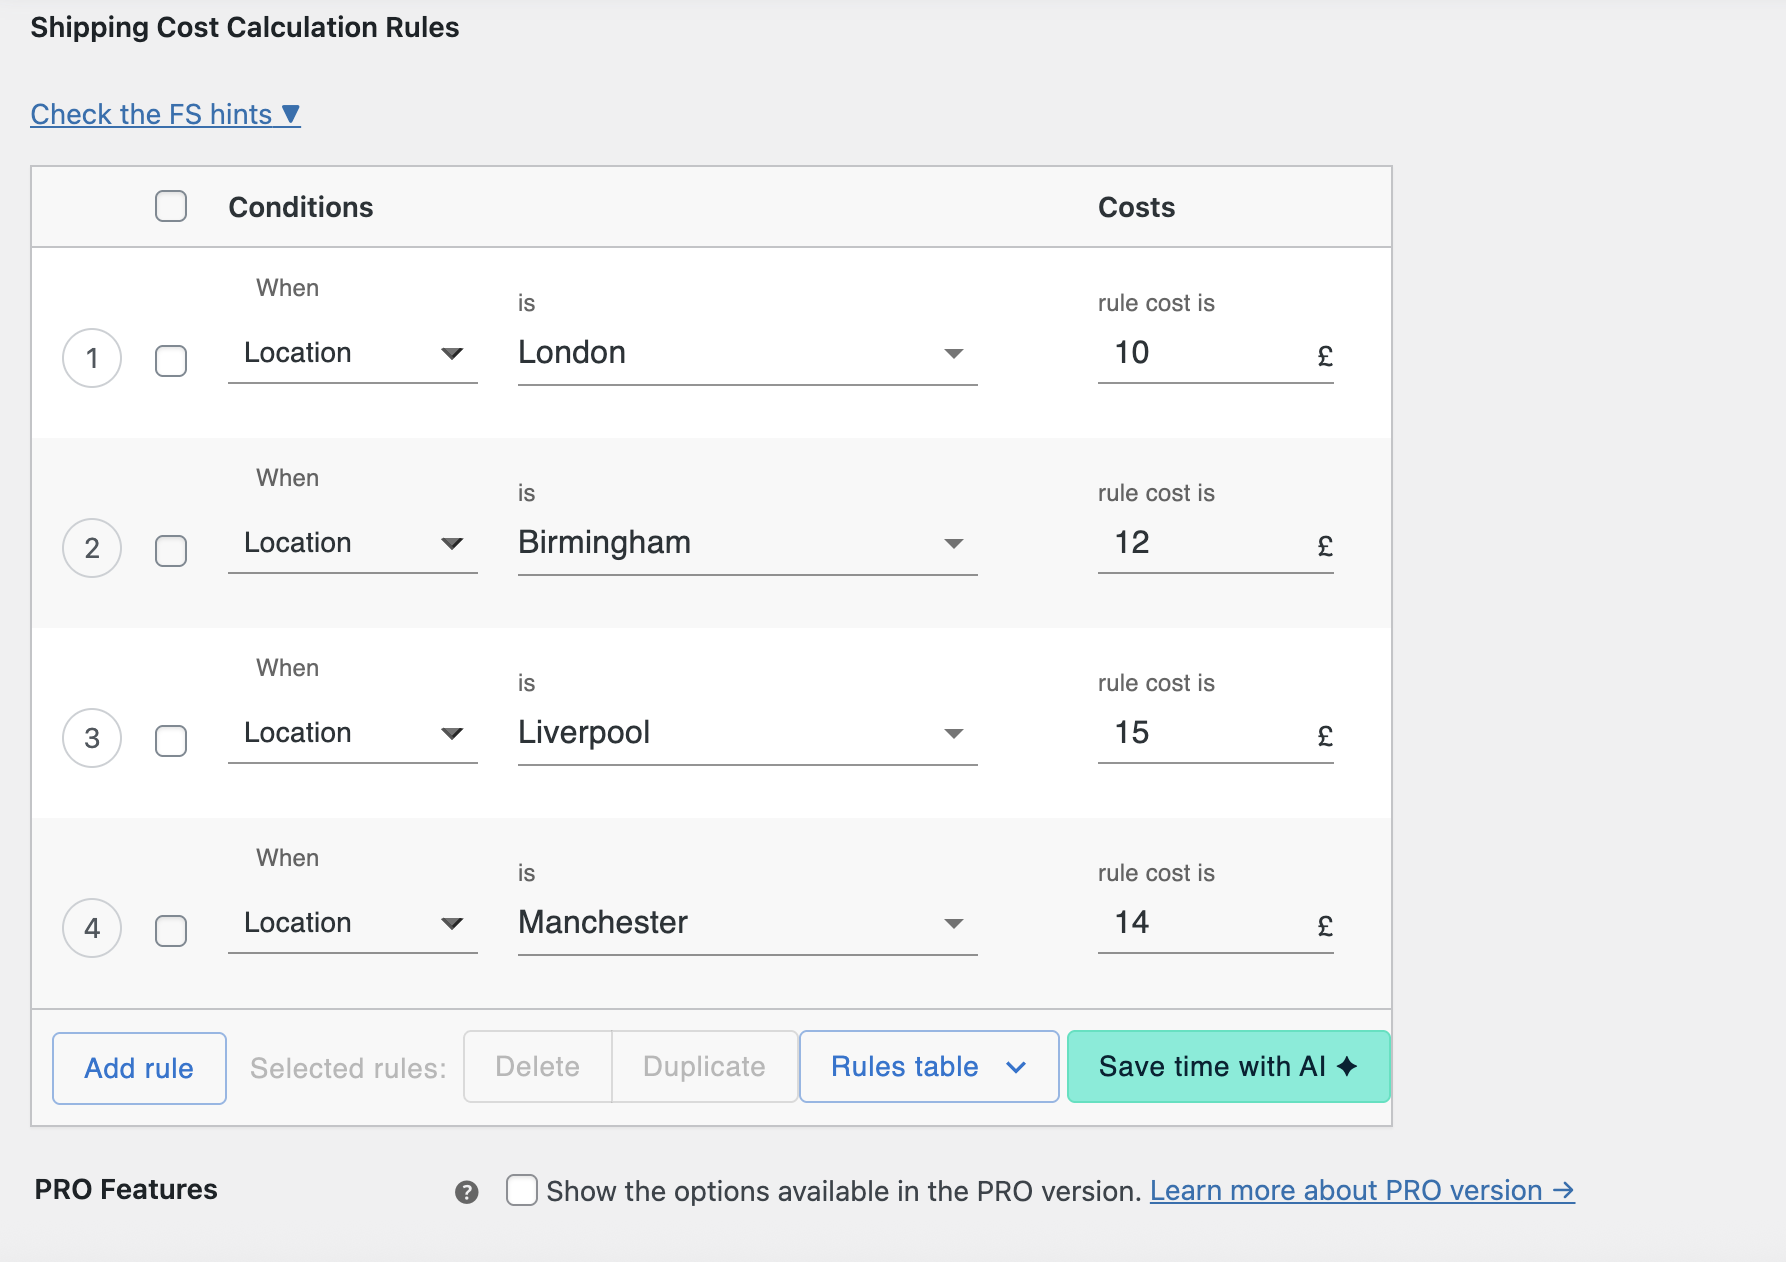
After completing the configuration, remember to save your changes. WooCommerce will now check the postcode field the customer enters when they add their shipping address. If the postcode matches one of your rules, the corresponding cost will be applied.
So if a customer enters a London postcode, they will see the £10 courier rate. If they enter a Liverpool postcode, they will see the £15 rate. There’s no switching between zones and no duplicated shipping methods. Just one clean configuration that’s easy to maintain and update.
City-based pricing in WooCommerce gives you more control, but it also requires a bit of ongoing attention. These recommendations will help you keep everything running smoothly as your store grows.
Only include locations where the delivery price is truly different. If the cost is similar across multiple areas, group them under the same price and rule. This keeps your configuration simple and easy to manage.
Fuel prices and carrier rates can change. Schedule a quarterly review to make sure your shipping fees still reflect real delivery costs. Adjusting just a few numbers can protect your margins without affecting customers elsewhere.
Customers appreciate knowing shipping costs before they reach the last step of checkout. You can:
This reduces surprises and increases trust.
If you notice a spike in abandoned carts from a specific region, it could mean your shipping cost for that city is too high. Small pricing optimizations can quickly increase conversions.
If you later expand to more cities, you can simply add new conditions in the same method. Keeping everything inside a single shipping zone means your setup grows naturally with your business, not in messy layers.
City-based shipping is not only about covering your delivery costs. Done well, it becomes a way to provide a fair, transparent experience that customers will value.
Different courier costs based on the customer’s city help you show fair, realistic delivery pricing while keeping control of your margins. Shoppers do not like surprises. Accurate pricing builds trust and keeps more customers moving through checkout. In this guide, you learned how to do this in WooCommerce without creating many separate shipping zones. By using Flexible Shipping together with Flexible Shipping Locations, you created one clean setup. Your store can now automatically show the correct delivery price depending on where your customer lives.
What you can do next:
You now have a scalable, easy-to-manage foundation that keeps both you and your customers confident during checkout.
WooCommerce does not support city-based pricing automatically inside one zone. To set different shipping rates for each city, install Flexible Shipping and the Flexible Shipping Locations add-on. Then create one shipping zone (e.g., United Kingdom) and add location-based rules using the Location condition.
A popular and beginner-friendly option is Flexible Shipping + Flexible Shipping Locations. It lets you create multiple city-specific prices inside one shipping method instead of making separate shipping zones for each city.
Yes. You can add one rule per city inside the shipping method. For example: London £10, Birmingham £12, Manchester £14. WooCommerce will show the correct cost based on the city entered at checkout.
In the Flexible Shipping Locations add-on, create a City condition matching the exact city name. The shipping method will appear only when the customer’s City field matches your rule.
Yes, but you would need a separate zone for each city. Using Flexible Shipping Locations is easier to manage because all cities stay inside one zone and one method.
Yes. Flexible Shipping allows multiple conditions per rule, so you can charge more for heavy items in certain cities while keeping lower rates elsewhere.
Yes. You can add free-shipping rules for selected cities or only when the cart meets a minimum order value.

Content Writer at Octolize
Bartosz Gajewski is a content and marketing specialist with a solid background in SEO, WordPress content strategy, and technical documentation for digital products. With years of hands-on experience in both in-house and freelance roles, he supports tech companies – especially in the SaaS and e-commerce space – by creating content that informs, engages, and drives results.
His approach blends storytelling with data-driven SEO, and he’s been involved in projects ranging from rebranding and product marketing to growth experiments and copywriting for complex software tools. On the blog, he shares actionable insights from his work across marketing teams, product documentation, and online store optimization.


The Neurodivergence Project uses the ocean and the natural world to empower neurodivergent people to build confidence, lasting friendships and help them achieve their goals.

Dominican Liturgical Center is based in Cracow and focused on promoting the learning of traditional music and singing. They also run a smaller publishing house and a webshop that is focused on selling mainly books and CDs.

Established in 2017. SGL is focused on selling gas bottles and non-gas products. Formerly, the company offered payment by card on delivery. For now, the SGL started online payments and they launched a webstore.