- Home
- WooCommerce
- What plugin are you looking for?
- Shopify
- What Do I Need?
- About us
- Blog
- Docs
- Contact us
- What can we help you with?
Adding icons to shipping options in WooCommerce may significantly enhance user experience and speed up the shopping process. This article will guide you through adding icons for WooCommerce shipping methods, helping you improve your online store’s visual appeal and professionalism.
Visual components are important in e-commerce to grab clients’ attention and improve their experience. Icons have become an essential component of user interfaces because they give consumers visual clues and make navigating easier. Moreover, many customers pay attention to the available shipping methods. Therefore, icons next to shipping methods help them identify available courier companies faster, making it easier to choose and speeding up your purchasing decision.
Enhancing Visual Appeal and Professionalism
Icons add a touch of professionalism and sophistication to your online store. They make the shipping methods visually appealing and help your store stand out.
Improving User Experience and Ease of Navigation
Icons act as visual cues, making it easier for customers to quickly identify and select the desired shipping method. This streamlines the purchasing process, reducing friction and enhancing the user experience.
Increasing Customer Trust and Confidence
Well-designed icons instil a sense of trust and confidence in customers. When they see clear and visually appealing shipping method options, they are more likely to trust your store and proceed with their purchase.
Before you proceed to add icons to your shipping method in WooCommerce, you need icons that can be displayed. How to find your shipping company’s logo? Many shipping companies provide their logos, but a good way would be to look for a suitable file through Google or aggregators of such files as WorldVectorLogo.
The file format itself is also important. The most optimal solution for a WooCommerce store is a file in SVG format. It’s better for responsive and retina-ready web logo design due to its scalability and lack of quality degradation. In addition, this provides the greatest assurance that the icon will display correctly regardless of the site format.
To add the icon to the shipping method, you can place the file on your server by adding it as Media in WordPress, the most secure solution. You can also use the file URL.
Adding icons to shipping methods is not a default functionality in WooCommerce. To achieve this, you need an additional solution. In this case, the free version of the Flexible Shipping plugin will work great. This WooCommerce shipping plugin supports the HTML tags in the Method Description field. You can use them freely, e.g., by putting the carrier company logo next to the shipping method with <img /> tag.
The best Table Rate Shipping for WooCommerce. Period. Create shipping rules based on weight, order totals, or item count.
Go to WordPress.orgorDownload for freeIn addition to the option to support HTML tags, it’s a table rate shipping plugin that allows you to add shipping rules based on weight and cart total. With over 100,000 active installs, it’s the most popular WooCommerce shipping plugin in the WordPress repository.
After you install and activate the Flexible Shipping plugin, it’s time to create a new shipping method. All you have to do is click on your shipping zone under WooCommerce → Settings → Shipping. Afterwards, choose the Add shipping method option.
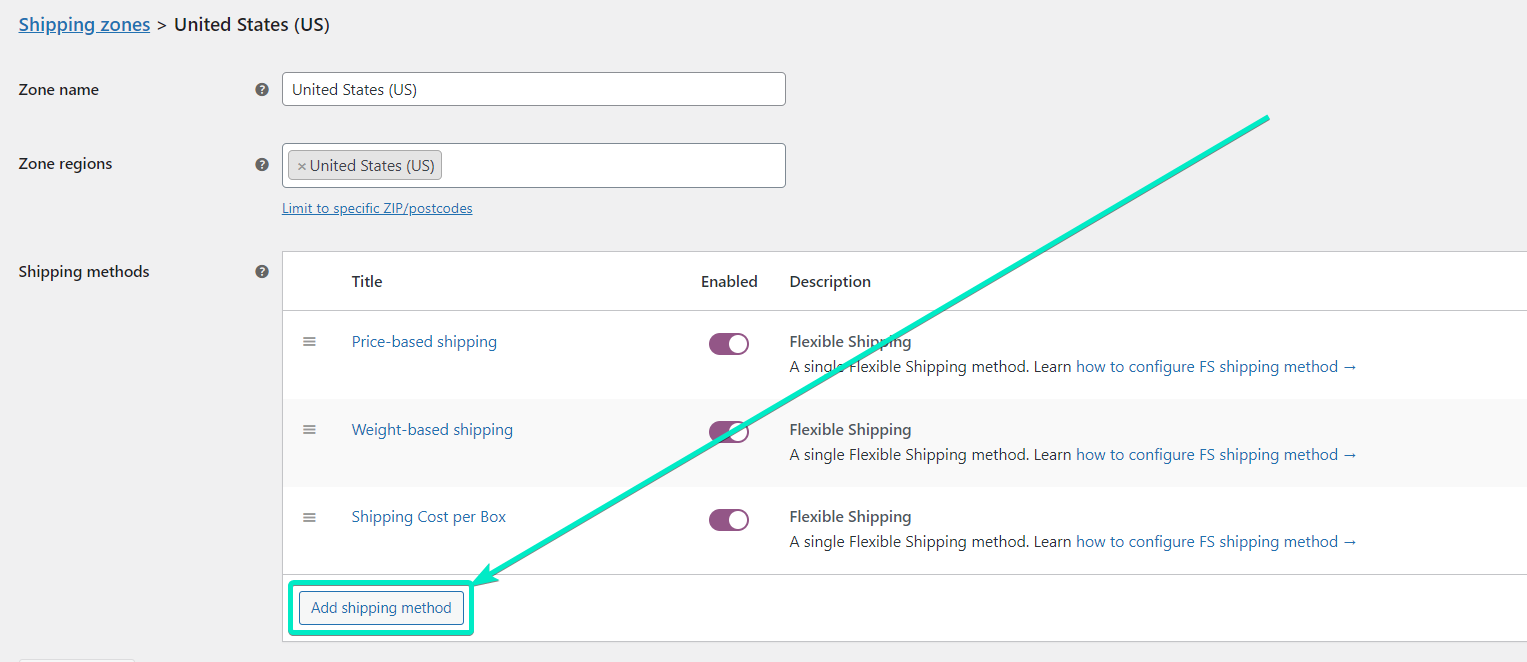
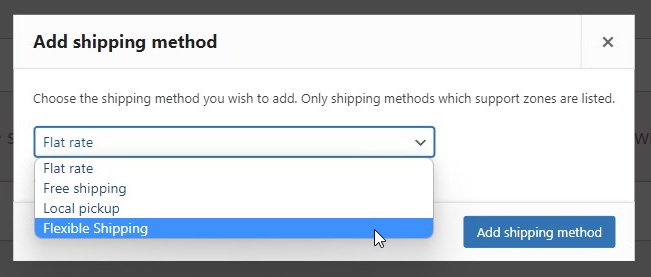
Select Flexible Shipping as your next shipment option, and then click the Add shipping method button again. It’s now time to handle the WooCommerce shipping method after adding the Flexible Shipping method.
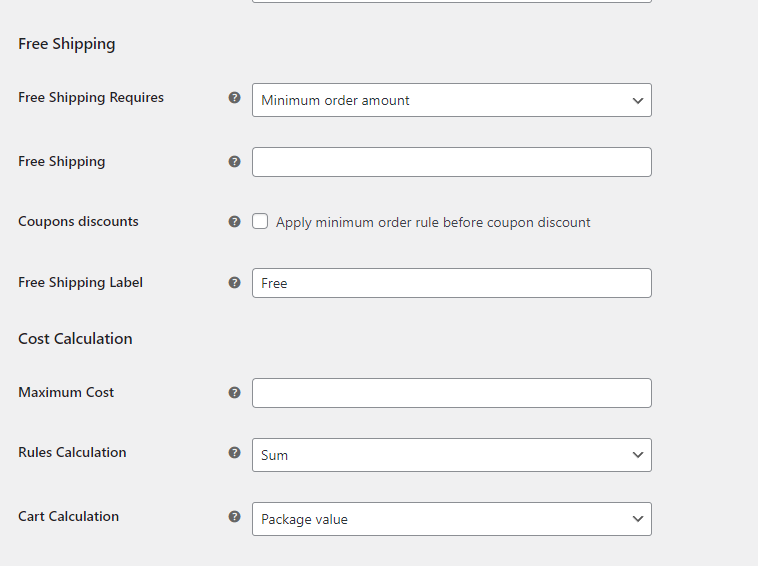
On the shipping method configuration page, you can set your shipping costs using the table rate, add free shipping or use the cost calculation method.
The most important part of configuring the shipping method when adding icons is the Method Title and Description in the General Settings section. As mentioned, the Flexible Shipping plugin supports the HTML tags in the Method Description field. And that’s where you’ll be able to add your icon.
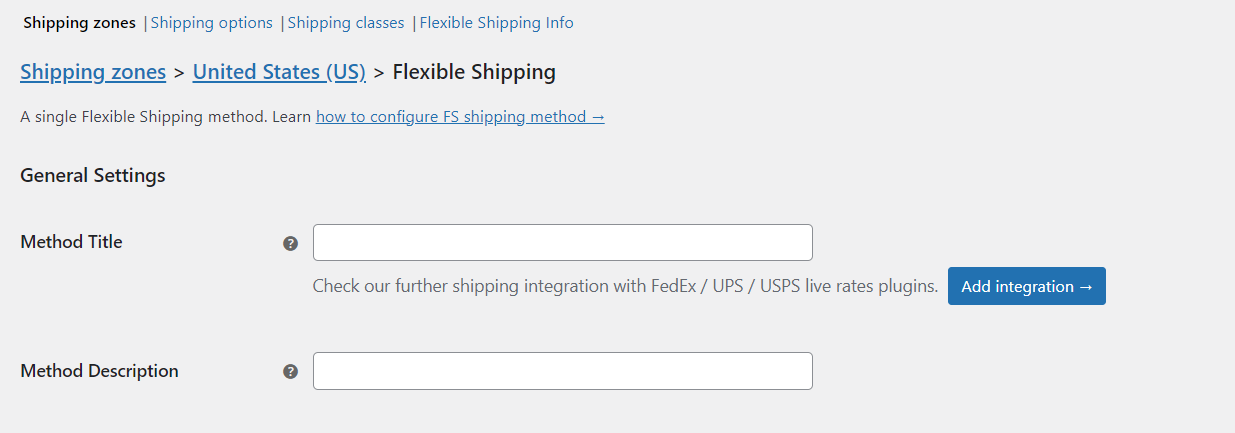
First, add Method Title, and then go to Method Description. In my case, I will specify UPS shipping as the name of the service and add the icon of this particular courier company in the description.
To add an icon, enter the HTML tag in the Method Description field: <img src= "icon-url.svg">. Instead of the icon-url.svg, put the URL of your icon file. It may be a file from your WordPress Media or a link to an external solution, just like in my example:
![]()
Ensure that the file is in the SVG format, and Save changes after the configuration.
After saving the changes, it’s time to test how the icon displays in your WooCommerce store. Note that the way it displays may vary depending on your theme. The icon next to the shipping method displays like this for the standard Storefront theme.
![]()
Adding icons to your WooCommerce shipping methods is a simple yet effective way to enhance your online store’s visual appeal, user experience, and professionalism. Following the step-by-step guide in this article, you can successfully incorporate icons into your shipping methods. Remember to choose icons that align with your branding, test their display, and troubleshoot any issues.
Our team usually replies within a few hours. Ask away — we'll help you find the right solution for your store.

Content Writer at Octolize
Bartosz Gajewski is a content and marketing specialist with a solid background in SEO, WordPress content strategy, and technical documentation for digital products. With years of hands-on experience in both in-house and freelance roles, he supports tech companies – especially in the SaaS and e-commerce space – by creating content that informs, engages, and drives results.
His approach blends storytelling with data-driven SEO, and he’s been involved in projects ranging from rebranding and product marketing to growth experiments and copywriting for complex software tools. On the blog, he shares actionable insights from his work across marketing teams, product documentation, and online store optimization.


Learn how Octolize solutions helped WooCommerce store based in the United Kingdom set up shipping scenarios.
Learn how Octolize helped Shopify store based in the USA set up distance based rates with a usage of Octolize Distance Based Rates.

Learn how Octolize helped NGO set up their WooCommerce rates with a usage of Flexible Shipping PRO.
It’s only works with old [woocommerce_checkout] shortcode.
Hi Pawel,
Make sure you have the latest version of Flexible Shipping – 6.6.0.
Let me know if you still encounter the issue.
Kind regards,
Mateusz