- Home
- WooCommerce
- What plugin are you looking for?
- Shopify
- About us
- Blog
- Docs
- Contact us
- What can we help you with?

Subscribe to our newsletter
In this article, you’ll learn how to add a tracking number to WooCommerce orders. Furthermore, you will know how to send tracking details to customers automatically, and display tracking information at the right moment. I’ll also show you why offering tracking information is critical for customer satisfaction. Moreover, how it can give your store a competitive edge.
Shipping tracking is a method e-commerce businesses use to keep tabs on the whereabouts of shipped goods until they reach the customer. For the customer, a tracking number is a tool to estimate the arrival of their purchase and the ability to monitor its journey. Providing shipping tracking numbers benefits businesses by enhancing customer satisfaction and increasing transparency. It also streamlines potential disputes by providing clear evidence of shipment and delivery.
Let’s be honest – providing a shipping tracking number in WooCommerce is not a nice-to-have feature. You have to meet modern customer expectations. According to research from Verte, a staggering 91 % of consumers actively track their packages, with 39 % checking updates at least once a day, and 19 % tracking them multiple times daily. These numbers reflect a clear shift toward hyper‑visibility in the shipping experience. It’s an expectation you have to meet if you want the customer to return.
The same study found that 70 % of consumers prefer to self-track their order status, rather than contacting customer support when there’s a delay. This means that if your WooCommerce store doesn’t offer easy access to tracking information, you risk not only frustrating buyers but also increasing support ticket load. And this, as you are probably well aware, causes additional costs.
Consumers have grown less tolerant of shipping delays: 58 % consider a delay of two to six days unacceptable, and 21 % expect shipments to arrive within one day of the promised delivery date. This sets a high bar for communication and reliability. A very effective solution is just to share tracking numbers, which gives a complete picture to the customer about his situation.
Integrating a reliable tracking system into your WooCommerce store reduces customer anxiety and boosts trust and brand reputation. It demonstrates professionalism and transparency, while freeing your support team from repetitive order-status inquiries. Ultimately, this leads to higher customer satisfaction, fewer support tickets, and stronger repeat purchase behavior.
![]()
By offering real-time tracking via built-in features or plugins, you’re aligning with consumer demands for transparency and control. It transforms a basic feature into a competitive advantage. Although these days, it means that if you don’t have this functionality then you stand apart from the competition.
There are several ways to provide a shipping tracking number to customers in WooCommerce. I will describe both manual shipping and automatic setup. For automatic shipping tracking number, I will show two examples using reliable plugins.
WooCommerce allows manually adding tracking numbers. After fulfilling an order, you can add a note to the order with the tracking number and mark it as customer-visible. Then, manually email this information to the customer. Some stores do it in such a way that after manually creating a shipment in the courier company’s application. They email their customer with information about the shipment creation and a link to track the shipment.
However, that solution has several significant drawbacks:
However, all this can be reduced – by integrating your WooCommerce store with a courier company. This way, you can create shipments automatically or manually, but directly from your WooCommerce panel, and automatically add a tracking link to your order email. I’ll show how to do it using the examples of two very popular courier companies: UPS and DPD UK.
The best way to provide a shipping tracking number to your customers in WooCommerce is by using a reliable WooCommerce shipment tracking plugin. You will find many such solutions on the market. In most cases, you will find them under the name shipping integration for a specific courier company. In this article, I will show you how to do it using our plugins: DPD UK & DPD Local WooCommerce and UPS WooCommerce Labels and Tracking.
To provide UPS tracking number to your clients automatically, you’ll need a proper plugin like UPS WooCommerce Labels and Tracking. This plugin does exactly what its name implies – it allows you to create UPS shipping labels directly from the WooCommerce admin panel and WooCommerce UPS shipment tracking by the store admin and their customers. One of the most amazing features of this plugin is the shipment tracking. You can share live UPS shipment tracking updates with your customers via email.
Create the shipments, generate the printable UPS shipping labels for the placed orders and track the parcels directly from your WooCommerce shop.
View Details or Add to cartIf you have the UPS WooCommerce Labels and Tracking plugin installed and active, let’s move on. I will try to walk you through the process step by step.
Before you can enable a WooCommerce UPS shipment tracking, you must properly configure the plugin. In the case of UPS WooCommerce Labels and Tracking plugin, it is effortless. You have to provide your UPS API credentials. To reach the plugin General settings, go to WooCommerce → Settings → Shipping → UPS Labels. To connect your WooCommerce store with the UPS API, you have to enter Client ID, Client Secret, and UPS Account Number in the appropriate fields.
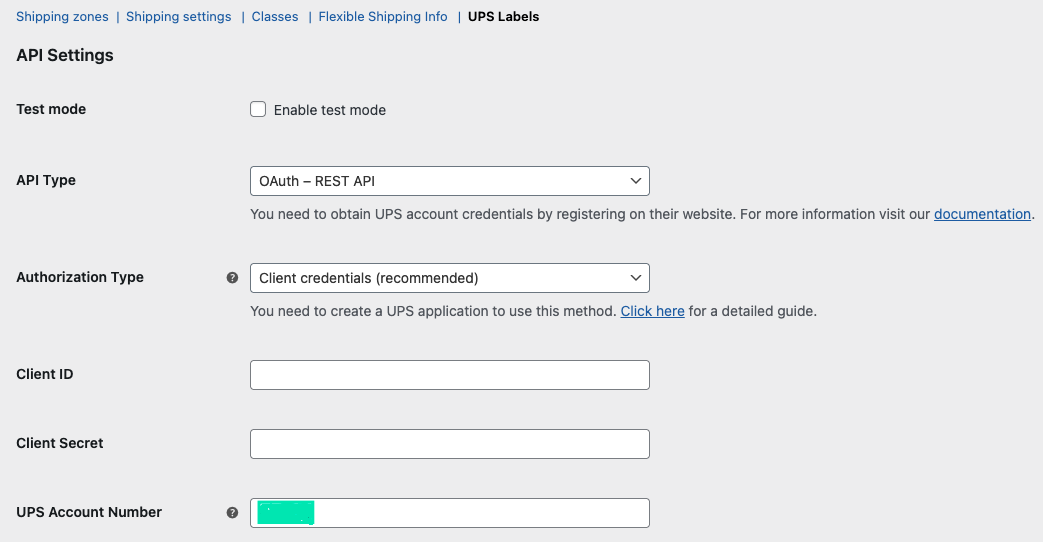
Once you have completed all fields, save your changes. If all the entered data is correct, you will get the message Connected in the API connection status field, as shown in the image above.
Now the most important thing. As I promised, to enable UPS Shipment Tracking in WooCommerce you only need one click, basically checking one checkbox. Under the API Setting, you’ll find the Advanced Options. There, you have the Tracking number checkbox. Just check it to add UPS parcel number with tracking link to WooCommerce transactional emails and order details. Remember to save the changes!
![]()
Once the plugin is configured, we can proceed to create UPS shipments. I described exactly how to do this in an article on how to create and print UPS Shipping Labels in WooCommerce.
These settings will ensure that the parcel tracking link will be added to the WooCommerce transactional emails sent to your customers once their order is shipped. This should have a positive impact on the customer experience in your WooCommerce store. I hope this small element will boost your sales.
To provide DPD UK tracking number to your clients automatically, you’ll need a proper shipping plugin like WooCommerce DPD UK & DPD Local shipping plugin. It’s the easiest and fastest solution.
This WooCommerce shipping plugin allows you to create the shipments, generate the printable DPD UK shipping labels for the placed orders. Furthermore, it tracks the parcels directly from your WooCommerce shop. Basically, this is one complete solution for DPD UK & DPD Local fulfillment in your WooCommerce store.
Ship your DPD orders faster. Automatically collect shipping details, download printable shipping labels, and track parcels.
View Details or Add to cartFirst, go to plugin settings: WooCommerce > Settings > Shipping > DPD UK.
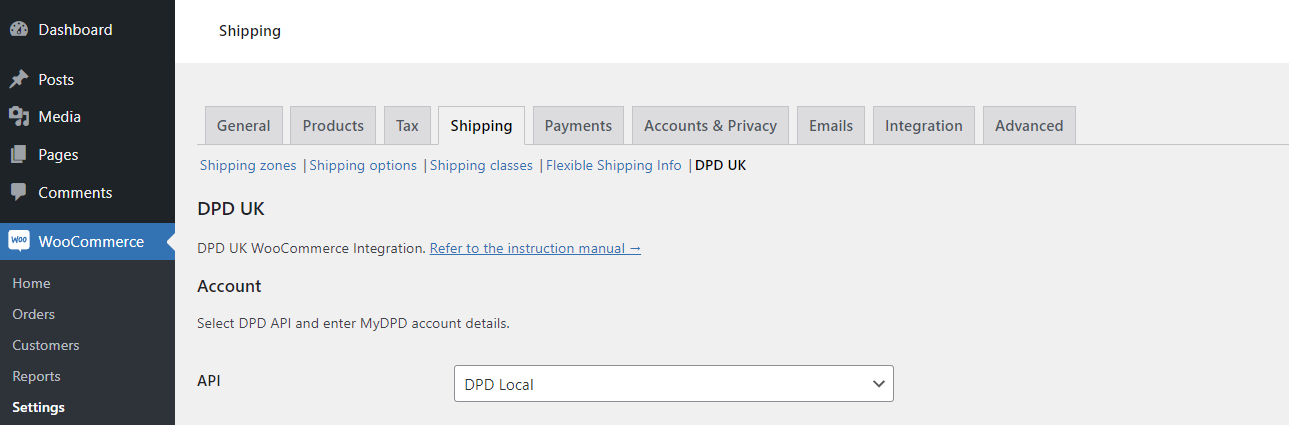
Then activate tracking numbers in customer emails in the WooCommerce DPD settings and save changes.

When you create a shipment and change the order status, WooCommerce will send an email notification to the customer. He will see his tracking number below the order details table.
In this way, he will be able to check the status of his DPD shipment very easily.
If I could put it in one sentence, it would be: Deliver more than just a number. Effective shipment tracking in WooCommerce is about providing a seamless post-purchase experience that builds trust and keeps your customers informed, reducing “Where is my order?” inquiries and improving satisfaction.
Here are key practices to follow:
Integrating a tracking code in WooCommerce is straightforward with the right plugin. Once you’ve installed a WooCommerce shipment tracking plugin like UPS WooCommerce Labels and Tracking, you’ll be provided with options to input or auto-generate tracking codes for each order.
The beauty of the WooCommerce order tracking feature is its seamless integration with email notifications. Once set up, tracking numbers are automatically embedded into confirmation emails, ensuring customers always have access to their shipment details. Most WooCommerce tracking plugins integrate directly with email templates. Once the number is assigned to the order, it’s automatically inserted into the “Order Completed” or “Shipped” emails. Customers can then click the tracking link to view the shipment progress instantly.
Depending on your chosen shipping method and plugin, the WooCommerce tracking number can either be auto-generated or manually inputted. The key is to ensure that each order has a unique tracking number for accurate monitoring. The process depends on your carrier and plugin. If you’re using integrations with carriers like DHL or UPS, the tracking number is auto-generated and added to the order. If not, you can manually add it while fulfilling the order in WooCommerce.
It’s the small details that often make the most significant difference. Providing reliable shipment tracking is one such detail that can greatly enhance customer trust and satisfaction. By leveraging the power of WooCommerce shipping plugins, you can offer an unparalleled shopping experience, ensuring customer loyalty and repeat business.
Ready to upgrade your shipping experience? Start with a WooCommerce shipping tracking plugin and give your customers what they’re looking for.

Content Writer at Octolize
Bartosz Gajewski is a content and marketing specialist with a solid background in SEO, WordPress content strategy, and technical documentation for digital products. With years of hands-on experience in both in-house and freelance roles, he supports tech companies – especially in the SaaS and e-commerce space – by creating content that informs, engages, and drives results.
His approach blends storytelling with data-driven SEO, and he’s been involved in projects ranging from rebranding and product marketing to growth experiments and copywriting for complex software tools. On the blog, he shares actionable insights from his work across marketing teams, product documentation, and online store optimization.


The Neurodivergence Project uses the ocean and the natural world to empower neurodivergent people to build confidence, lasting friendships and help them achieve their goals.

Dominican Liturgical Center is based in Cracow and focused on promoting the learning of traditional music and singing. They also run a smaller publishing house and a webshop that is focused on selling mainly books and CDs.

Established in 2017. SGL is focused on selling gas bottles and non-gas products. Formerly, the company offered payment by card on delivery. For now, the SGL started online payments and they launched a webstore.