
- Home
- WooCommerce
- What plugin are you looking for?
- Shopify
- Find my product
- About us
- Blog
- Docs
- Contact us
- What can we help you with?

Shipping is the part of a WooCommerce store that works fine until it doesn’t. At twenty orders a week, one person can read the order screen, copy an address into a courier portal, print a slip, and move on. At two hundred orders a day, that same routine turns into a morning of tab-switching, re-typed addresses, mismatched tracking numbers, and a support inbox filling up with customers asking where their parcel is.
The problem is rarely the carrier. It is the gap between the data WooCommerce holds and the systems that actually move the box. Every time someone bridges that gap by hand, the store pays for it twice: once in time, and again in the errors that come back as reshipments and refunds.
This article walks through the shipping workflow as it actually runs in a WooCommerce store, from the moment an order is placed to the moment the parcel leaves the building. Each stage looks at what usually breaks, what to configure in core WooCommerce first, and which plugins are worth adding when the native setup runs out of road. Some of the tools mentioned are built by WebToffee, some by other developers. What matters about each one is what it removes from someone’s day.
Most stores try to fix shipping by adding a tool at the point where the pain is loudest, usually label printing. That rarely helps for long, because the delay upstream simply moves downstream. A bad address does not become a problem at the label stage; it becomes visible there.
So start by drawing the path an order actually takes. In a typical WooCommerce store, it passes through seven stages, and three of them change hands: from the website to the person packing, from the packer to the carrier, and from the carrier back to the customer. Handoffs are where data gets re-typed, and re-typing is where the time and the errors live.
Once the stages are written down, audit each one with a single question: what does a person have to do here that the system already knows? If the answer is “copy something”, that step is a candidate for automation. If the answer is “decide something”, leave it alone and make the decision easier instead.
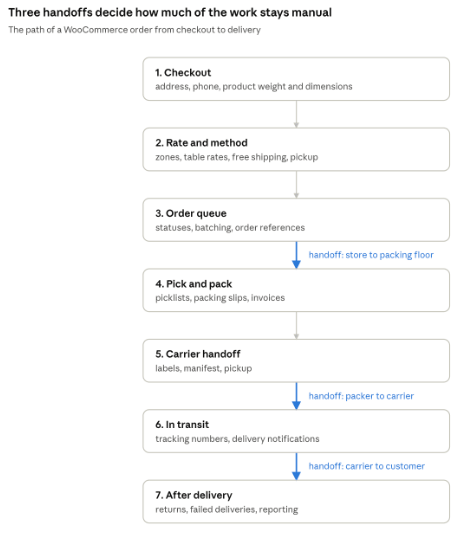
order path · 7 stages, 3 handoffs
The three marked arrows are the points where order data crosses into another system or another pair of hands. Those are the places worth automating first.
A shipping workflow can only be as clean as the data the checkout collects. Two kinds of data matter here, and stores usually neglect the second one.
The first is the customer’s address. Free-text address fields invite typos, missing apartment numbers, and postcodes that belong to a different city. Couriers either reject these at manifest time or, worse, accept them and fail the delivery three days later. Address autocomplete solves most of it by replacing typing with selection: WooCommerce’s own Google Autofill Customer Addresses extension fills city, state, and postcode from a verified suggestion, and several third-party alternatives do the same against carrier address databases. Whichever you pick, make the phone number a required field. Most courier APIs will not accept a shipment without one, and most last-mile drivers will not attempt a delivery without calling first.
The second is product data: weight, dimensions, and shipping class. These are optional in WooCommerce, so they quietly go unfilled, and then live carrier rates come back wrong or not at all. Auditing them one product at a time is unrealistic past a few hundred SKUs. The practical route is a spreadsheet round trip: export the catalogue, sort by empty weight column, fill the gaps, and import it back. WebToffee’s Product Import Export Plugin for WooCommerce handles that cycle with column mapping, so you can update only weight, dimensions, and shipping class without touching prices or descriptions. The same file can assign shipping classes in bulk, which is what makes the rate rules in the next stage possible.
It is worth doing this audit before peak season rather than during it. A missing weight on a slow-moving SKU costs nothing until the day it sells forty units.
WooCommerce ships with shipping zones, flat rate, free shipping, and local pickup. For a single-country store selling similar-sized products, that is genuinely enough. The setup starts to strain when the cost of a parcel depends on something the core methods cannot see, such as combined cart weight, destination distance, or a mix of oversized and small items in one box.
That is the point of adding rate rules rather than flat rates. Flexible Shipping by Octolize is the usual first stop, with a free version that calculates cost from cart weight or order value and over 100,000 active installations. WooCommerce’s own Table Rate Shipping extension covers similar ground with rate tables per zone and conditions on weight, item count, price, and shipping class. Live carrier rates are the other option, pulling real prices from the courier at checkout, though they only work as well as the weights and dimensions you cleaned up in the previous stage.
WooCommerce gives you Processing and Completion. A warehouse needs more resolution than that, because “Processing” covers an order that was paid two minutes ago, one that is waiting on stock, one that is packed and sitting by the door, and one that went out yesterday but nobody marked. When every order looks the same, someone has to remember the difference.
Custom statuses fix this cheaply. Adding states such as Packed, Awaiting Stock, and Ready for Dispatch turns the orders list into a filterable queue, and plugins like zorem’s Advanced Order Status Manager let you create them without code, each with its own colour and its own customer email. The discipline that matters is keeping the list short: a status nobody updates is worse than no status at all, because it makes the screen lie.
Order references are the other quiet friction point here. WooCommerce numbers orders by internal post ID, so your sequence has gaps and jumps that make no sense to a courier agent on the phone or an accountant reconciling a manifest. Sequential Order Numbers for WooCommerce applies a continuous, prefixed format, which is worth doing before you start exchanging order lists with anyone outside the store.
And for stores that already work in batches, the fastest improvement is usually bulk movement of data rather than better screens. Exporting the day’s unfulfilled orders as a CSV for a 3PL, then importing the returned file to write tracking numbers and move statuses, replaces an hour of copy-paste with two scheduled jobs. Order, Coupon, Subscription Export Import for WooCommerce supports filtered exports by status and date, saved column mappings, and scheduled runs over FTP, which is what makes an unattended handoff possible. Stores that also move product and customer data regularly tend to end up on the broader Import Export Suite instead, because one mapping tool is easier to maintain than four.
The packing bench runs on documents, and most stores produce them one order at a time from the order screen. That is the single most repetitive task in the whole workflow, and it is also the easiest to batch.
It helps to be precise about what each document is for, because the terms get used interchangeably and then the wrong one gets printed.
| Document | What it carries | Where it goes |
|---|---|---|
| Invoice | Line items, taxes, totals, legal seller details | Customer, accounts |
| Proforma invoice | The same detail before payment is settled | B2B buyer, customs |
| Picklist | Items and bin locations, often merged across orders | Picker, warehouse floor |
| Packing slip | Contents of this parcel, no prices | Inside the box |
| Delivery note | Confirmation of what was dispatched | Inside the box or to the receiver |
| Shipping or dispatch label | Addresses, order reference, barcode | Outside of the box |
| Address label | Sender, recipient, or return address alone | Outside of the box |
Two refinements are worth knowing about. The QR Code Add-on encodes the order and invoice number on the document, so the packing bench can scan rather than read a number aloud, and several countries now expect a QR code on compliant invoices anyway. The Customizer for WooCommerce PDF Invoices is for the case where the default template does not match what your finance team or your market requires, with a drag-and-drop editor instead of template overrides in a child theme. Stores selling B2B or across borders often add proforma invoices to the same stack, since buyers frequently need the document before they can raise a purchase order.
One honest caveat: a PDF shipping label generated from your store is not the same thing as a carrier label. It carries your addresses and order reference, which is enough for in-house delivery, a local courier who manifests separately, or a dispatch note on a box. A label with a trackable carrier barcode has to come from the carrier, which is the next stage.
This is the handoff where most of the remaining manual work lives. There are three realistic routes out of WooCommerce, and the right one depends less on your order volume than on who you ship with.
The first is a shipping platform that sits between your store and several carriers. ShipStation, Shippo, Sendcloud, and regional equivalents such as Shiprocket pull orders in, buy labels at negotiated rates, print them in batches, and push tracking numbers back. The official ShipStation for WooCommerce connector is free and maps your order statuses to its own, which is the integration worth testing first if you already use the platform. The appeal of this route is that carrier choice becomes a per-order decision made at the label screen rather than a plugin you have to replace.
The second is a direct carrier plugin, one per courier, generating that carrier’s labels and manifests from inside WooCommerce. This suits stores with one dominant courier and a negotiated contract. It keeps everything in one admin, but each carrier is a separate plugin to maintain, and that cost grows faster than most stores expect.
The third is a file exchange, which is still how a large share of 3PLs and regional couriers work. You send a daily order file, they send back a file of tracking numbers. This gets a bad reputation because people do it by hand, not because the method is weak. Run on a schedule with saved column mappings, it is reliable and carrier-agnostic. The Order, Coupon, Subscription Export Import plugin mentioned earlier covers both directions: an automated export of orders in a chosen status, mapped to whatever column names the warehouse expects, and an import that writes tracking numbers and moves orders to the next status in bulk.
Whichever route you take, settle one question explicitly: which system is the source of truth for the fulfillment state. When both WooCommerce and a shipping platform think they own the order status, you get orders marked complete that were never packed, and the only way to find them is a customer complaint.
“Where is my order?” is the most common support ticket in ecommerce, and it is almost entirely self-inflicted. Customers ask because nothing told them. Every answered WISMO email costs a few minutes that the store never planned for, and the fix is cheap compared to the volume.
The baseline is a tracking number attached to the order and surfaced in three places: the shipped or completed email, the customer’s account page, and any order status page you run. Advanced Shipment Tracking for WooCommerce by zorem does this in its free version, with a carrier list, a tracking widget in emails, and bulk tracking upload by CSV. Its paid tier, paired with the TrackShip service, goes further and monitors the shipment itself, so an order can move to Delivered without anyone touching it and a delayed parcel can trigger a message before the customer notices.
Two additions earn their place for stores shipping to mobile-first markets. SMS or WhatsApp notifications get read where email does not, and a dispatch message with a tracking link removes most of the remaining queries. And since customers frequently want the invoice at the same moment, attaching it to the dispatch email rather than making them log in removes another small friction point. The WebToffee PDF invoices & Packing Slips for WooCommerce plugin includes documents in specific order emails by status, so the invoice can ride along with the shipping confirmation instead of arriving separately.
The part most stores skip is setting expectations before the order is placed. A dispatch cut-off time on the product page, an honest delivery estimate at checkout, and a note about what happens on weekends will prevent more tickets than any notification you send afterwards.
A streamlined workflow is one that handles the exceptions too, and shipping produces a steady supply of them: refused parcels, undeliverable addresses, items that arrive damaged, and buyers who simply change their minds.
Give failures a home in the system. A return-to-origin status, a rule about who checks it daily, and a defined path back to restock or refund will stop these orders from drifting. Without that, they sit in Processing for weeks and quietly corrupt both your inventory counts and your fulfilment metrics.
Returns themselves are partly a legal question. Stores selling to EU consumers have to honour a 14-day right of withdrawal and make the process easy to use; WebToffee’s EU Order Withdrawal Button for WooCommerce adds a compliant button on the customer’s side and handles the request end to end on the admin side, with automatic approval, refund, and restocking where you want it. Whatever route you take, the paperwork needs to match: a refund should produce a credit note, which the invoice plugin generates against the original document rather than leaving you to write one by hand.
Finally, measure the thing. Most stores know their shipping costs in aggregate and almost nothing at the level where decisions get made. Export a few months of orders with shipping method, cost charged, destination, and weight, then look at four numbers: shipping revenue against shipping spend by zone, average time from payment to dispatch, the share of orders that failed delivery on the first attempt, and the proportion of support tickets about delivery. Those four will tell you whether the next change should be a rate rule, a carrier, a packing process, or a notification.
For a store doing somewhere between 100 and 300 orders a day with a two-person packing team, a streamlined routine usually settles into something like this.
The detail worth noticing is that no step involves opening an individual order. Once that is true, the volume can roughly double before anyone needs to be hired.
Streamlining WooCommerce shipping is less about finding one powerful plugin than about removing the places where a person has to carry data from one system to another. The order already knows the address, the weight, the contents, and the destination. Every manual step exists because something in the chain cannot read what the order already holds.
If you are starting from a fully manual process, the order of work that tends to pay back fastest is: clean the address and product data first, batch the documents second, automate the carrier handoff third, and add tracking notifications fourth. Measurement comes last only because it needs a stable process to measure. Each step is small enough to finish in a day, and each one makes the next easier.




Learn how Octolize helped Kurzgesagt, the online shop behind one of YouTube’s most popular science channels, set up conditional courier rules using the Shopify Shipping Rates Rules & Zones app.

Learn how Octolize solutions helped WooCommerce store based in the United Kingdom set up shipping scenarios.
Learn how Octolize helped Shopify store based in the USA set up distance based rates with a usage of Octolize Distance Based Rates.
 Pickup Points
