- Home
- WooCommerce
- What plugin are you looking for?
- Shopify
- About us
- Blog
- Docs
- Contact us
- What can we help you with?
🚀 Ready to optimize your WooCommerce & Shopify shipping setup? Get FREE early access →

Subscribe to our newsletter

The most common ways to determine shipping costs in e-commerce stores are by weight, price, and quantity. However, in some cases this is not enough and it is best to determine shipping costs based on product categories or even specific products. If you’re looking to implement WooCommerce shipping by product category, this guide will show you all the necessary steps using real-world examples.
Let’s start with the basics by answering the question: what are product categories in WooCommerce?
WooCommerce product categories are used to divide the products available in the e-commerce store. Usually they are grouped by similar features. The division into categories allows customers to easier find what they are looking for, and additionally allow them to browse the store for additional promotions. They’re also incredibly useful for store owners to section, promote and streamline their products for a better customer experience.

The product categories also have endless uses which can not only help you save time but make more sales too. Besides separating products and displaying them in your WooCommerce store, product categories can also work great for determining costs for shipping products. The most common way to do this is with shipping class, but product categories will work well too. What’s more, if you have many products in your store and your shipping scenario is not complicated, shipping based on product category will be a much easier solution to implement. Many online stores sell products that vary significantly in size, weight, or delivery method. Think of a store selling both books and furniture — shipping costs should differ based on product categories. That’s why configuring WooCommerce shipping by product category is essential for offering fair pricing and maintaining profitability.
Similar to categories on your posts on WordPress, you can add, delete, and edit product categories. Creating a product category in WooCommerce is not a complicated operation, but I’ll walk you through it step-by-step.
Follow our step-by-step configuration video guide to set up product-based shipping conditions in minutes:

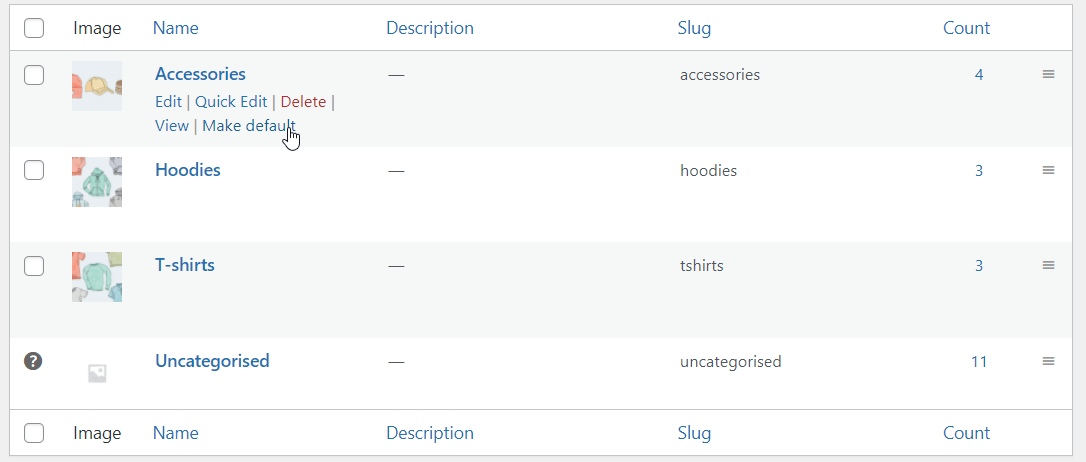
1. Go to the Products > Categories from your WordPress dashboard. On the right side, you’ll see all the categories that were previously added. On the left side, you’ll have the fields to create a product category in WooCommerce.
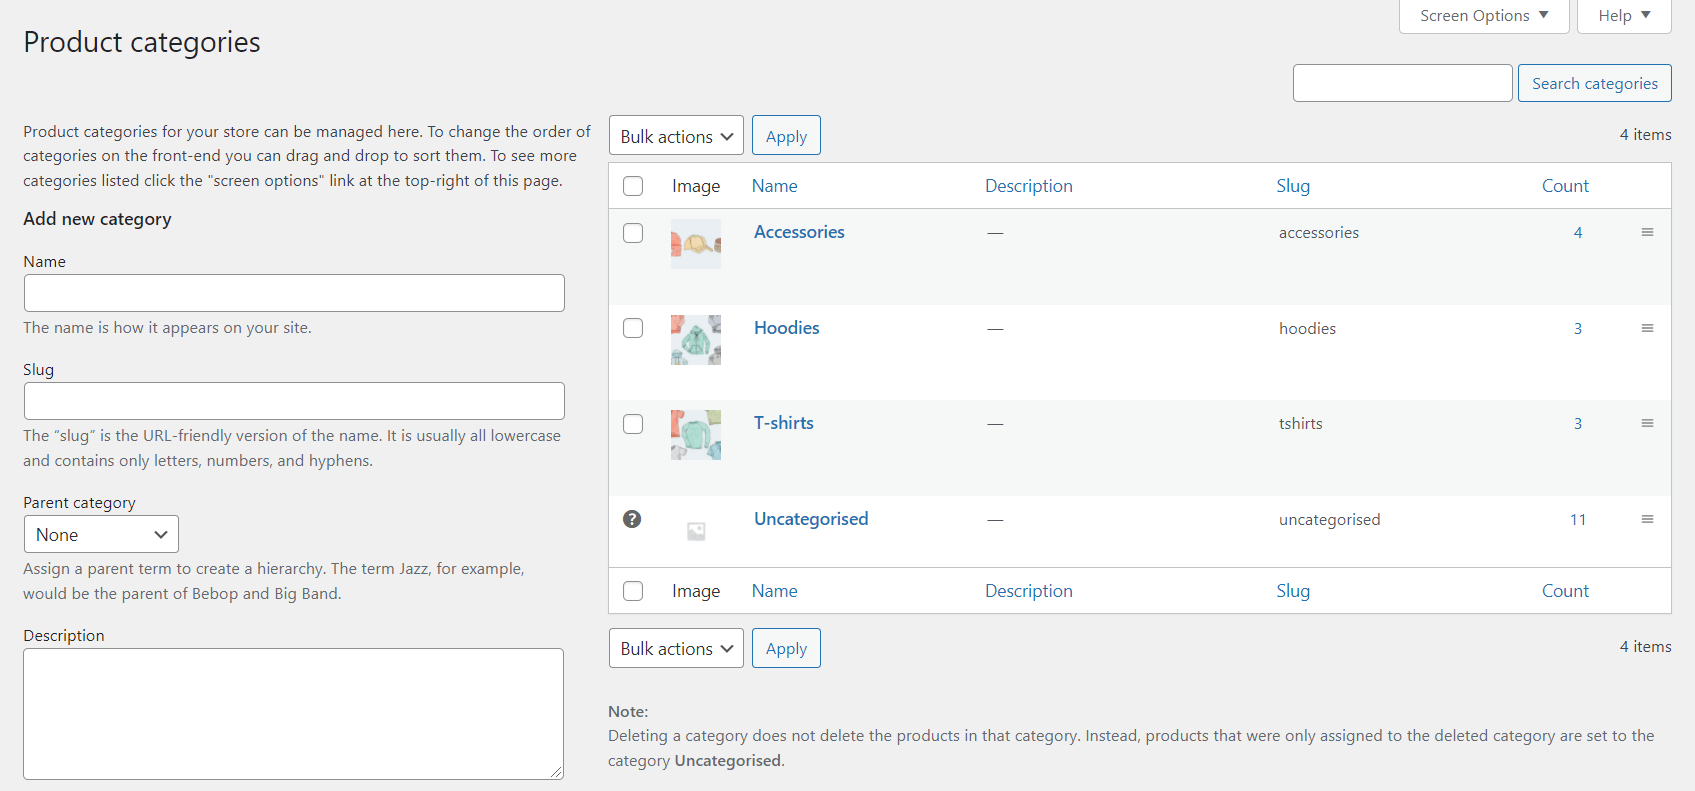
2. Add a Name for your category. It’s very important that it describes the product group for your customers.
3. Add a Slug (optional). This is the URL-friendly version of the name. If you leave this field empty, a slug will be automatically created from the name of your product category.
4. Select a Parent if this is a subcategory.
5. Enter a Description if you want your customers to have a better understanding of the category. Remember, that it’s displayed only by some themes.
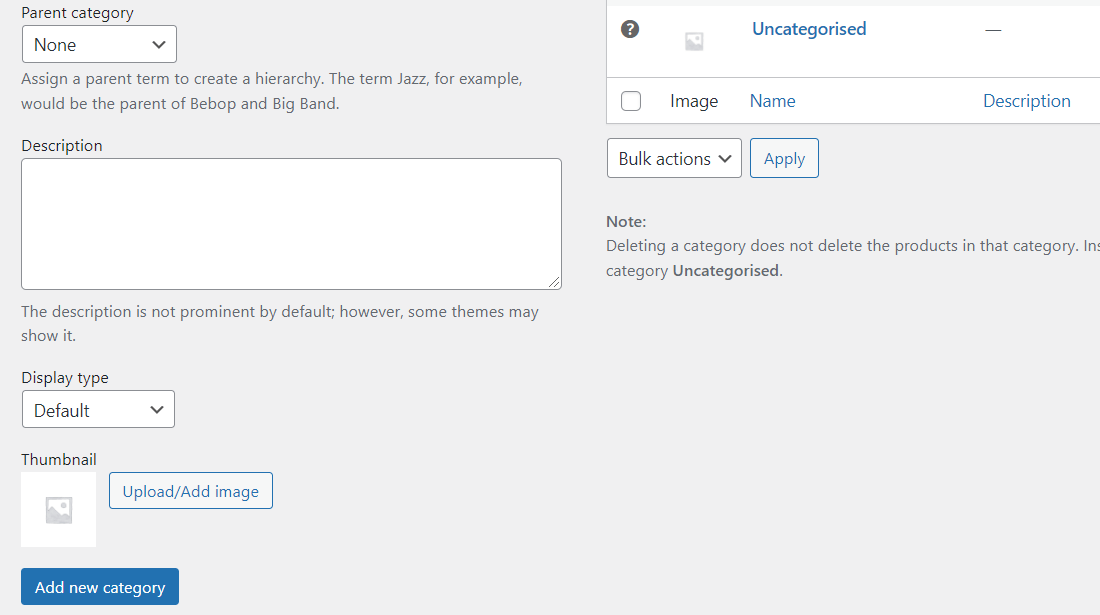
6. Choose the Display type. Decide what is shown on the category’s landing page. “Standard” uses your theme’s default. “Subcategories” will display only the subcategories. “Products” only displays products. “Both” will display subcategories and products below that.
7. Upload or Add an image. It’s another optional feature, but it most cases it’s a good idea to add it. Some themes display product category images, so it can be an effective way to help your customers easily identify what they’re searching for.
8. Check if everything is correct and click Add new category button to create a product category in WooCommerce. From now, it will be displayed in the all categories field.
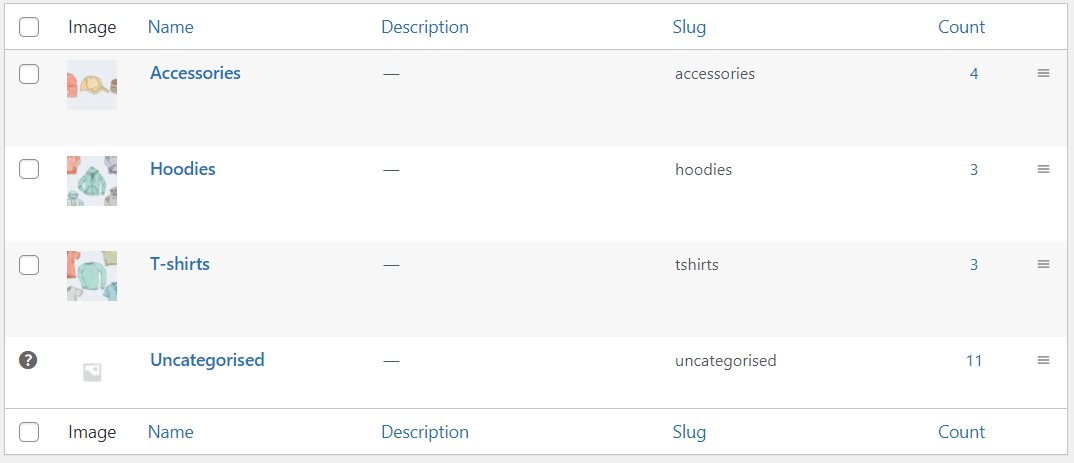
If you want to edit it, just click on its name or use Edit link beneath it.
Categories can also be reordered by dragging and dropping. Their order is important for the default categories list in your store. This includes both widgets and the category/subcategory views on product pages.
Once you have a category created, you can assign your products to it. To do this, go to the list of products (Products > All products) in your WooCommerce store and edit the one you want to assign to the category.
On the right side of the page, you should see a Product categories metabox. It allows you to assign that product to the available categories. You can select more than one category, or even create a new one directly from that field.
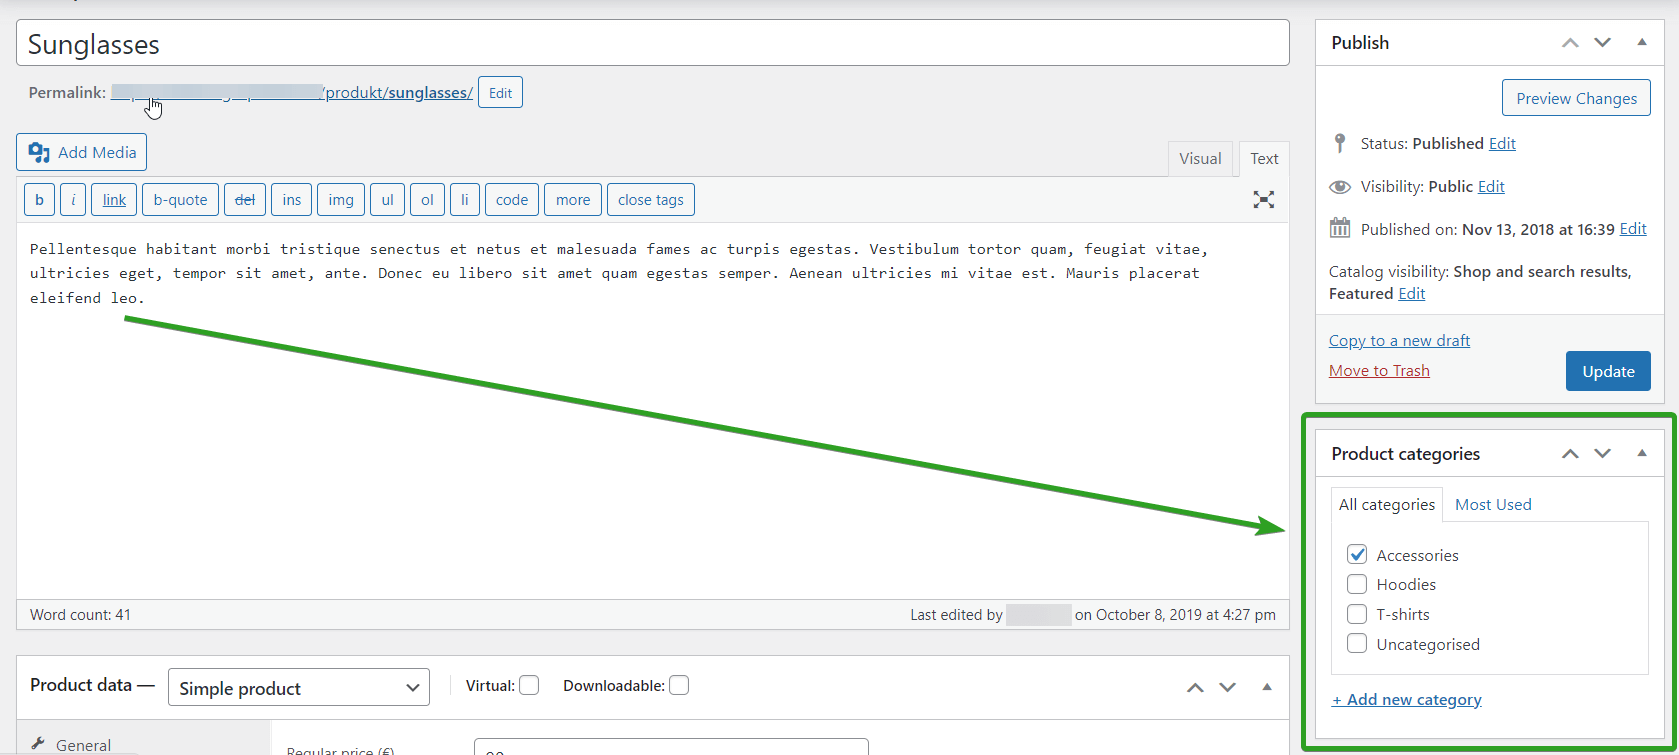
After assigning the category, update the product, and it should already be available in the category list.
Basically, there are three ways to display all the products assigned to a certain product category:
1. Go to Products > Categories, select the category that you want to check and click on View link. You’ll be redirected to the front page of your WooCommerce store, where you will see all the products that are assigned to that category.
2. Go to Products > Categories, select the category that you want to check and click on the number in the Count field. You’ll see a list of all products assigned to that category in your WordPress Dashboard.
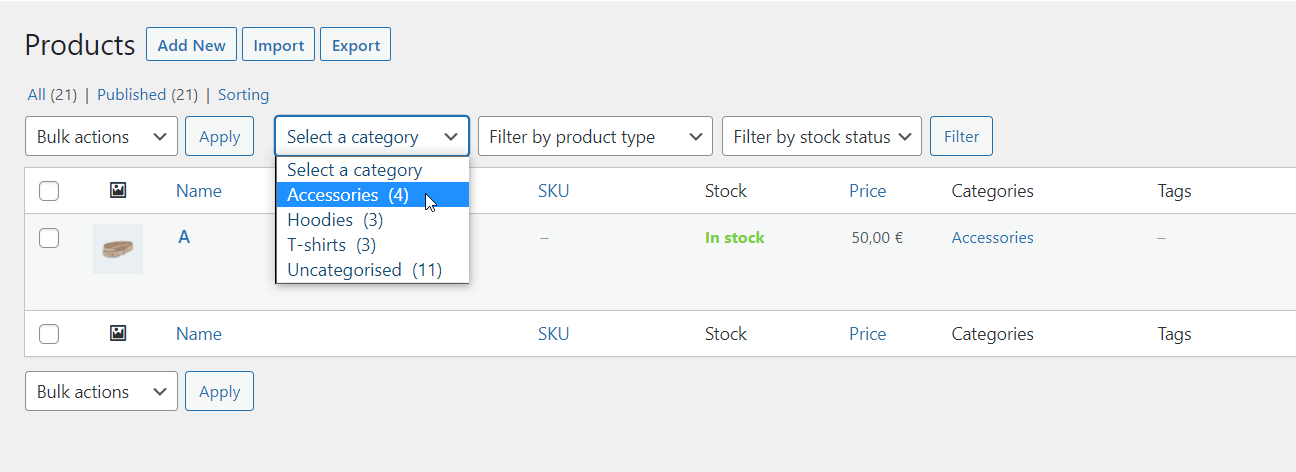
3. You can get the same result by going to Products > All products and using the category filter. Just select the product category, and you’ll see all products assigned to that category in your WordPress Dashboard.
Some WooCommerce shortcodes ask for the category ID to display a list of categories. That’s why it can be useful to easily find the ID of each of them. It’s very simple. To do that, just go to Products > Categories. Select the category that you want to check or click on Edit link beneath it. Then, find the page URL in your browser.
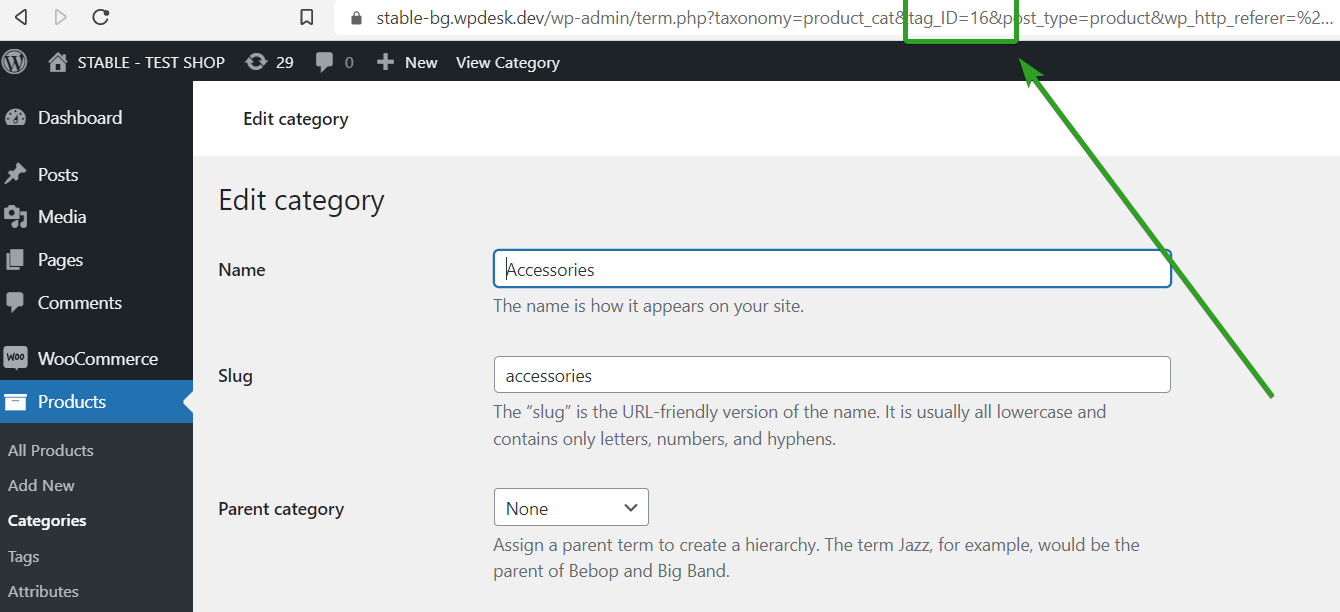
Check the tag_ID parameter in the page URL. The value of that parameter is that category ID. In my example, as you can see it is tag_ID=16, so my product category ID is 16.
If you need additional information, you can check the official WooCommerce documentation.
Now, when you know what WooCommerce product categories are and how to set them, let’s use it in your WooCommerce store. To set WooCommerce shipping cost based on a product category, you’ll need the Flexible Shipping PRO – an advanced WooCommerce table rate shipping plugin. It offers powerful, but easy-to-use WooCommerce shipping options based on weight, cart total, product count and much more. One of its many features is of course product based shipping.
The best Table Rate Shipping for WooCommerce. Period. Create shipping rules based on weight, order totals, or item count.
View Details or Add to cartIt’s basically a table rate shipping plugin, which is a great solution to replace limited WooCommerce flat rate shipping method.
Once you install and activate the Flexible Shipping plugin, you can configure it. To do that, just simply go to WooCommerce → Settings → Shipping. There, select the WooCommerce shipping zone which you want to add the feature to.
Then, add a new WooCommerce shipping method in the shipping zone where you want to set shipping based on product category. Click the Add shipping method button:
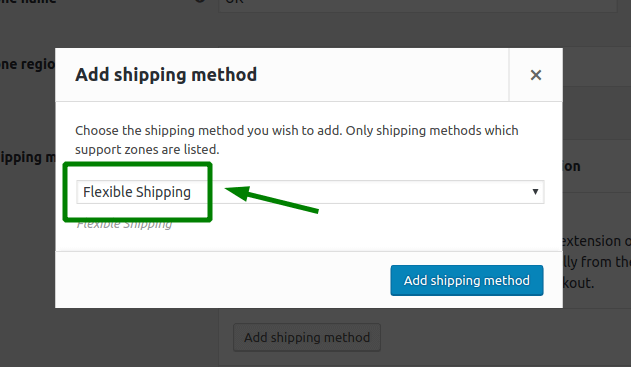
Choose the Flexible Shipping and again click the Add shipping method button.
Now, you should have your shipping method added and activated. It’s time to configure it.

You can set it’s Title and Description and any other available feature like WooCommerce advanced free shipping over amount.
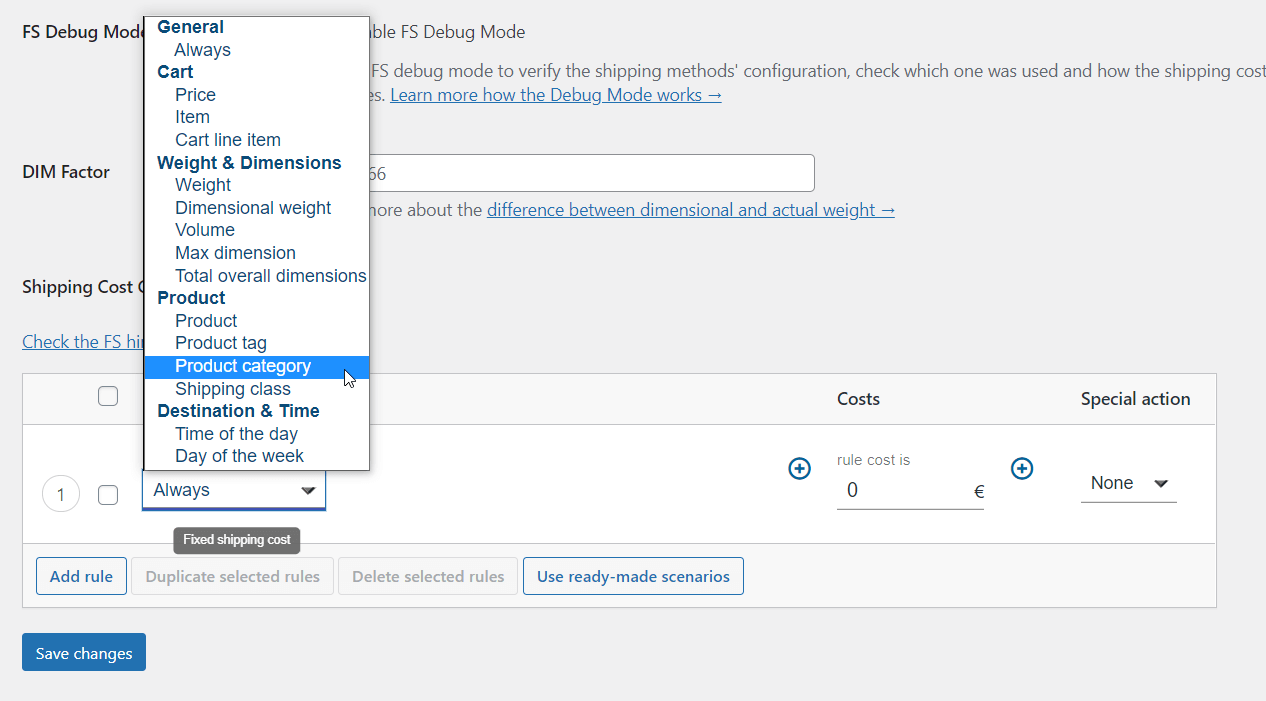
After you set that up, scroll down to the Shipping Cost Calculation Rules table.
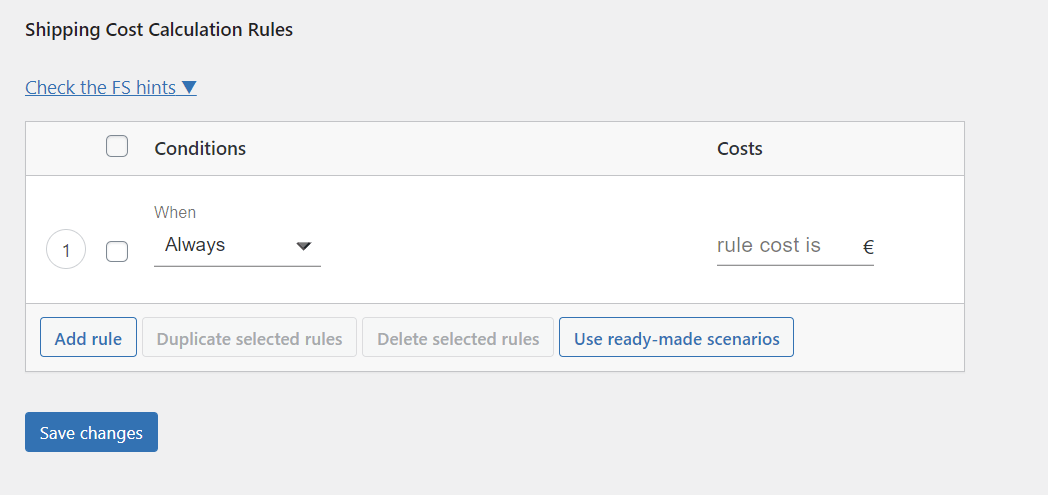
In the conditions field, select Product Category.
Then, select the product category and set it’s cost.
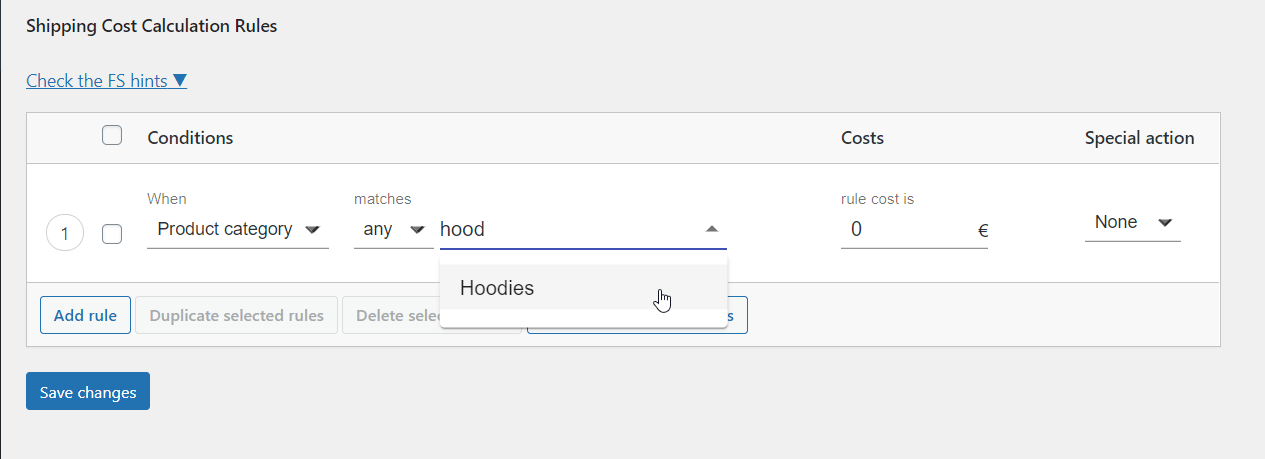
You can set the same shipping fee for multiple categories. When you configure all the shipping rules based on your shipping charges, Save changes.
This way, the shipping rate will be applied where products from certain product categories will appear in the shopping cart in your WooCommerce store.
If you want to set more WooCommerce advanced shipping, you can set the shipping charge based on WooCommerce shipping class or single product in the same way.
Setting up WooCommerce product shipping isn’t difficult, but it’s easy to miss some details that can break your shipping logic or lead to unexpected results. Whether you’re using a plugin like Flexible Shipping or building rules manually, here are a few tips and common pitfalls to keep in mind.
You can use this method for much more advanced shipping operations than simply determining the shipping cost based on the product category. The Flexible Shipping PRO plugin also allows you to:
Setting up category-based shipping in WooCommerce can be a game changer when your store sells products with diverse characteristics. Instead of applying the same shipping rules to everything, you can tailor shipping costs and methods to better reflect the nature of each product category. But when exactly does this approach make sense?
Here are the most common scenarios where shipping by product category is not only useful — it’s essential:
If your store offers both lightweight items (like accessories or books) and bulky products (like furniture or gym equipment), shipping costs will differ significantly. Charging the same flat rate across the board could either lose you money or drive customers away. With category-based shipping, you can assign higher shipping rates to heavier items without affecting lighter products.
Some stores use different couriers based on the product type — for example, one carrier for fragile electronics and another for standard goods. By setting up shipping by category, you can assign different methods and services based on the product type, improving efficiency and customer satisfaction.
Promotional strategies often include WooCommerce free shipping for specific product categories, like clothing or home decor. With category-based rules, you can enable free shipping only for those categories — while maintaining standard or premium rates for others.
Category-based shipping lets you introduce advanced shipping logic — for example:
Free shipping if the cart includes only items from a certain category.
Charge per-category shipping fees for mixed carts.
Disable certain shipping methods if specific categories are present.
In some setups, shipping costs depend on both location and product type. For instance, you might offer local delivery for perishable food only in specific regions. Using categories alongside shipping zones allows you to build precise and flexible rules.

Content Writer at Octolize
Bartosz Gajewski is a content and marketing specialist with a solid background in SEO, WordPress content strategy, and technical documentation for digital products. With years of hands-on experience in both in-house and freelance roles, he supports tech companies – especially in the SaaS and e-commerce space – by creating content that informs, engages, and drives results.
His approach blends storytelling with data-driven SEO, and he’s been involved in projects ranging from rebranding and product marketing to growth experiments and copywriting for complex software tools. On the blog, he shares actionable insights from his work across marketing teams, product documentation, and online store optimization.


Learn how Octolize helped Shopify store based in the USA set up distance based rates with a usage of Octolize Distance Based Rates.

Learn how Octolize helped NGO set up their WooCommerce rates with a usage of Flexible Shipping PRO.
See how Octolize helped Dominican Liturgical Center set up pickup points with a Pickup Points plugin for WooCommerce.