- Home
- WooCommerce
- What plugin are you looking for?
- Shopify
- What Do I Need?
- About us
- Blog
- Docs
- Contact us
- What can we help you with?
🚀 Ready to optimize your WooCommerce & Shopify shipping setup? Get FREE early access to a new product →

Consider the following scenario: a consumer wants to make a purchase from your shop. He selects the items, feels content with his selection, and proceeds to make the payment. But as it happens, he receives the WooCommerce no shipping options available message on the checkout page: “No shipping options were found”. What will he do? Just abandon the cart and purchase somewhere else. In this article, we’ll explore the possible reasons behind the problem and provide solutions to ensure your WooCommerce shipping options display correctly.
The most popular issues standing behind “no shipping options were found” message are:
How to identify which one is the case? Enable debugging in WooCommerce to identify any errors or issues in the shipping setup. Go to WooCommerce → Settings → Shipping → Shipping options, scroll down to enable Debug mode, and then save your changes.
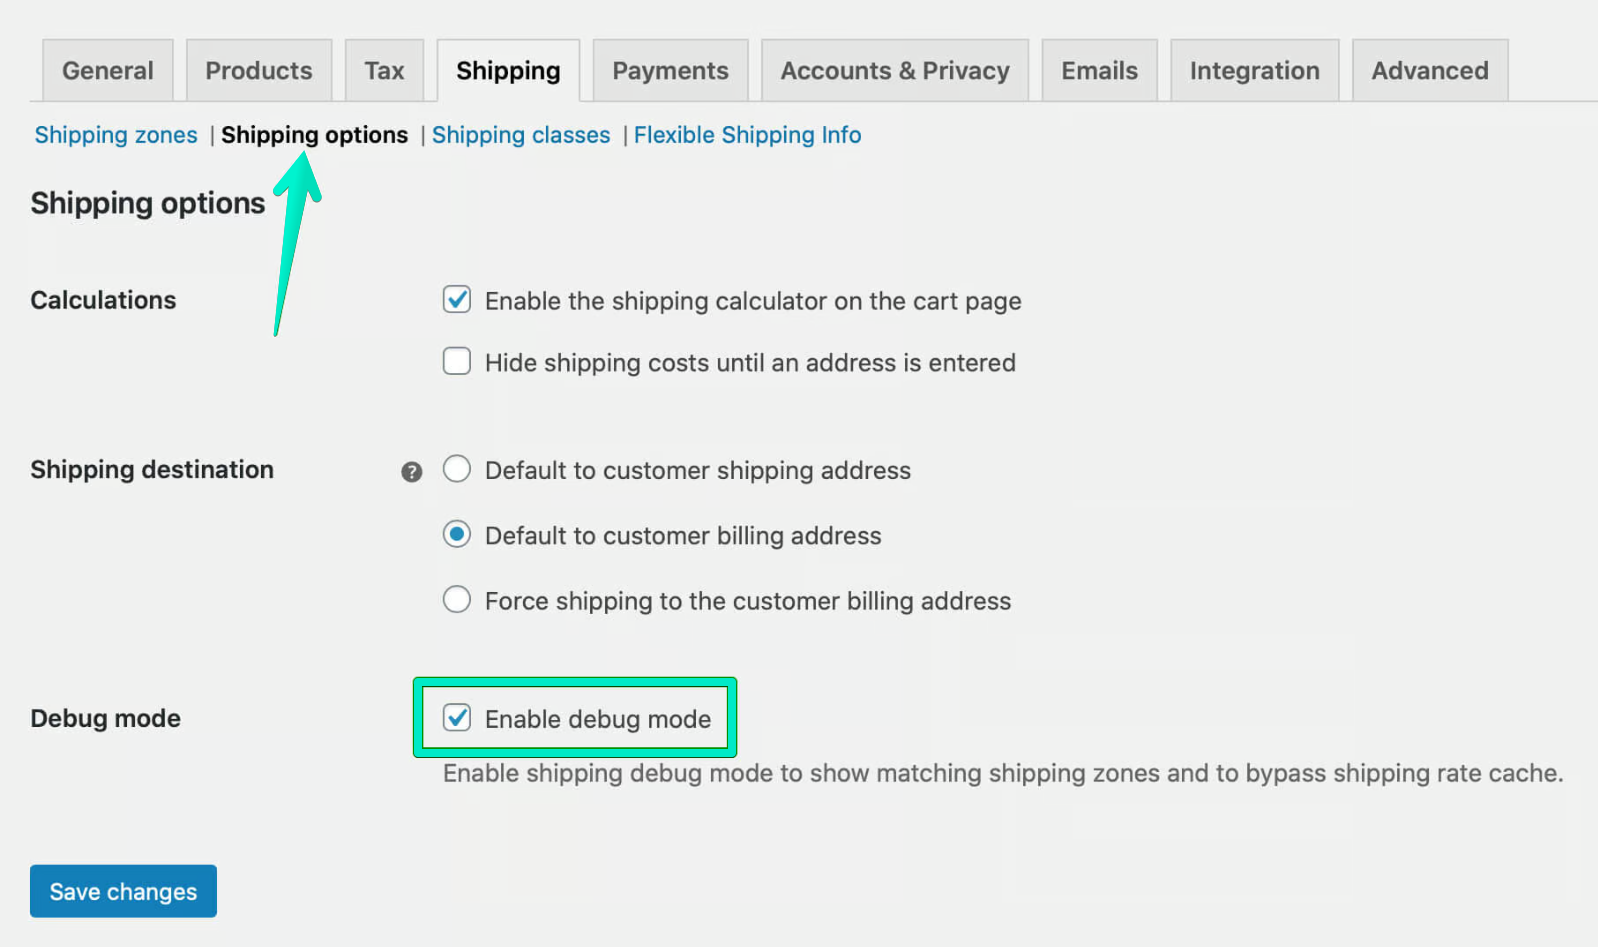
Once you turn the Debug mode on, it will show you in the cart what might have caused the “no shipping options were found” error. It’s a great help if it comes to troubleshooting when you experience any problems with the shipping configuration and it usually sheds some light on the situation.
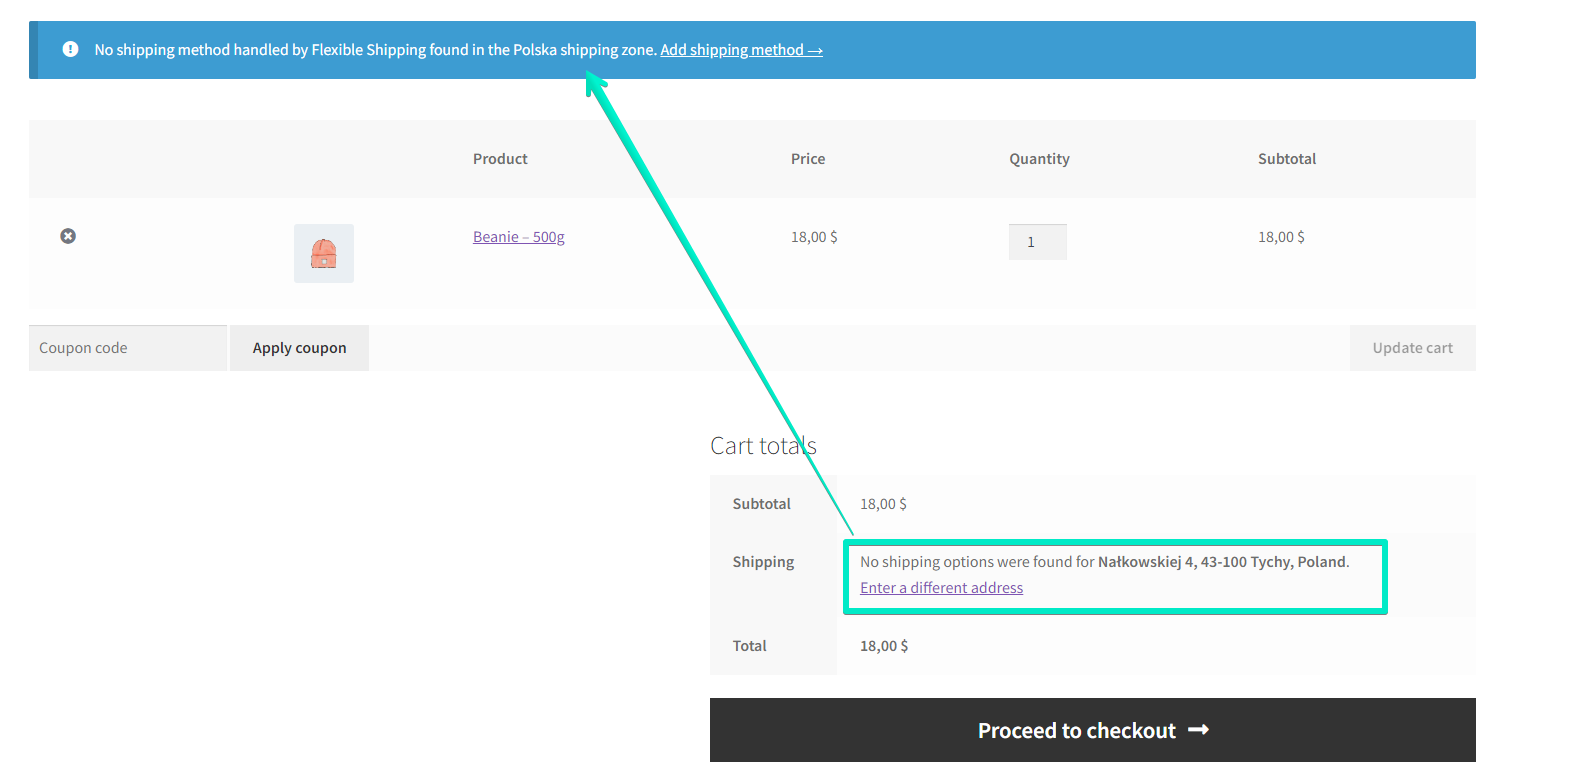
You can see that the No Shipping Options were found error occured because of No shipping method handled by Flexible Shipping found in the Polska shipping zone.
A key factor that can affect the display of shipping options in WooCommerce is theme compatibility. If your theme isn’t fully compatible with WooCommerce, it can interfere with the functionality of the plugin, including shipping options. To check for theme-related issues, switch to a default WordPress theme recommended for WooCommerce: Storefront. If the shipping options appear after that change, the problem likely lies with your theme. Contact the theme developer for support or consider using a WooCommerce-friendly theme to ensure seamless operation.
Another common cause for shipping options not showing in WooCommerce is plugin conflicts. Some plugins might not play well together, leading to functional issues. This can be a problem especially if you have plugins in your WooCommerce shop that are supposed to affect shipping in any way.
To identify conflicts, deactivate all your plugins except WooCommerce. Then check that the shipping cost displays correctly. If it does, reactivate plugins one by one while checking the shipping options at each step. When you find the plugin causing the issue, look for updates or consider alternative plugins that offer similar functionalities without conflicts. The safest way to debug these types of problems is to create a backup of your shop, the so-called stage version.
Additionally, the developers of WooCommerce plugins often offer support in case of compatibility issues between their products and your shop. If you have a paid version of a plugin such as Flexible Shipping PRO WooCommerce, you can contact support for shipping related issues, such as a problem displaying shipping options on the checkout page or plugin related issues like cart based shipping in WooCommerce.
The best Table Rate Shipping for WooCommerce. Period. Create shipping rules based on weight, order totals, or item count.
View DetailsorAdd to cartOutdated versions of WordPress, WooCommerce or the plugins themselves shouldn’t have much of an impact on the shipping cost display on the order page, as long as you don’t make changes to the site. Any element update to your shop may cause the problem to arise. This is especially true if you update the WooCommerce version. Often older versions of plugins do not support features in newer versions of WooCommerce, so combining the latest WooCommerce with an older version of a shipping plugin can result in shipping options not displaying correctly on the order page.
This is why it is so important to ensure that all the elements that make up your online shop are up to date: WordPress, all plugins, themes and PHP versions. This practice can resolve many issues and enhance your store’s performance and security.
If standard troubleshooting steps don’t resolve the issue with “no shipping options were found” error, you should use custom fixes. This can involve adding custom code snippets to your theme’s functions.php file or using WooCommerce hooks and filters to adjust shipping behavior. Custom solutions should be approached carefully, with the assistance of a developer to avoid further complications.
To reduce the risk of cart abandonment, change the “No shipping options were found” message. You can display information about minimum purchase requirements or suggestions to check address details carefully. Address validation and autocomplete services can also help prevent user errors during the input of shipping details. Additionally, selecting appropriate shipping services based on geographical limitations and product types is crucial to avoid such issues.
You can do so with two methods. One with the usage of a free plugin – no coding knowledge needed, and the other, more complex with custom code.
The use of a plugin is a great and very convenient solution. With Shipping Notices plugin, you can easily change the “No shipping options were found” message to your own custom notice. I’ll show you step-by-step how to do it.
First, install and activate the plugin. Shipping Notices is completely free, so you can download it from the WordPress repository.
Make sure you have activated the plugin and go to the settings page: WooCommerce > Settings > Shipping > Shipping Notices.
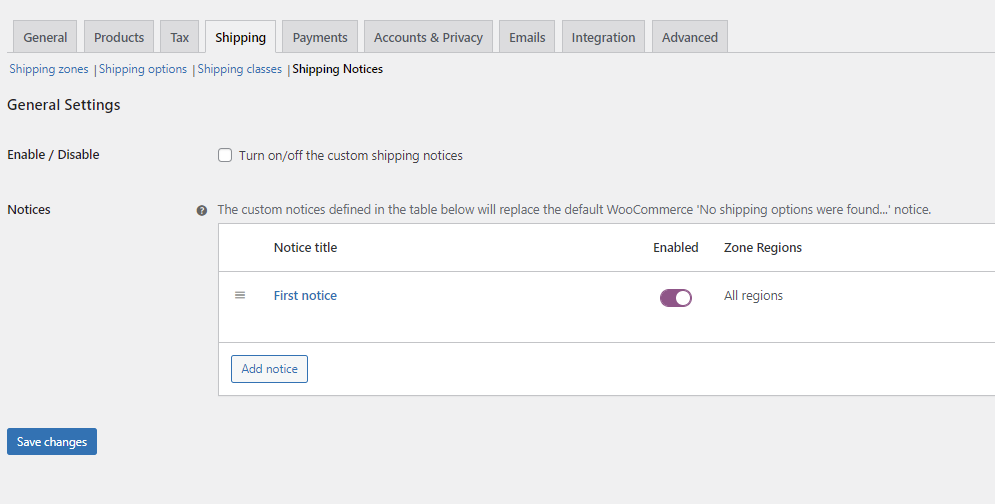
There you have the list of all your custom shipping notices. As you can see, as default there are no notices. To change that, click on the Add notice button. The new notice creation page will appear.
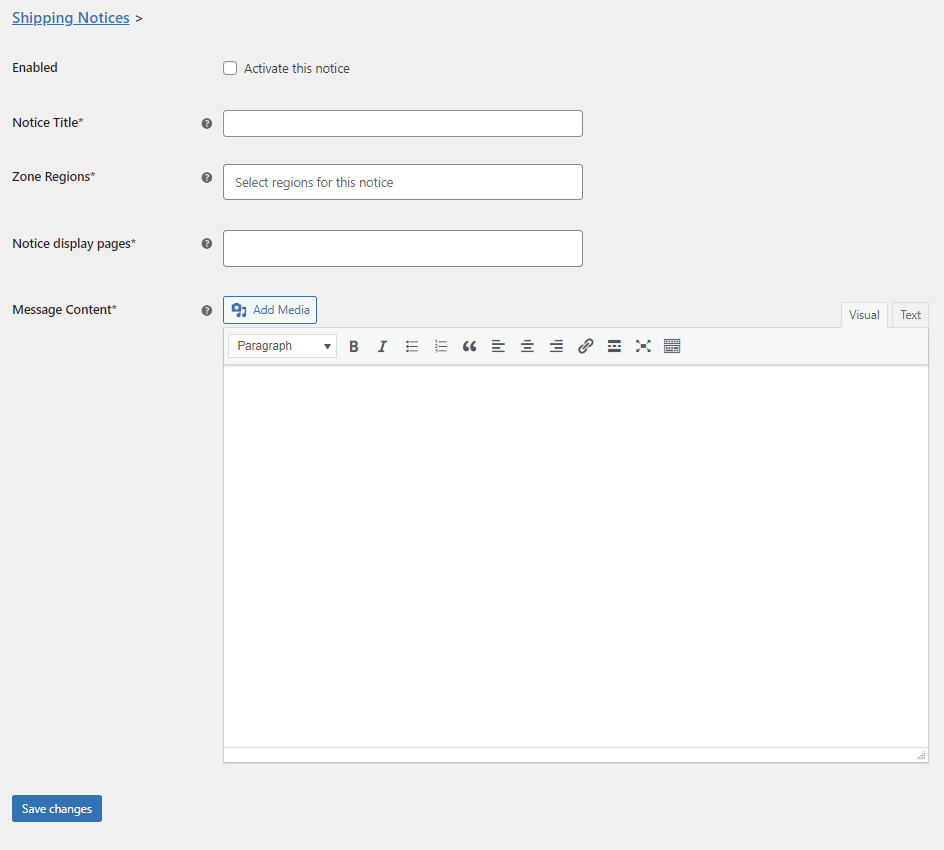
Tick the Enabled box to activate this notice. Next, fill in the Notice Title field with the unique title for easy identification – it will display only on the plugin’s settings.
Then, you can select Zone Regions for which the plugin should display the notice. It is useful if you intend to show that notice only for specific addresses. This solution will work great if individual shipping pricing is needed for specific regions. Otherwise, just select All regions.
The last step of configuration. Determine where the notice will display in the Notice display pages field. You can display it on the cart or checkout or even on both of them.
After configuration, you can add the content of your notice. To do that, use the visual or text editor. You can use standard WordPress formatting, including adding media files. Make sure you have configured the notice and click on the Save changes button. Now in the list of all notices you should see the one you just added.
Now, enable it using the Turn on/off the custom shipping notices checkbox and Save changes.
And that’s it! Your custom message should display according to your configuration instead of the “No shipping options were found” one.
Get Free Shipping Notices Plugin →
Basically, all you have to do is to add a special code in the theme’s functions.php file or use an additional plugin like Code Snippets. We have prepared the code that you can use in your store:
class WPDeskNoShippingMessage {

/**

* Register hooks.

*/

public function add_hooks() {

add_filter( 'woocommerce_no_shipping_available_html', [ $this, 'change_message' ] );

add_filter( 'woocommerce_cart_no_shipping_available_html', [ $this, 'change_message' ] );

}

/**

* Change message.

*

* @param string $message

*

* @return string

*/

public function change_message( $message ) {

return __( 'Your order is too heavy. Please contact us to get individual shipping cost' );

}

}

( new WPDeskNoShippingMessage() )->add_hooks();
With the code, instead of the default message, your client will get your custom message. In my case it will look like this:
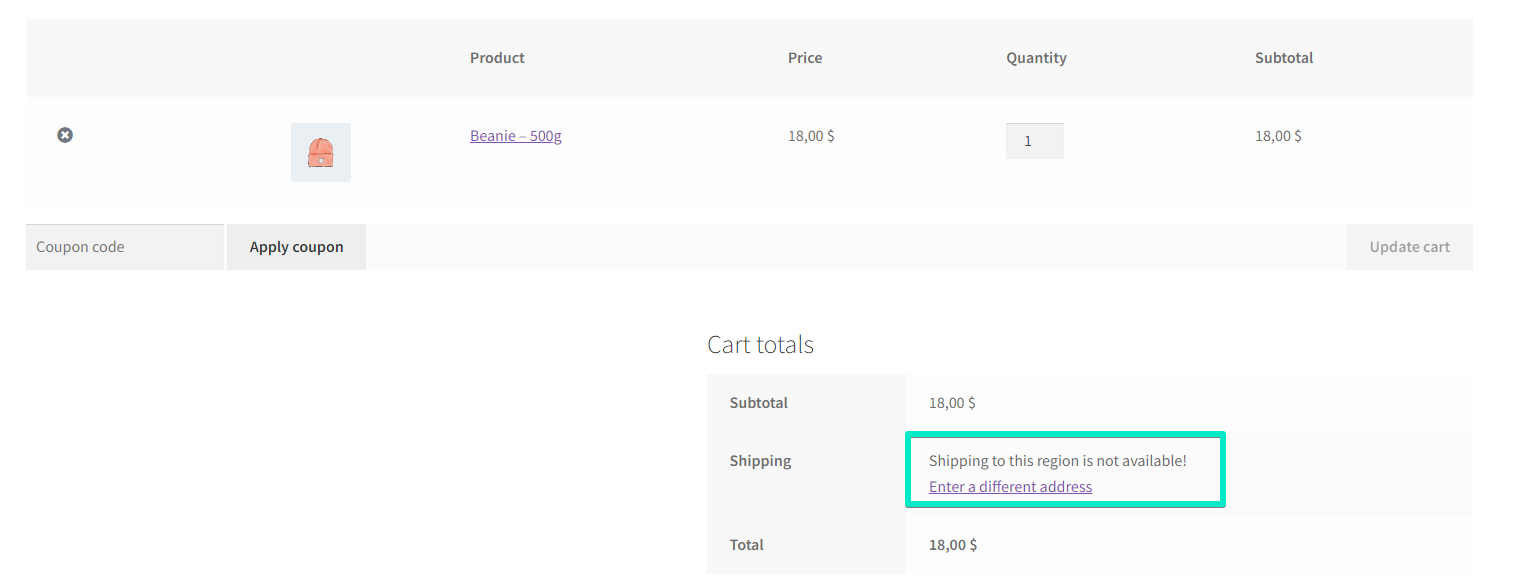
If you’d like to enter your own message, just replace the “ No shipping options are available for this address. Double-check your details or get in touch with us for help.”
Shipping options not showing in WooCommerce can be a complex issue with various potential causes. By systematically checking theme compatibility, plugin conflicts, and configuration settings, you can identify and resolve the problem. Keeping WooCommerce, your theme, and plugins up to date is also crucial for maintaining functionality and avoiding conflicts.
For persistent issues, consider seeking help from a developer or the WooCommerce support team. Properly configured shipping with WooCommerce not only enhances the customer experience but also ensures smooth operation and increases conversion rates for your store. Configuring the shipping zones correctly is crucial to avoid errors during checkout, such as the ‘No Shipping Methods Available’ error, which can arise from a lack of support for the customers’ addresses.
To prevent your users from feeling disappointed at the last stage of their buyer journey, enter a custom message and guide them with clear instructions or alternative options, ensuring a smoother experience.
Our team usually replies within a few hours. Ask away — we'll help you find the right solution for your store.

Content Writer at Octolize
Bartosz Gajewski is a content and marketing specialist with a solid background in SEO, WordPress content strategy, and technical documentation for digital products. With years of hands-on experience in both in-house and freelance roles, he supports tech companies – especially in the SaaS and e-commerce space – by creating content that informs, engages, and drives results.
His approach blends storytelling with data-driven SEO, and he’s been involved in projects ranging from rebranding and product marketing to growth experiments and copywriting for complex software tools. On the blog, he shares actionable insights from his work across marketing teams, product documentation, and online store optimization.


Learn how Octolize solutions helped WooCommerce store based in the United Kingdom set up shipping scenarios.
Learn how Octolize helped Shopify store based in the USA set up distance based rates with a usage of Octolize Distance Based Rates.

Learn how Octolize helped NGO set up their WooCommerce rates with a usage of Flexible Shipping PRO.
No help, your plugin still doesn’t work
Hi James,
Do you still encounter an issue? If yes, could you please describe an issue and contact us through the form?
Kind regards,
Mateusz