Subscribe to our newsletter

Creating and printing labels is an important part of DPD UK & DPD Local fulfilment for WooCommerce. In this article, I’ll describe step by step how to configure it in your WooCommerce store. As a bonus, I’ll show you how to print a DPD UK or DPD Local labels on thermal printers automatically.
Before getting into the process of generating a DPD Shipping Label, let’s get a brief look at an example label.
As you can see, it contains all the required information for DPD Shipping. It generally includes the following information:
The above information allows couriers to deliver your customers’ orders where they need to go as quickly as they’re supposed to get there.
First, you need to integrate your WooCommerce store with DPD UK or DPD Local account. When it comes to DPD UK & DPD Local integration with WooCommerce, there is one best solution – an integration plugin.
The most popular WooCommerce solution on the market is a plugin from Octolize. It allows you to take full care of DPD fulfillment in your store – connect to your DPD UK or DPD Local account, create shipments with printable labels and track parcels. Moreover, this solution allows you to fully automate the entire process, streamlining your work.
Ship your DPD orders faster. Automatically collect shipping details, download printable shipping labels, and track parcels.
View Details or Add to cartGo to WooCommerce → Settings → Shipping → DPD UK. In API field, choose DPD Local or DPD, and enter your Username and Password from your account. Then, Save changes and the connection status should change to a green OK.
Having the DPD account connected to the plugin, it’s time to configure it. In the article, I’ll focus in the Label settings. If you need complete information about how to integrate and configure the DPD UK & DPD Local WooCommerce plugin, go to our detailed guide on how to integrate DPD UK or DPD Local with WooCommerce.
All the configuration options will be displayed in the same window, after the connection status changed to a green OK. Go to the Printing options section, and choose the Label format. Available label formats:
You can also select the Get label button behavior for HTML labels. It can download the label file or open it in the new tab of your browser.
Having the plugin configured, it’s time to create a shipping method for DPD UK or DPD Local. DPD UK WooCommerce requires a free version of the Flexible Shipping plugin. But you don’t have to worry – the Flexible Shipping plugin is fully free. It not only allows you to add a shipping method for DPD UK & DPD Local, but also lets you create in your it’s much more powerful than regular . It’s a free that’s used daily by over 100,000 stores worldwide.
The best Table Rate Shipping for WooCommerce. Period. Create shipping rules based on weight, order totals, or item count.
Go to WordPress.org or Download for freeHaving the Flexible Shipping plugin installed and activated, go to WooCommerce → Settings → . Then, click on the which to you want to add the feature. I have the ‘UK’ :
Next, click the Add shipping method button:
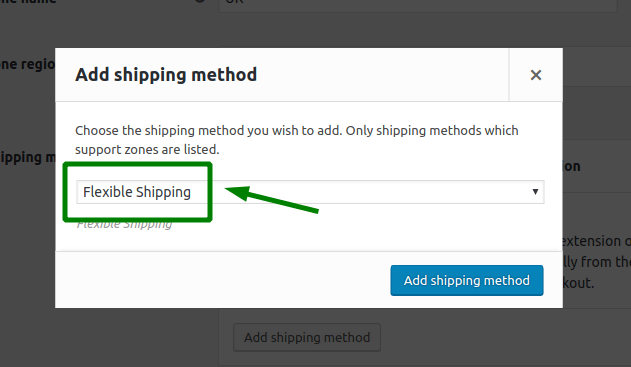
Choose the and confirm with Add button again.

Now you can .
In General Settings section, you can set Title and Description. Below you can also change the tax settings for and .
In the shipping cost calculation rules, you can set the shipping cost. If you just want to use simple flat rate, you can use the rule Always and set the shipping rate.
If you want to use more advanced shipping calculator, you can use one of the available conditions like weight or price. You can read more about it in our WooCommerce shipping calculator guide →.
The most important part of configuring the DPD shipping method is to enable integration with DPD UK. Just above Shipping Cost Calculation Rules, you’ll find the Shipping Integration options, where you can choose the DPD UK:
Having the proper integration enabled, you’ll have the option to configure it.
In the Service field, you can choose the DPD UK or DPD Local service which will be used for this shipping method. You can also add extended liability and set additional shipping notes on the label in the Reference fields. You can apply shortcodes:
[order_number],[shop_name],[shop_url].When you’re done with the shipping method configuration, save changes and your DPD UK & DPD Local shipping method is ready and available to your customers. In the same way, you can set additional shipping methods with other DPD services.
It’s time to create the shipment and download the shipping label. This can be easily done for any order for which your customer have selected the Flexible Shipping method with DPD UK integration enabled. The DPD metabox will be added in the order edit screen.
All the data will be automatically filled based on your settings and the ordered products. If everything is correct, you can click Create button to make a new DPD UK or DPD Local shipment. When the shipment is created, you can download the printable label:
The label will be created according to the plugin settings. Then you will be able to print it and send the package.
I’ll show you how to print DPD UK & DPD Local Label on thermal printer. To print labels directly from WooCommerce, you’ll need an additional plugin – Flexible Printing. You can get it at a lower price together with DPD UK & DPD Local WooCommerce by purchasing the Advanced DPD UK Integration Bundle.
Automatically print the shipping labels on thermal printers using the Print Node service.
View Details or Add to cartTo integrate Print Node with WooCommerce, create an account at Print Node and download the API key after registration and account activation. Then, enter the downloaded API key in the Flexible Printing configuration and save changes.
Having the Print Node connected to your WooCommerce, it’s time to configure the printer. Go to the Printers tab, where you can configure printers and set the default printer for all integrations.
If you added a printer to the Print Node, a new tab with its name will appear in the Printers menu. Click on it to configure the printer. If there are no options available, this means that the sharing service (Print Node) does not allow you to change the printer’s options. You can Print Test Page to test if the connection is working correctly.
To select printer for your DPD UK integration, go to the Integrations tab. If you have your DPD UK & DPD Local WooCommerce plugin activated, select the printer to print DPD UK & DPD Local labels.
Remember to save changes, and you should be able to print DPD UK & DPD Local labels directly from your WooCommerce.
You can do it from the WooCommerce orders list.
You can also print the label directly in the single order page.
Integrate your WooCommerce with your DPD UK account, customize it for UK locations, and automate the whole process by creating and printing labels.
View Details or Add to cartThere is another option to print labels for DPD, without having to manually click a button in WooCommerce. The DPD UK & DPD Local WooCommerce plugin in combination with Flexible Printing allows you to automatically print labels for your orders.
To print labels automatically, you must enable automatic printing in the integrated shipping plugin’s settings. You’ll find it in the plugin’s settings: WooCommerce → Settings → Shipping → DPD UK.
With these settings and the correctly configured connection to Print Node that I wrote about above, labels for all completed orders with DPD UK & DPD Local shipping will automatically print on the printer of your choice. It works perfectly with thermal printers recommended by the DPD UK & DPD Local.