Subscribe to our newsletter

It probably won’t be a shock to say that WooCommerce is our favorite eCommerce tool. However, we realize that it does have its flaws—one of them being the lack of tools to import and export shipping methods. That’s why we created the Flexible Shipping Import/Export plugin to help you easily manage and move shipping methods between zones or stores.
When developing the Flexible Shipping Import/Export plugin, we focused on meeting three important needs that our customers reported to us. Those needs are:
We believe that with our plugin, all these actions will become much easier.
Easily download, import, move, replace, update, or backup multiple shipping methods in your WooCommerce store.
View Details or Add to cartThe plugin allows you to easily import and export shipping methods created with the Flexible Shipping plugin. It also works with the Flexible Shipping PRO plugin and the Flexible Shipping Locations Add-on.


Please have in mind that the Flexible Shipping Import/Export plugin only exports shipping methods created with the Flexible Shipping plugin. If the plugin doesn’t detect any methods to export, it will display the error message:
In this case, create new Flexible Shipping methods that can then be exported to a CSV file. You can use the Add your first Flexible Shipping method button to do it.
To import a shipping method, you will need a CSV file with the shipping methods. It is best to simply export the shipping method, but you can create this file yourself. If you want to learn more about the supported format or want to download a sample CSV file, take a look at the plugin documentation.
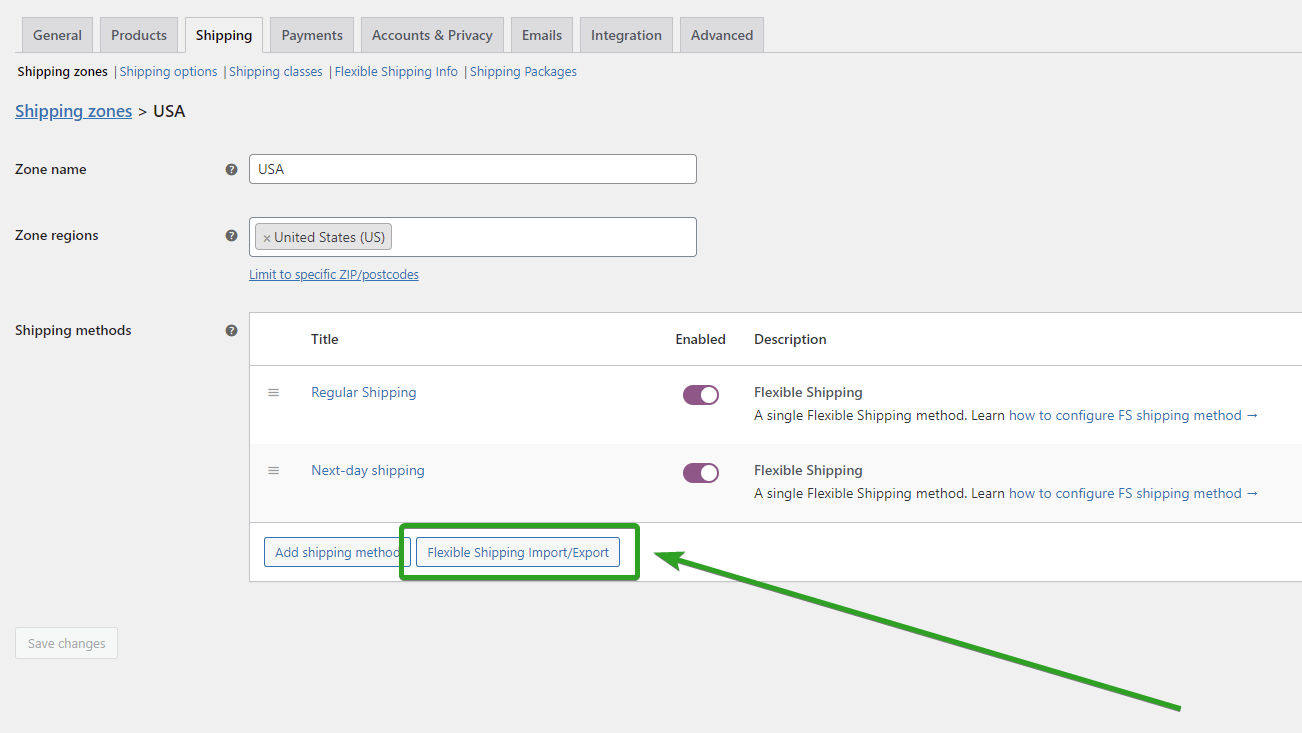
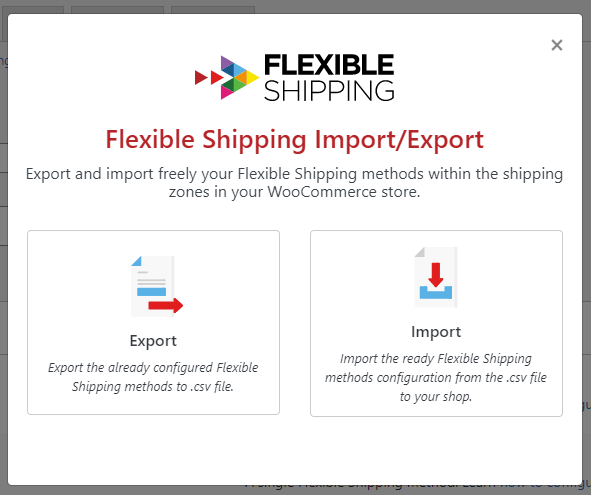
When you’ll have your CSV file, go to the shipping zones where you would like to import shipping methods. Under the list of all methods, you will find the Flexible Shipping Import/Export button. Use it to open the import/export window.
To import a shipping method, you will need to upload a CSV file. You can click the center of the box in the window to select the file you want to upload, or simply drag and drop it into this location. The plugin only accepts CSV files with a correctly configured data structure.
Once the file is loaded, the plugin will display all the shipping methods available to import. For each method there are three possible actions:
Here, you can also enable imported shipping methods. If you are not updating any shipping methods, select Create New Shipping Method and then Import Methods.
If the import was successful, you will receive a confirmation message.
You can now refresh the page or use the Refresh and go to the shipping zone button.
Now, that you know how to import and export shipping methods in WooCommerce using the Flexible Shipping Import/Export plugin, let’s talk about the practical use of these options. As I mentioned earlier, we were focused on the three most popular scenarios: export shipping methods to different WooCommerce stores, moving shipping methods between shipping zones, and manually updating prices of multiple shipping methods at the same time.
If you manage more than one WooCommerce-based store, you surely know that it takes a lot of time to set up each new store. With the import and export features, you can easily transfer shipping methods from one WooCommerce store to another.
It can also be very useful if you want to add a new shipping service to all of your stores. Using the Flexible Shipping Import/Export plugin, you can set it in one store, export the shipping method and just import it to each one of the other stores.
If you ship your products to several countries, you certainly spend a lot of time setting up your shipping methods. Shipping rates of courier companies are usually based on weight and differ for most countries. Setting one shipping method with weight based shipping can take some time to configure. When you multiply that by the number of shipping zones, the entire shipping setup can take several hours. With the Flexible Shipping Import/Export plugin you’ll have to configure only one shipping method, and then import it for each shipping zone.
Another practical way to use import and export shipping methods in WooCommerce is to manually update the prices of multiple shipping methods at the same time. This will work well when you have several shipping methods in one shipping zone and need to update them. This often happens when couriers update their prices.
Instead of going from one method to another and changing the values in each shipping method, you can export all the shipping methods and change the prices directly in the CSV file. This will allow you to change all prices in one place and save you time.
By using the Flexible Shipping Import/Export plugin, you can streamline the way you manage shipping methods in WooCommerce. Whether you’re transferring configurations between zones, replicating setups across multiple stores, or updating shipping costs in bulk, this tool simplifies what would otherwise be a time-consuming process.
With full compatibility for both the free and PRO versions of Flexible Shipping, along with detailed documentation and support, it’s an essential solution for efficient, scalable shipping management.
Can I export WooCommerce shipping zones?
No, WooCommerce does not support exporting full shipping zones, including their name or country/region settings. However, with the Flexible Shipping Import/Export plugin, you can export the shipping methods assigned to a specific zone and import them into another, which allows you to replicate the setup more efficiently.
How do I import shipping methods between shipping zones?
You can import shipping methods between zones using the Flexible Shipping Import/Export plugin. First, export the shipping methods from one zone into a CSV file. Then, go to your target zone and import the file. The plugin allows you to create new methods or update existing ones during the import process.
Can I transfer shipping methods between WooCommerce stores?
Yes. You can export shipping methods from one WooCommerce store and import them into another store using the same plugin. This is particularly useful if you manage multiple stores and want to duplicate your shipping configurations.
How can I update shipping method prices in bulk?
Export the shipping methods to a CSV file, edit the prices directly in the file, and then import it back into WooCommerce. This method saves time by allowing you to update multiple shipping method rates at once without editing them individually.
Is the plugin compatible with Flexible Shipping PRO?
Yes, the Flexible Shipping Import/Export plugin works with both the free and PRO versions of the Flexible Shipping plugin. It is also compatible with the Flexible Shipping Locations Add-on.
Can I use this plugin to back up my shipping configuration?
Yes. Exporting your shipping methods into CSV files effectively creates a backup of your configuration. You can store these files and re-import them whenever needed to restore your shipping setup.
What happens if there are no methods to export?
If the plugin does not detect any Flexible Shipping methods in a zone, it will display an error message. In that case, you need to first create shipping methods using the Flexible Shipping plugin before attempting to export.