
Running a shop and willing to sell your products worldwide in a different currency? Wondering how to set up the prices conversion to work flawlessly for all the products and shipping? Check our guide and learn how to configure the currency switcher with UPS WooCommerce live rates plugin.
There is no doubt that selling the products worldwide does not only give you a chance to reach a new audience but also to skyrocket your sales. However, you must be aware it also brings some additional difficulties you’ll have to encounter and deal with. Once you jumped in at the deep end and gave the global sales a go, offering your customers a choice which currency they want to pay with becomes pretty much natural. You may think this is where the things get tough, but do they? Why not give UPS live rates plugin a try, combine it with the currency switcher and simply let them do the rest? Dive in deeper into this brief guide and get the grasp of the whole process of UPS and currency switcher configuration in your WooCommerce store.
Before we start let’s take a close up on the situation. The shipping companies such as UPS are broken down into many smaller country-oriented branches and divisions. That’s why during the user account registration process you are usually redirected to the website’s localized version and the local currency is used for billing. The same currency is usually also used to calculate the shipping rates. However, our aim is to display the rates in a currency more approachable for global shipping e.g. USD or EUR. In many cases the carrier’s API does not simply provide the automatic currency conversion and this is where the currency switcher comes in handy.
In order to piece it together all we need is…
A plugin allowing to show your customers the automatically calculated UPS shipping live rates. The PRO version provides i.a. the multi-currency support and grants the compatibility with the most popular WooCommerce currency switchers.
View Details or Buy nowNow that we know what our tools are let’s learn…
For better understanding let’s first throw some light on how UPS live rates plugin works. It uses your UPS account credentials to establish the connection with UPS API. Once it’s on, it sends all the shipping data, including the addresses and ordered products’ weight and dimension to API. Based on the received information UPS API returns the rates which are displayed in the cart and checkout. That’s why it is essential for both, your shop and your UPS account, to operate in the same currency. However, the tricky part involves maintaining the UPS account’s and shop’s default currency consistency with all the prices being displayed in the desired currency. To make it all work we need to configure the currency switcher in a way that it converts the prices as soon as the page loads and make the currency be recognized as if it was set as WooCommerce defaults.
Firstly ensure your shop’s default currency at WooCommerce → Settings → General → Currency Options matches the one used on your UPS account. It’s important to check it at this point since this setting will disappear once the WOOCS currency switcher is enabled.
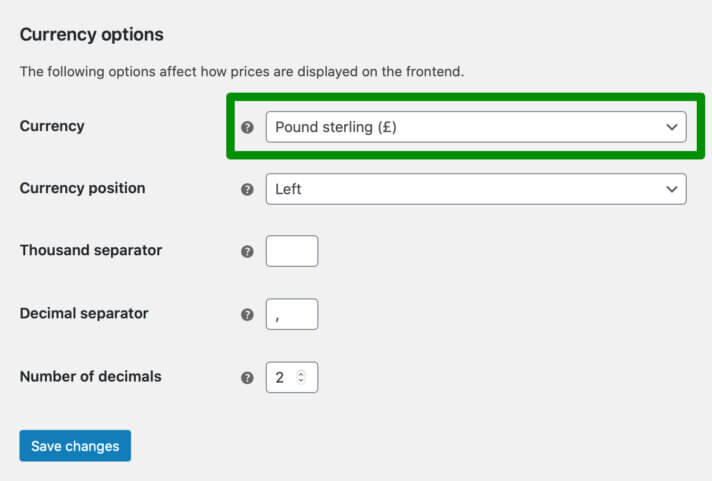
If you’re not sure what your UPS account currency is, you can check it easily after logging in at UPS Accounts and Payment Options.
When verified, install the two aforementioned plugins in your shop. Download the UPS PRO Live Rates plugin zip file from My Account / Downloads tab and upload it via Plugins → Add New → Upload Plugin option.
If it comes to WOOCS you can either download it directly from the WordPress repository or use the WordPress in-built plugin installer to get it done from the shop level:
Once they are both installed and active:
go to UPS plugin configuration screen at WooCommerce → Settings → Shipping → UPS or simply hit the Settings link under its name on the plugin list to be redirected. Fill in the API Settings section fields with your UPS account credentials:
Being here, you can also tick the Debug Mode checkbox at the very bottom of the screen:
Enabling it temporarily may help you with further troubleshooting if something goes wrong during the configuration process.
Now, move on to the Shipping zones and add the UPS shipping method within the zone you want the live rates to be displayed:
Now, when everything is set for UPS and currency switcher configuration is the only thing left to do, let’s proceed to…
Navigate to WooCommerce → Settings → Currency tab to reach the WOOCS configuration screen:
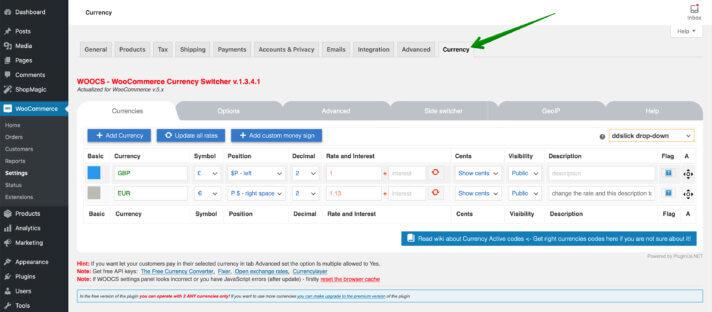
In the Currencies tab’s first row add your shop’s default and your UPS account currency (GBP in my case). Below add the desired currency (EUR) you want all the prices and shipping live rates to be displayed in. Mark the first one as Basic currency with the blue square on the left. Next, use the dropdown lists to choose the currency Symbol, its Position and pricing Decimal precision. Fill in the Rates and Interest fields with the conversion rates you want to use. I’ve entered 1.13 here since according to ECB rates £1 stands for ca 1.13 € at the moment.
Remember to save the changes you’ve made each time with Save changes button at the very bottom. Leave the other settings untouched and move on to the Options tab:
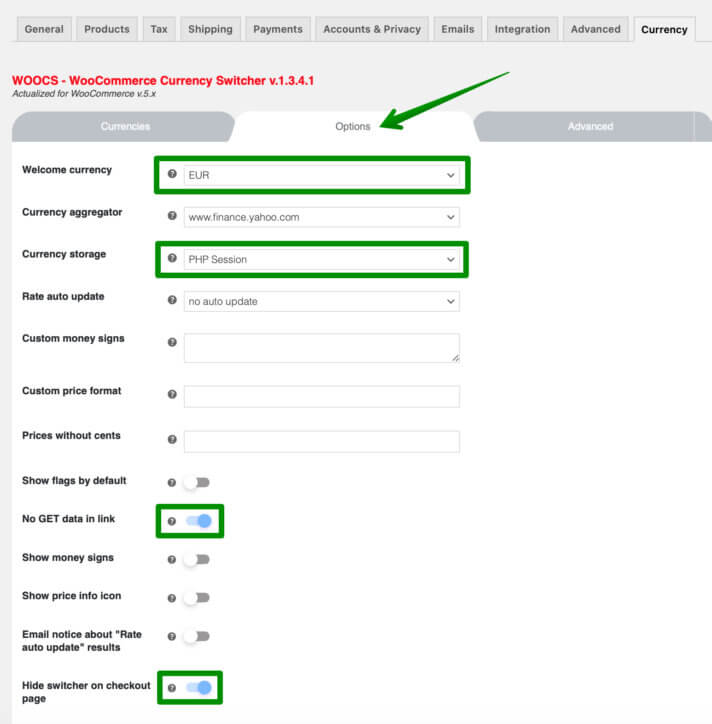
Change the Welcome currency here to the one you want your shop to display all the prices in and the Currency Storage to PHP Session. Turn on the No GET data in link option to prevent the URLs from getting the currency-related suffix. Then, swipe the Hide switcher on checkout page toggle below and proceed to the
tab:
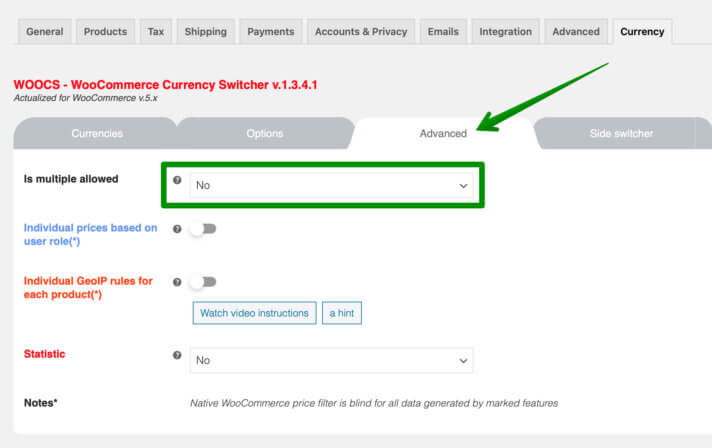
The only setting here we need to take care of is Is multiple allowed. Select No to allow the customers to pay for the placed orders only in your preferred currency (EUR).
Next, jump to the Side switcher tab:

and use the Enable/Disable toggle switch to put the currency switcher widget out of sight.
Last of all, go to the GeoIP tab for the final adjustments:
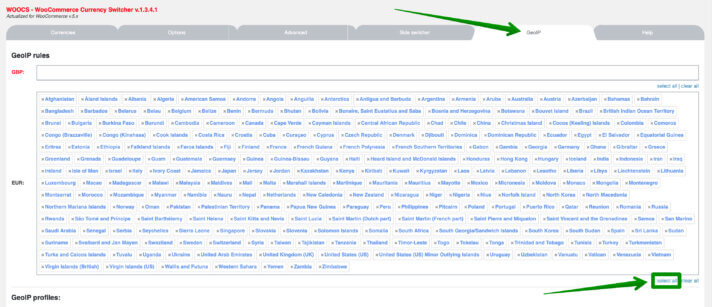
Click the Select all link under the EUR input field to make this currency default one for all the countries. Save the changes one last time and that’s it. The whole UPS and currency switcher configuration is done. Now let’s see how the…
…works live. If you followed the instructions above and everything was configured properly all the prices in your shop should be now displayed in EUR despite the fact that GBP still remains your shop’s default currency:
Even in the cart, after entering the shipping destination details, the UPS live rates are automatically converted to EUR:
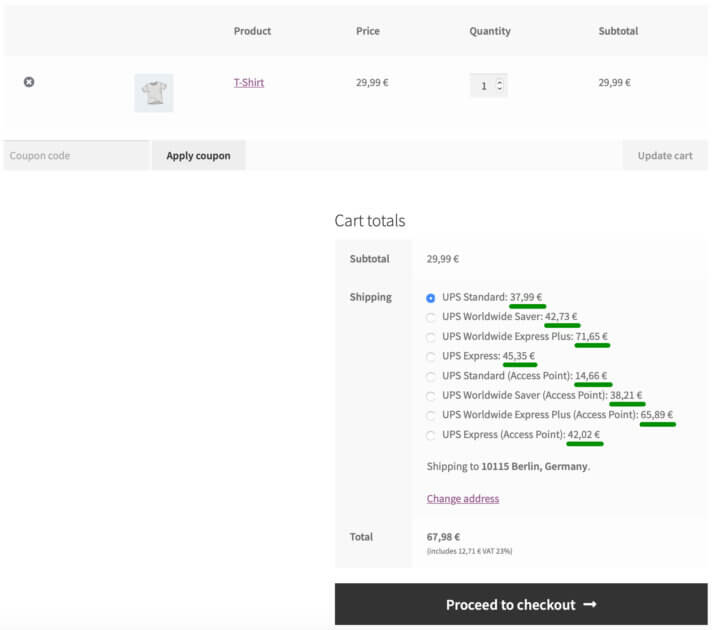
As you can see our primary goal has been achieved. The compatibility between UPS account, shop’s default and API’s currency is maintained. So, mission complete.
You have been shown how to tackle one of the most common issues our support comes across on daily basis. These instructions can be also easily applied to any other currency scenarios or adjusted to fit your needs.
If the currency switcher hadn’t been used at all, the Debug Mode would have shown the following notice:

so if you encountered the Invalid UPS currency error, you may also consider this article a ready-made solution to your problem.
This guide has been knocked together as an answer to multiple inquires our support team receives continuously. I hope it comes in handy and after reading it setting up the currency conversion for UPS live rates using the 3rd party currency switcher becomes for you an open book. However, if you still somehow feel in the dark, don’t hesitate and leave your questions in the comments below.