
Setting up shipping is one of the most critical steps in launching a WooCommerce store. Get it right, and you create a seamless checkout experience for your customers. Get it wrong, and you risk losing sales to high costs or confusing options. While WooCommerce provides a powerful set of tools out of the box, navigating them for the first time can be a challenge.
This guide will walk you through every essential shipping setting, from creating your first shipping zone to organizing products with shipping classes. Let’s build a shipping strategy that works for your business.
In this article, you will learn:
A shipping zone is a geographical region to which you ship your products. It can be a continent, e.g. Europe or North America, a country, e.g. Poland or the United States, or a smaller area, e.g. California.
How large or small your shipping zones are is entirely up to you and depends on your business size and characteristics.
Shipping zones are necessary due to the various shipping methods available in different regions. For example, if you ship your products to North America and Europe, you may be offering very different shipping options and carriers for both continents. Or maybe you would like to enable free shipping in America, but not in Europe.
The video below explains the concept of WooCommerce Shipping zones in detail:
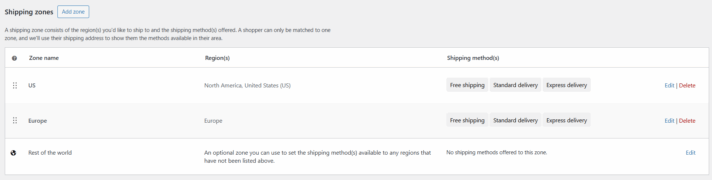
Go to WooCommerce > Settings > Shipping. Click “Add zone”, then name it and select the region(s) within the zone.
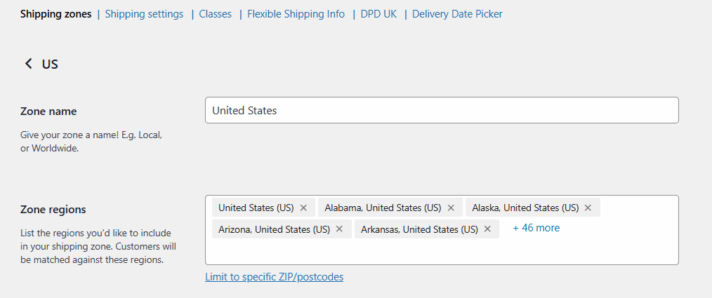
You can also limit the region to specific postal codes by clicking on the link below the region selection. It may prove useful when you want to offer local delivery or pickup. However, it can be very time-consuming to add zip codes manually, and then configure the shipping methods for each zone. The task is much easier and faster with our Flexible Shipping Locations plugin:
Extend Flexible Shipping with custom locations and create shipping costs based on weight, order totals or item count.
View Details or Add to cartBy default, WooCommerce allows you to edit a zone, remove a zone, or browse through the shipping methods added to a zone using the “Edit” and “Delete” buttons on the right.
You can also sort the zones, but remember that the client will be given the shipping zone that is the closest match to their delivery address. If you configure a couple of zones with overlapping regions, make sure to set their order.
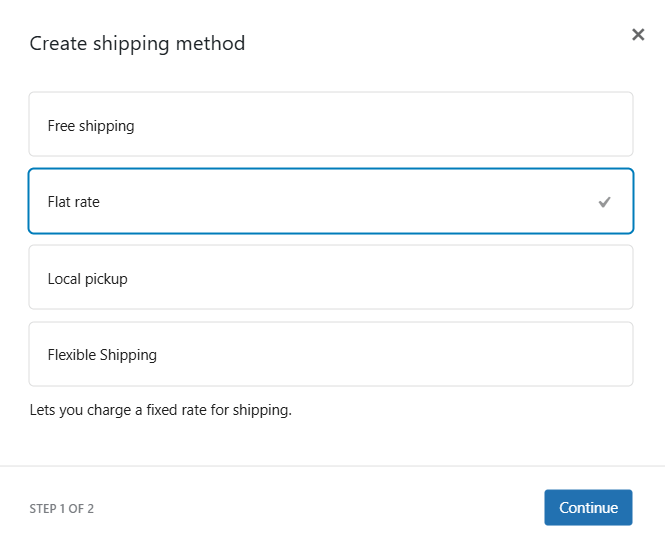
Creating shipping zones is just the beginning. Once they’re set up, you will be able to add and configure the shipping methods. Click on “Edit” in the column Shipping Method(s) to add one of the available methods.
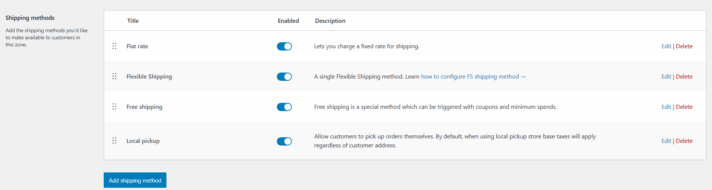
The are 3 shipping methods available in WooCommerce by default:
To manage the added shipping methods, click on the “Edit” button on the right.
Similarly to the zones, the shipping methods can be sorted, which is important when you want to set the order in which your customers see them.
The methods’ settings and their removal are available via the “Edit” and “Delete” buttons on the right.
Looking for more details on shipping methods? Watch our comprehensive video:
Flat rate is the most basic shipping method in WooCommerce. It allows you to set a fixed shipping rate for all products, with the possibility to apply a few more complex conditions based on the number of items and/or percentage.
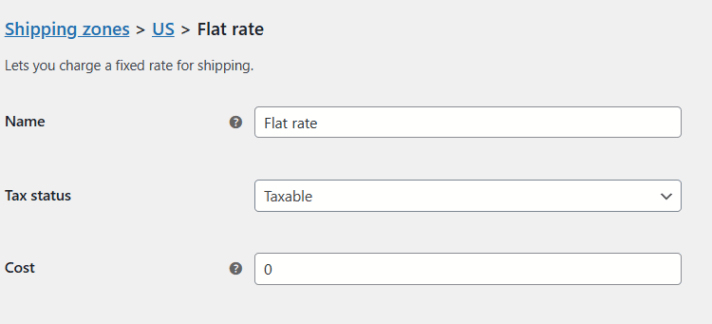
Method Title – the shipping method’s name displayed to customers at checkout.
Tax status – decide whether the shipping method is taxable or not.
Cost – the fixed price for shipping.
The fixed price set at Cost can be straightforward, but there are ways to apply more complex conditions. Here are the available options:
Examples:
Free shipping is a great way to increase sales, reduce cart abandonment, and grow customer loyalty. Customers are more likely to spend more in your store if you offer free shipping above a certain threshold.
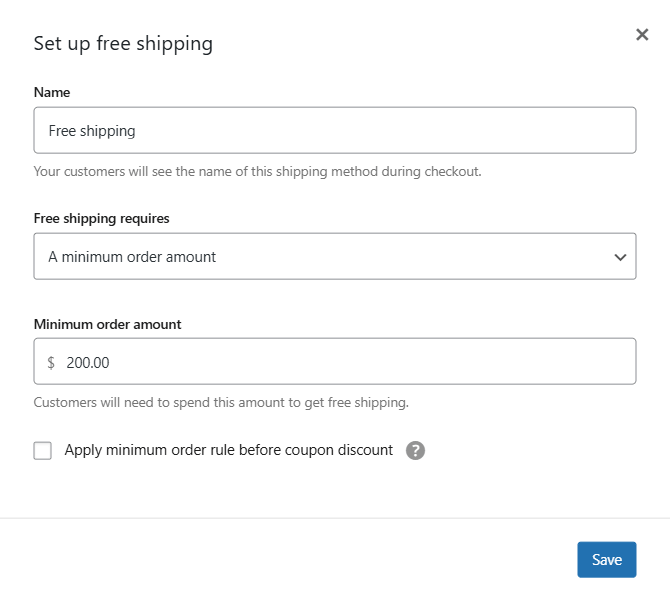
Free Shipping Settings
As the name suggests, this shipping method is used to set the cart total required to make the shipping free. You can choose one of the following options:
Please note that coupons will also be used when the minimum order for free shipping has been set.
The local pickup option is great for brick-and-mortar stores. Customers living nearby can save up on shipping costs by dropping by to collect their order in person.
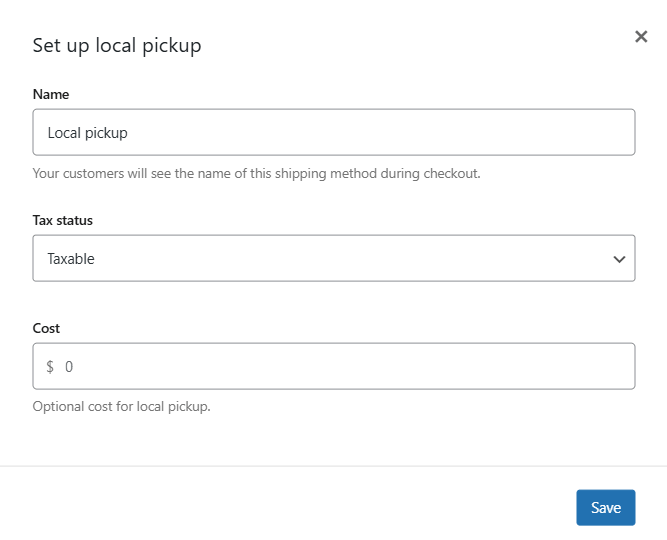
Local pickup settings
Configuring the local pickup is no different from setting the Flat Rate. Simply set the method title. If picking up an order at the location is free of charge, you can skip the tax status and the cost.
Many stores sell products of different sizes and weights. Therefore, Flat Rate Shipping is just not good enough for them. They need a more complex solution for advanced shipping cost calculations.
This is where the Table Rate Shipping method comes in. It is an easy way in which a store can set rules to calculate advanced shipping costs.
Rules can be based on:
The best Table Rate Shipping for WooCommerce. Period. Create shipping rules based on weight, order totals or item count.
Go to WordPress.org or Download for freeLet’s take a look at an example. The conditions are as follows:
Such conditions will be shown in Table Rate like this:
| Rule based on | Conditions | Shipping class? | Cost to add |
| weight | 1-5 lbs | no, every product | $10 |
| items | any item | yes, XYZ | -$3 |
| items | 5 or more items | no, every product | $8 |
This section is rather straightforward. It allows you to set basic rules for shipping costs calculations and display, or the shipping destination. It is also where you can enable or disable debug mode, which will help you solve possible configuration errors.
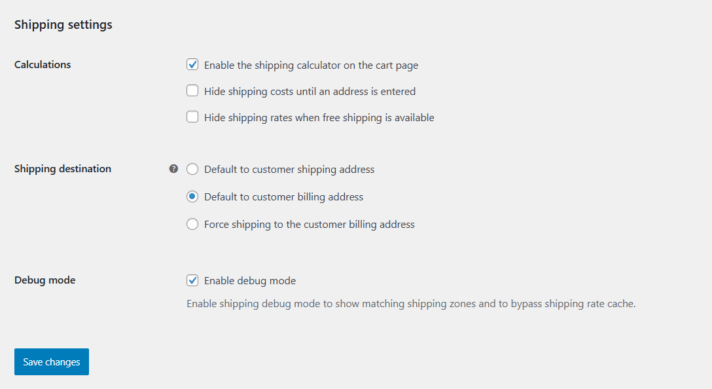
Enable the shipping calculator on the cart page – check this option if you want the client to be able to calculate the shipping cost depending on the shipping zone:
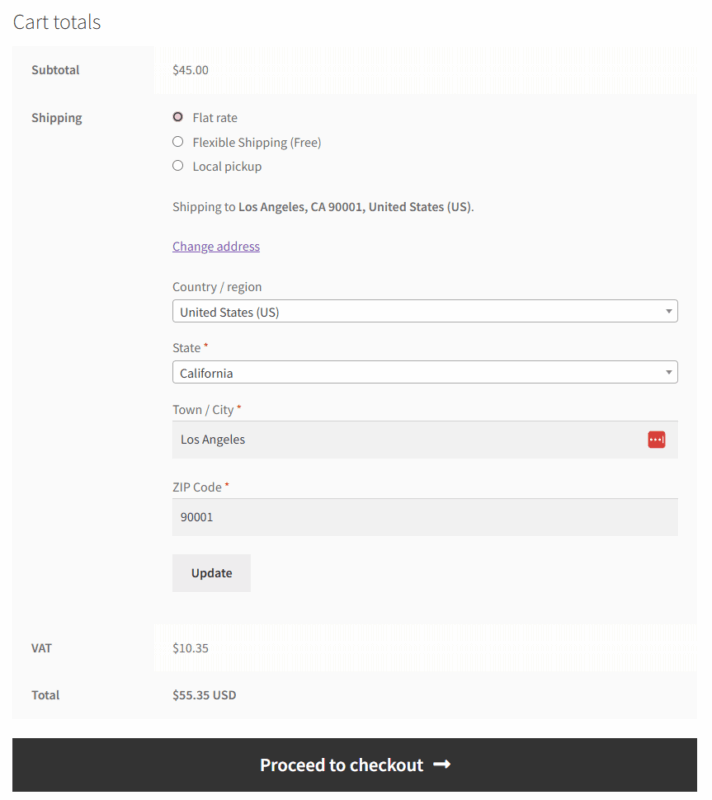
Hide shipping costs until an address is entered – check if you want the shipping cost to be visible only upon the summary of the order.
Shipping Destination – decide which address is the default shipping address.
Shipping Classes are a crucial tool for businesses that sell products of different sizes. They help group together products with similar shipping characteristics.
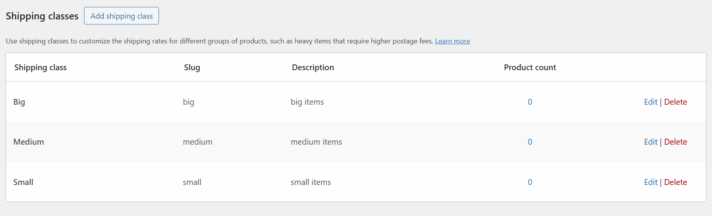
Click “Add shipping class” and fill out Shipping Class Name and Description for your reference. Slug is a unique identification; it will be automatically filled out if you leave this field empty.
Editing and deleting shipping classes is possible with the “Edit” and “Delete” buttons on the right.
Once you have created your shipping classes, you need to configure the shipping costs for them. The process is very similar to setting up Flat Rate – just go back to Shipping Methods. You will notice that a new section has appeared:
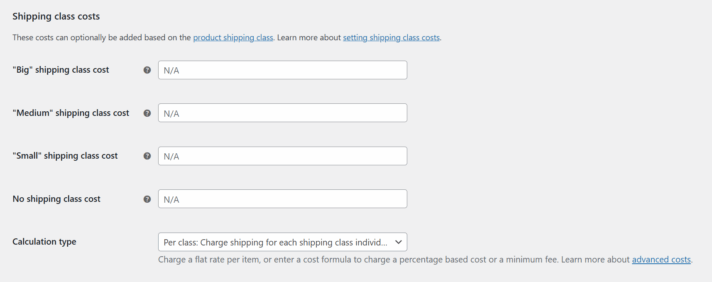
Shipping Class Cost – there will be a separate field with a shipping cost for each class. It is ordered according to settings in the Shipping Classes tab. Additional costs may be set for classes.
No Shipping Class Cost – applicable when using the Per Class calculator (below).
Calculation Type – when it comes to calculating shipping cost for shipping classes, you can choose one out of two options:
To assign a shipping class that you’ve created to a product, go to Products. Select a specific product from the list and click “Edit”. Then, go to product data and choose Shipping.
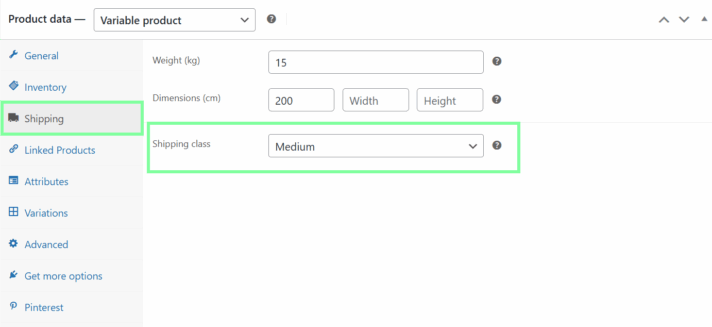
Edit shipping class for product
All you need to do is select the shipping class you’ve created and update the product.
If there are variations of the product, you can assign separate shipping classes for each product.
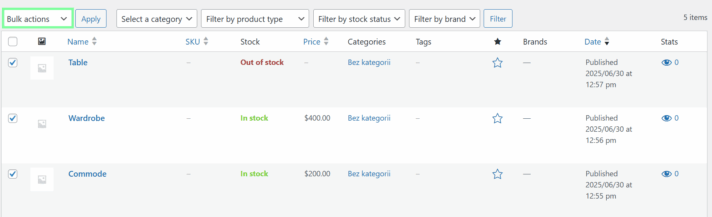
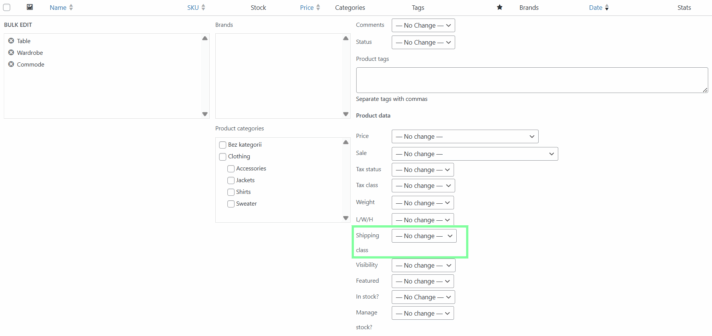
You can also assign the selected shipping class to many products at once.
Go to Products and select a couple of products, then from the Bulk Actions list select Edit and click Apply.
Let’s say you would like the customers who selected Free shipping to get Cash and Bank transfer payment methods only. However, the customers who chose a courier should be able to pay using Bank transfer, Cash, and online transfer. That’s Conditional Shipping Payments.
Configuring shipping in WooCommerce doesn’t have to be complicated. By mastering the core concepts of Shipping Zones, Methods, and Classes, you can build a solid foundation for your store.
When your needs grow beyond the basics, Octolize is here to help. With the Flexible Shipping plugin, you can easily create advanced, conditional shipping rules that scale with your business, ensuring your shipping is both customer-friendly and profitable.
The best Table Rate Shipping for WooCommerce. Period. Create shipping rules based on weight, order totals or item count.
Go to WordPress.org or Download for free
There are different ways to calculate shipping costs in WooCommerce. You need to set up Shipping Zones for geographical shipping settings, create Shipping Classes for different categories of products, select appropriate shipping methods, and adjust the shipping settings. You can also integrate your WooCommerce shipping with carriers to display shipping rates directly taken from their websites.
Shipping classes are categories of products you can create based on similar characteristics. For example, you can divide your products into big or small if you run a furniture store, or durable and perishable if you sell food. This helps assign the right shipping category for them, as different groups of items need different shipping conditions.
The Flat Rate shipping method is the most basic way to calculate shipping costs in WooCommerce. It allows you to set a fixed shipping rate for all your products, regardless of their size or cart total. You can also use it to perform some basic calculations, such as adding an extra fee per item in the cart or a percentage-based insurance fee.
Table Rate Shipping allows WooCommerce store owners to configure more complex shipping scenarios. Where Flat Rate shipping lets you set a fixed shipping rate for all your products with only basic configurations, with Table Rate, you can set up scenarios based on cart weight, cart total, and much more with the PRO version of Flexible Shipping.
In order to offer international shipping in your WooCommerce store, you first need to sign a deal with international carrier(s). Once you have such a deal in place, you need to set up Shipping Zones for the different geographical regions you deliver to. This will allow you to offer different shipping rates and carriers for clients in different countries.

Lucyna Polok is an SEO and content specialist passionate about crafting effective strategies and creating engaging content. She has worked across a variety of industries, both in-house and as a freelancer. A strong believer in the power of storytelling, she believes that good content not only delivers business results, but also resonates with customers through an emotional connection with a brand.
At Octolize, she is responsible for aligning the content strategy with business goals and increasing visibility, trust, and authority of the brand via data-based SEO efforts. On the blog, she focuses mostly on topics for those only beginning their adventure with e-commerce, explaining scenarios and terms in an approachable way.


Hi, quick question, I have two zones with overlapping zone codes but only the default option is displayed at the cart, is there a way to show all option? THANKS
Hi Solène, could you please clarify what do you mean by “default option”? Is only the one shipping method being displayed in the cart instead of all of them? If so, I suppose it might be caused by the shipping zones’ ranges overlapping one another other. In such case, only the shipping zone located higher on the zones list will be matched and the shipping methods configured within will be used. The zone placed lower won’t be even considered, so I believe you should start the whole troubleshooting from fixing the shipping zones configuration and prevent them from overlapping one another.
my site cant detect internation shipping cost bwhile i configured it to be table rate. what is the challenge
Hi Jenny, to be honest there might be many reasons of such behaviour. In most cases it is caused by the incorrect shipping zones’ or shipping methods’ configuration. Have you enabled the Debug mode at WooCommerce → Settings → Shipping → Shipping options to check if the shipping zones are matched properly after entering the shipping address in the cart?
Hi. how do I give customers the option of ordinary (non-tracked) post or opting for paying a bit more and having tracked post?
Hi Peter, have you tried setting it up simply by adding two separate shipping methods, each with different shipping cost your customers may choose from?
Can someone explain how to discount shipping via the shipping class edit? I’ve tried using formulas such as (5 * [qty]) but they never add up to what I want them to be. It’s very frustrating and there are no helpful plugins i’ve found for this issue.
Hi Deanna, could you please provide us with some more details on your specific scenario? Do you want the shipping cost to vary depending only on the shipping classes or the shipping classes and item quantity combined?
Hi,
We deliver newspapers across the UK to peoples homes through a network of independent newsagents
Each newsagent has its own shipping zone because they charge different daily delivery rates
Smaller newsagents have quite a small delivery footprint, so can set their delivery area down to a few hundred postcodes and even a wildcard LL13 9* could be too big
bigger operators can cover whole counties so wildcards can work
Can shipping zones cope with 3000+ Shipping Zones i.e individual newsagents?
Can it cope with a table of all 1.8 million postcodes?
I am looking for an alternative solution such as postcode lookup or address finder if this is too tricky or slow
Your help would be appreciated
Hi Rory, since matching the shipping zone based on the entered postcode is handled by the WooCommerce itself, I’m afraid that checking the 1.8M postcodes, if not optimized, might indeed slow down your site and negatively affect the shopping flow in your store, not to mention configuring so many shipping zones for individual agents. What I may advise here is either using some sort of 3rd party Google Maps API-based shipping address matching and autocompleting at the checkout or I’ve heard some time ago about the plugin allowing to visually ‘draw’ on the map the areas the certain shipping zone should cover, which might be useful as well. Nevertheless, I would also consider hiring a developer to prepare a dedicated solution since it might be much more effective than using and/or adapting the existing ones to your specific use case.
Can I use your plugin to display alternative shipping supplier rates depending on the product Class?
I have some Outsize products which can only be picked up or towed to the customer on a flat rate + petrol allowance per km basis provided the address is <= 200Km
For everything else I have two different shipping suppliers – Post and Courier.
Post offers Basic and Express Rate for small items up to 1M long
Courier is used for everything longer than 1m or weighing more than 22Kg
I have set up Classes for groups of items depending on how they can be shipped (e.g. Post or Courier, Courier Only, Pickup or Tow)
I have plugins from both the Post and Courier company that can show live rates.
Hi Paul,
Thank you for your message.
Can I use your plugin to display alternative shipping supplier rates depending on the product Class?
Yes, you can use our Conditional Shipping Methods. It allows defining the rules when the specific shipping methods, e.g., live rates should be available to pick and when not to. It is based on certain conditions – including shipping class.
Kind regards,
Mateusz