When you have already installed your WordPress, your next step will be installing plugins. What is a plugin on a website? It’s like an app on your phone. You can download or purchase it to extend the functionality of your WordPress website. Whether you need to add a contact form, open a store, improve SEO, or increase site speed, that can be done with plugins. In this article, I will describe in detail 3 methods on how to install WordPress plugin. When you finish reading, you will have the necessary knowledge to install and activate both types of plugins – free and paid versions.
How to add plugins to WordPress?
In order to add free plugins that are available in WordPress Repository you need to:
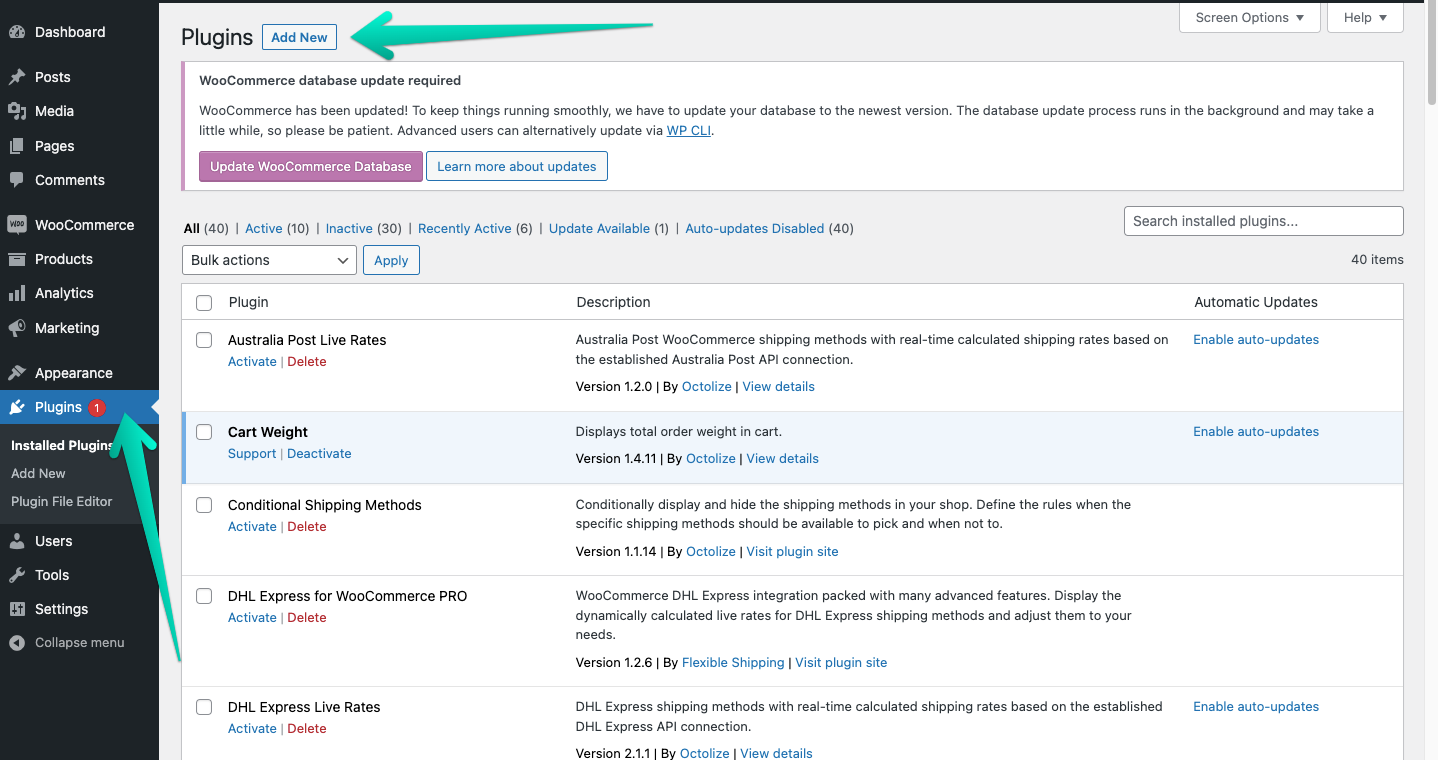
Start by going to the tab “Plugins” on your WordPress.
On the top of the page you will see the button “Add New”, click on it or click on the tab “Add new” which is located in the sidebar under the tab “Plugins”.
Adding a new plugin on the WordPress.
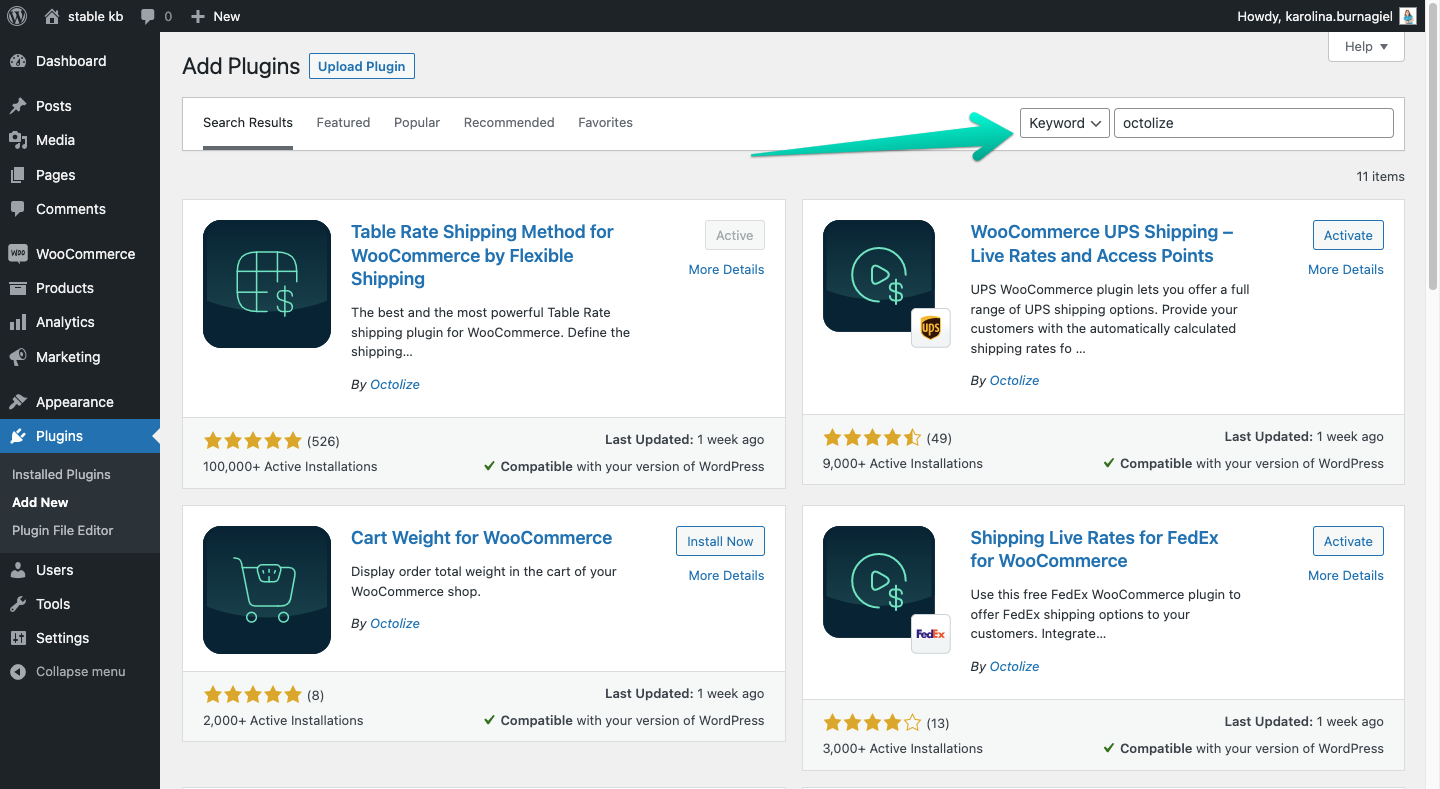
In the search window on the right side, enter the name of the plugin that you are interested in or its author. You can also search with phrases as “shipping” or “SEO”. Really, sky is the limit. As an example, I searched using “Octolize”. This way, I got all the plugins that I was searching for.
Searching plugins directly from the WordPress.
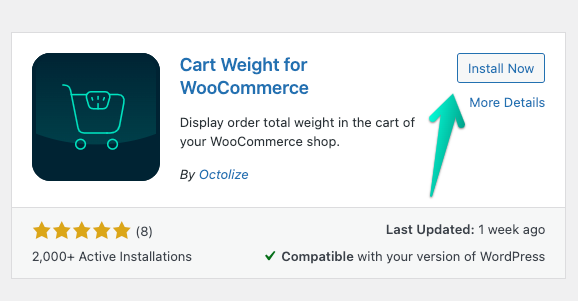
The plugin that I will be installing is “Cart Weight”. When you find the plugin that you need, click on the button “Install” that is located next to the plugin icon. Installation will start instantly.
Install the plugin “Cart Weight”.
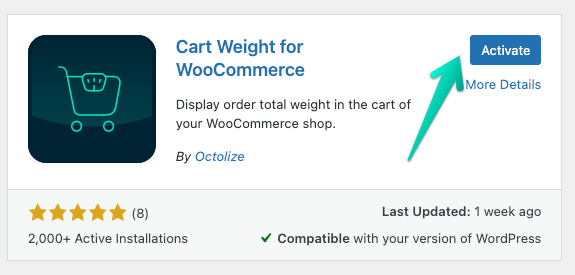
When you successfully installed the plugin, you will see the button “Activate”, click on it.
Activate the plugin “Cart Weight”.
It’s done! You have successfully installed WordPress plugin
If you prefer, we also have a video tutorial that guides you step-by-step through the installation and activation process. Additionally, it features a dedicated troubleshooting section to help resolve any issues
How to install WordPress plugin from .zip?
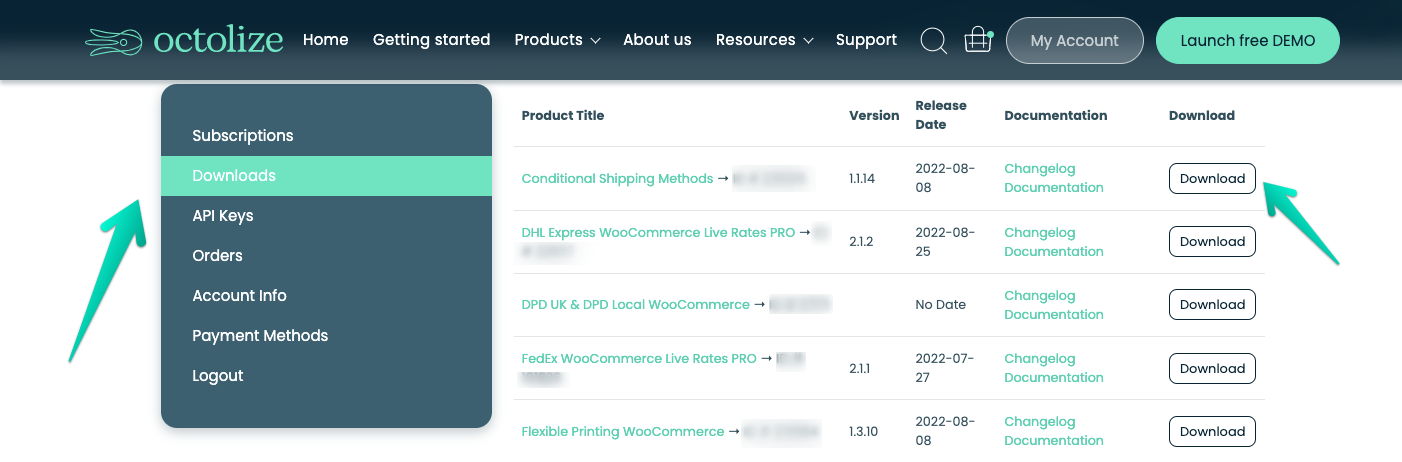
To install the plugin from .zip, you need to download it. In case of the free versions of plugins, you can download them from their site in WordPress Repository. If you have one of the Octolize plugins for shipment facilitation, you need to log in to My account (you will receive login credentials to your e-mail address after the purchase) and go to the tab “Downloads”. There you will find a list of plugins that you own in our store. On the right side is the button “Download”. Click on it, and a package with the plugin will be downloaded to your computer.
Free plugin “Cart Weight” available to download on WordPress repository.Download the paid version of the plugin from My Account on Octolize.
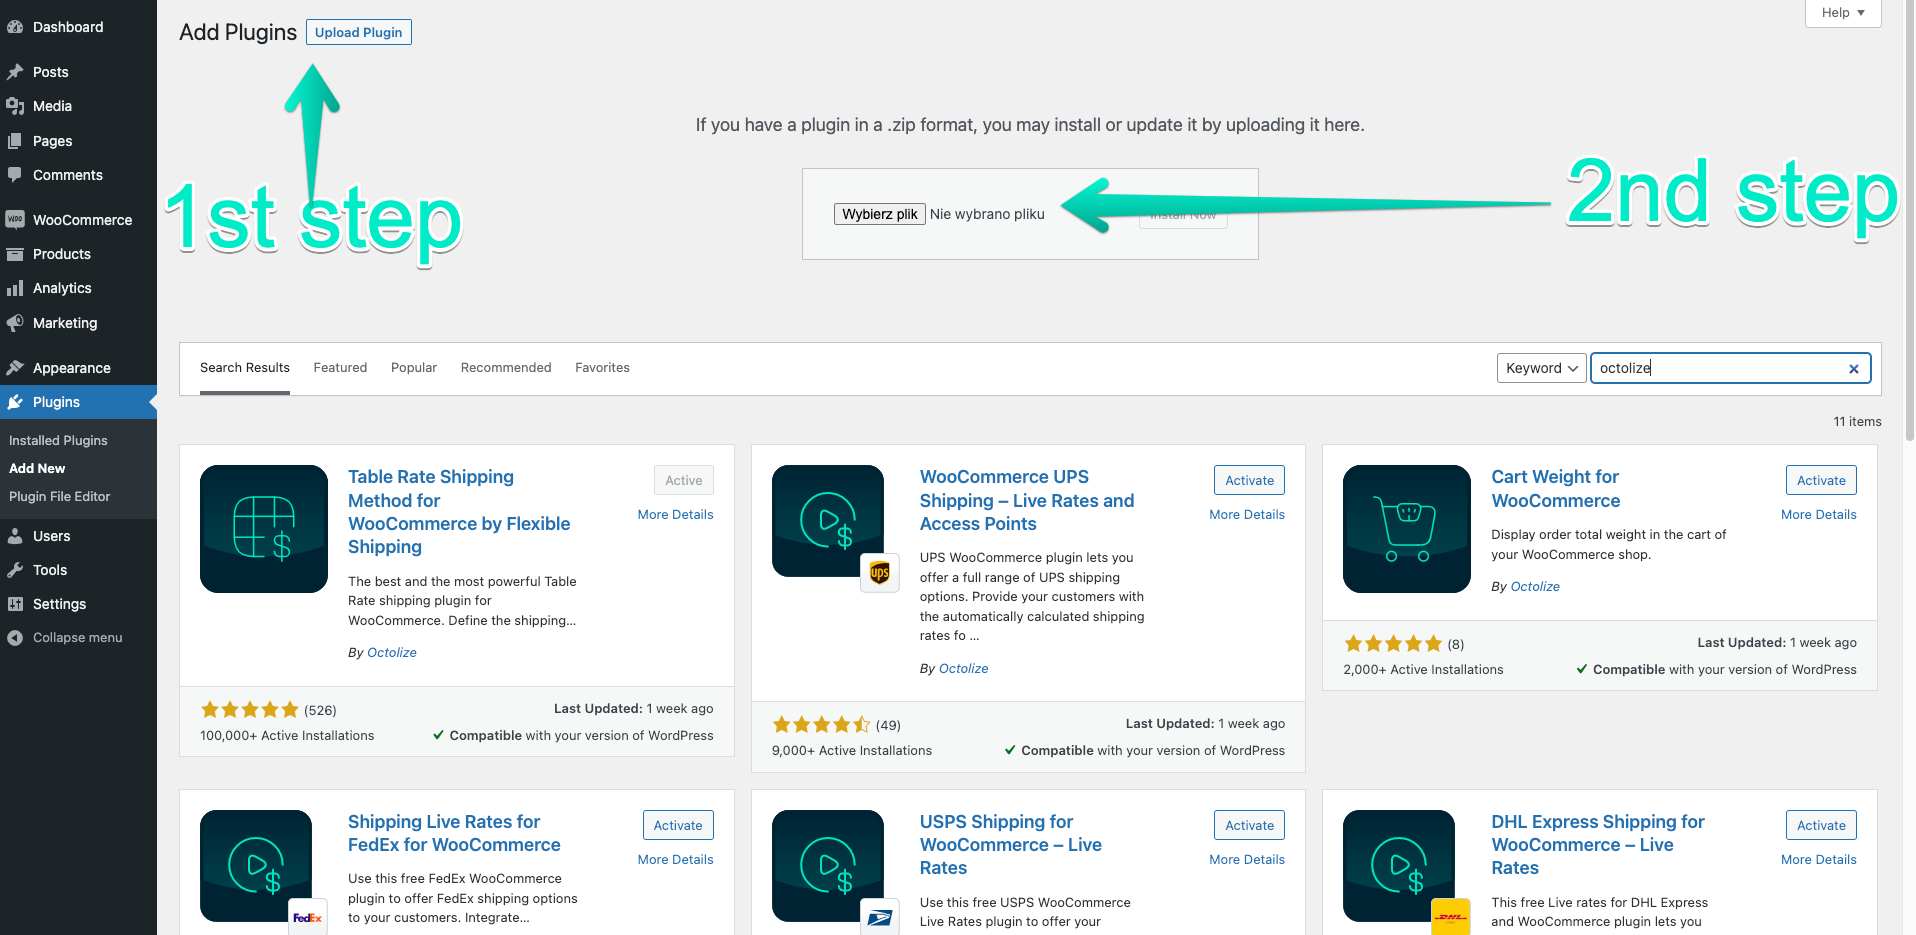
Once you have your ZIP file, go back to your WordPress, tab “Plugins” in the sidebar menu, and click on the button “Add New”.
On the top of the page you will see button ”Upload Plugin”, click on it. Next, load the ZIP file with the plugin from your computer and click “Install Now”.
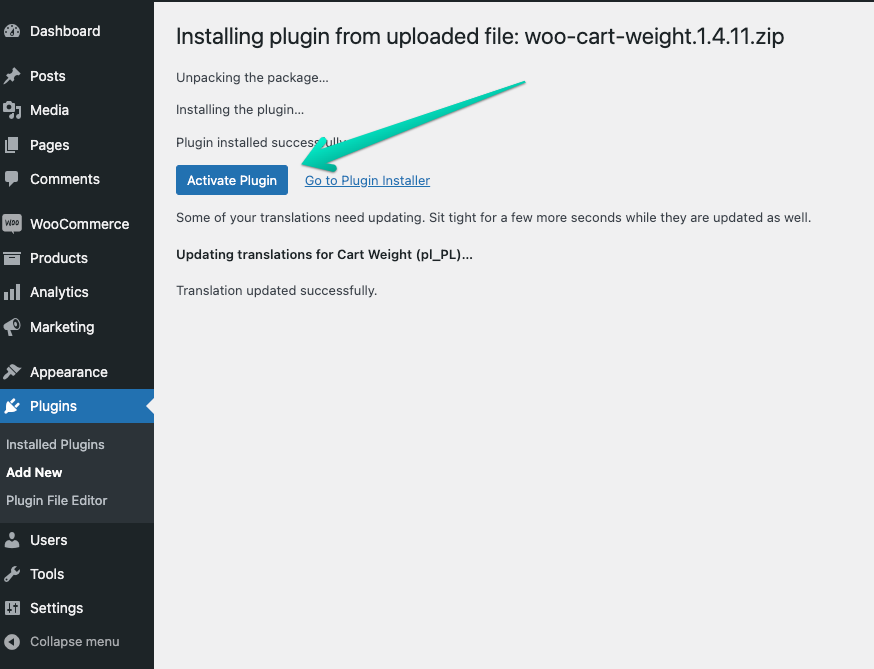
After you installed the plugin, click the button “Activate Plugin”.
That was the last step of the plugin activation in case of free plugins.
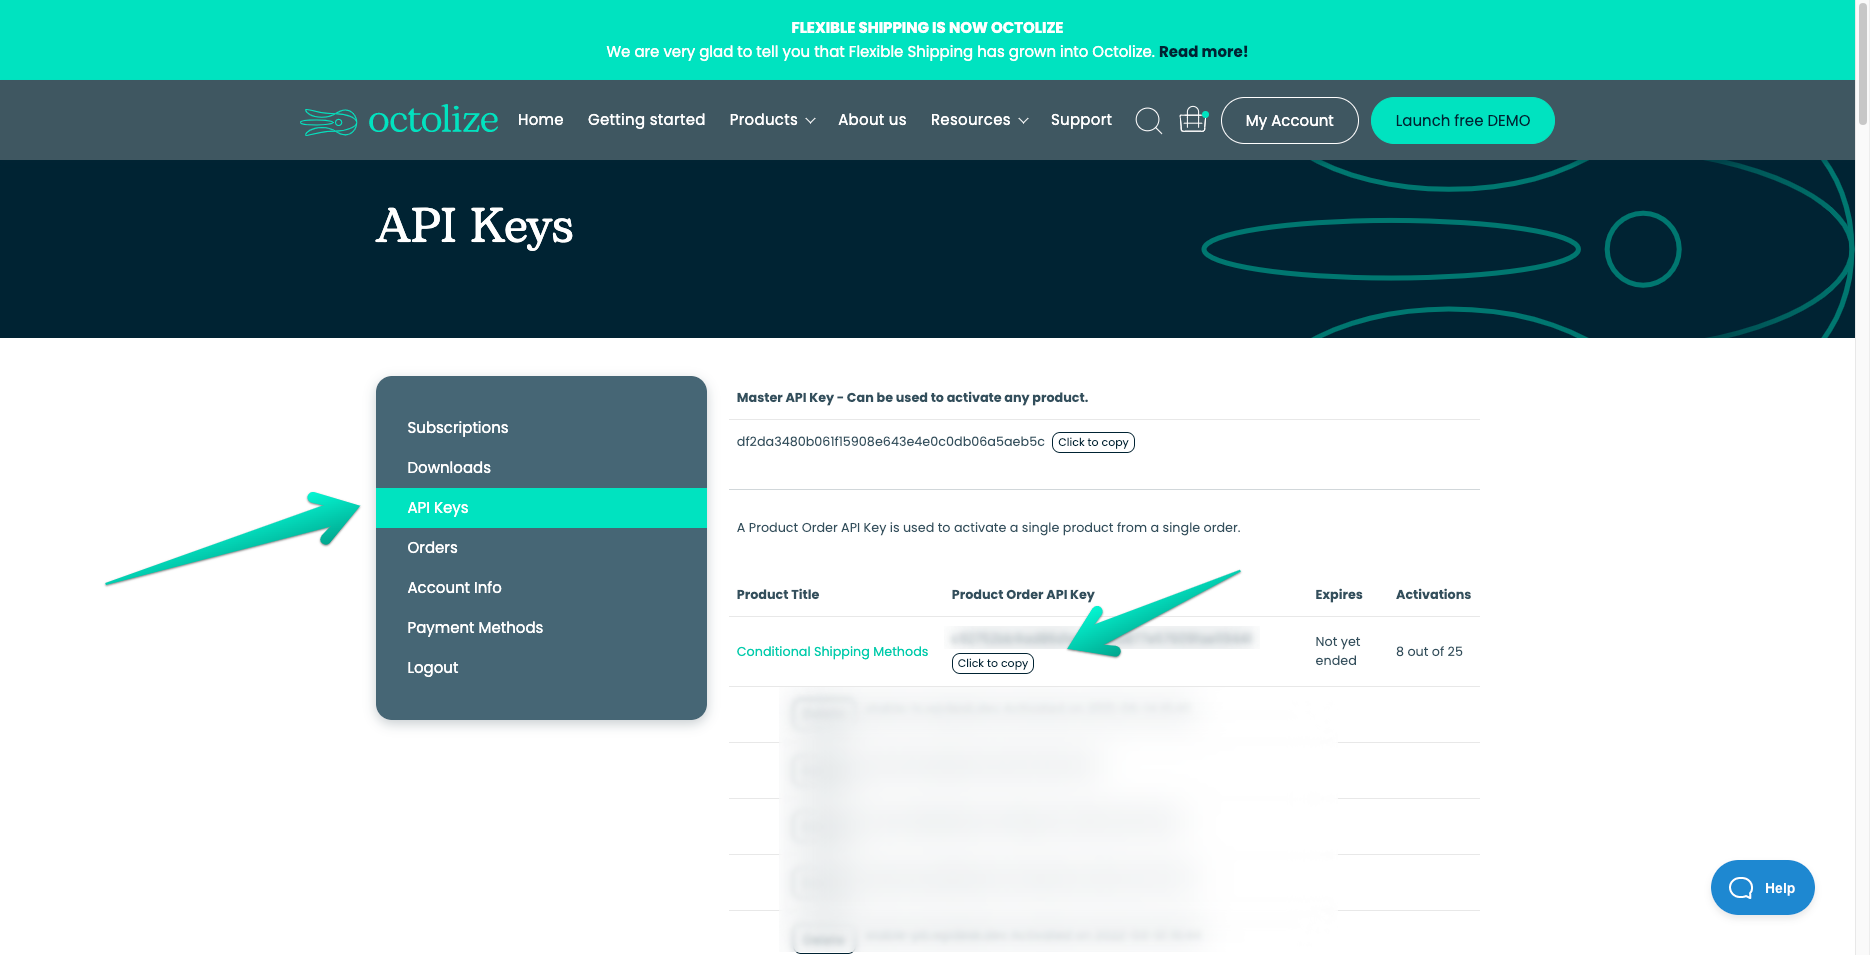
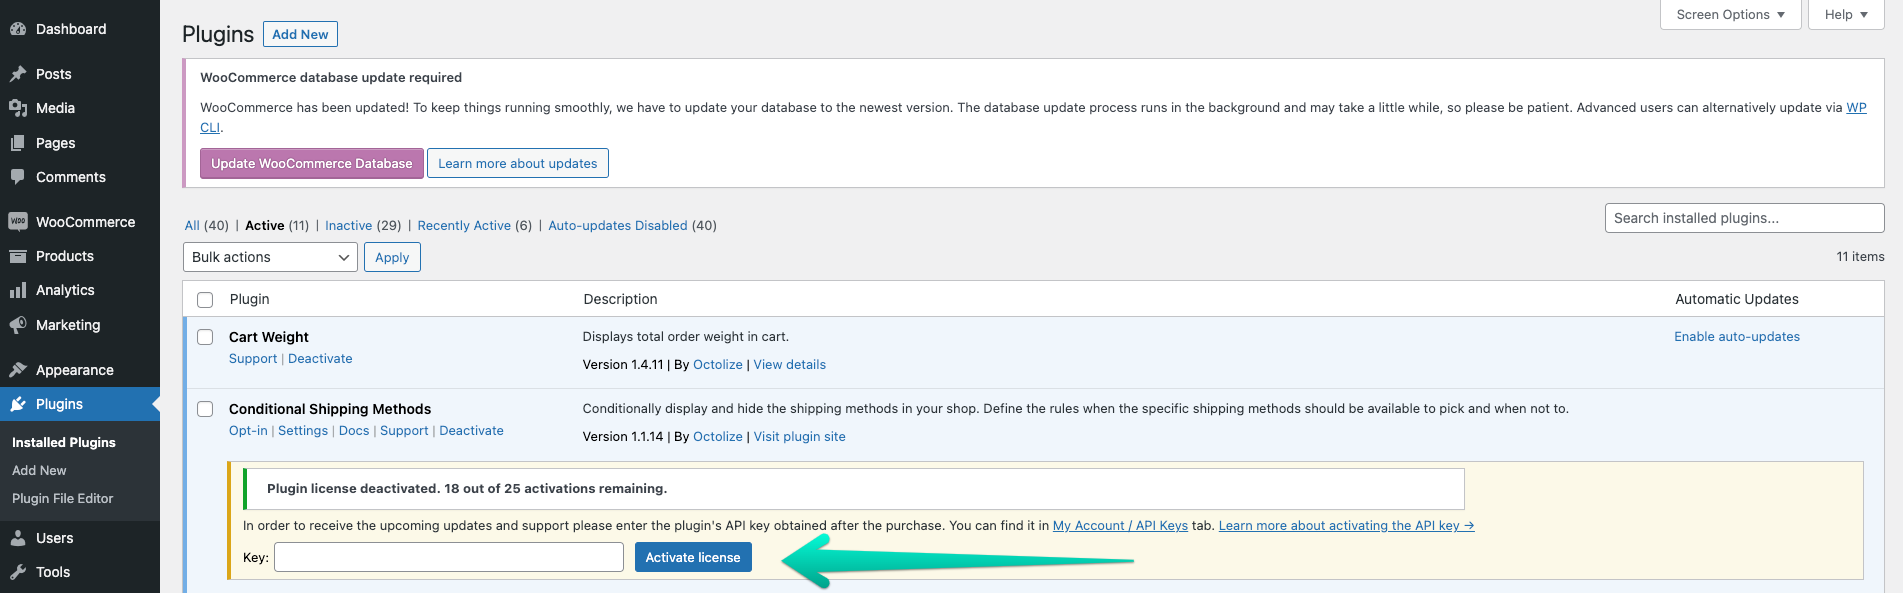
For the paid plugin version, you will need to enter the API Key that will activate the license. API Key will give you access to the upcoming plugin’s updates and our technical support. You can find the key in My Account → API Keys tab on our website.
On My Account you will find the API Key needed for license activation.
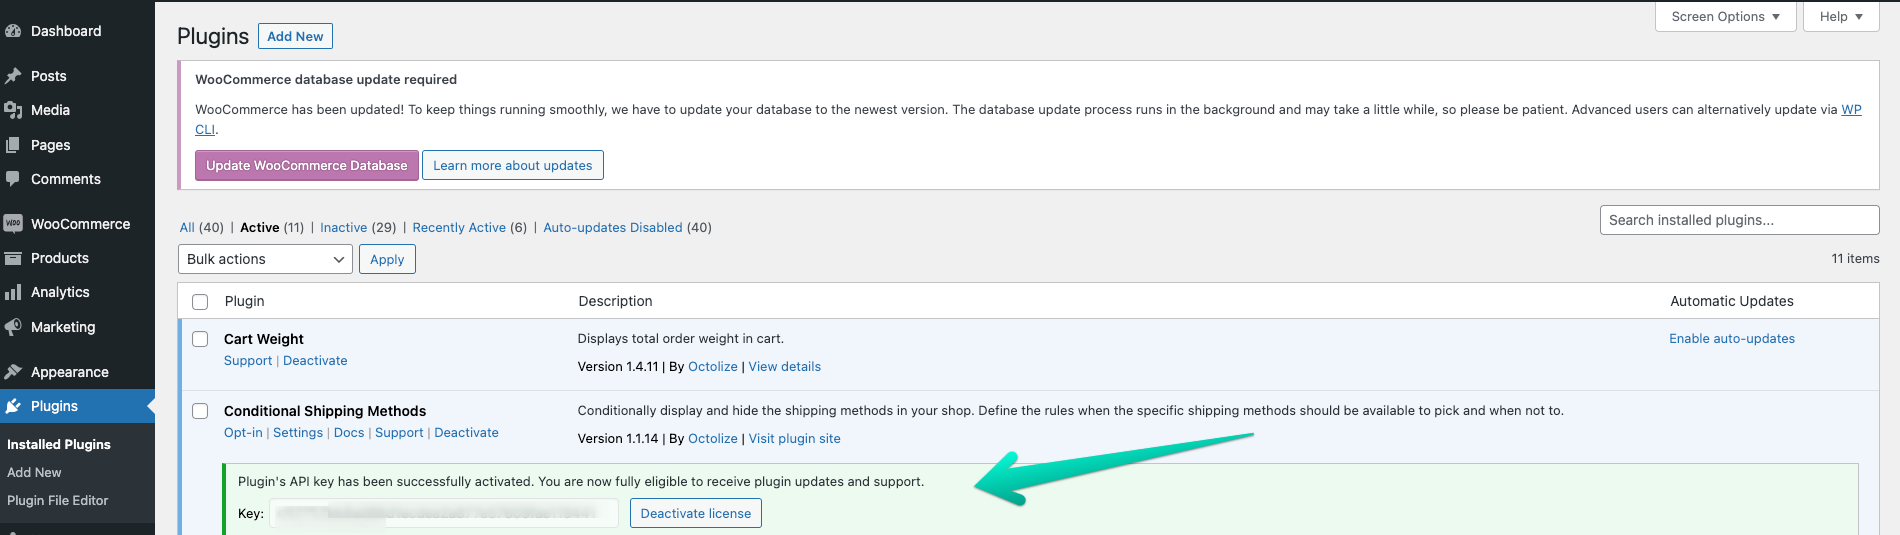
When you find the API Key, copy it and enter it in the key field. Now click “Activate license”. After successful activation, the orange box will change to green.
Enter the API Key in a dedicated box.
The green box means that you have successfully activated the plugin license.
Manually install a WordPress plugin via SFTP (secure FTP)
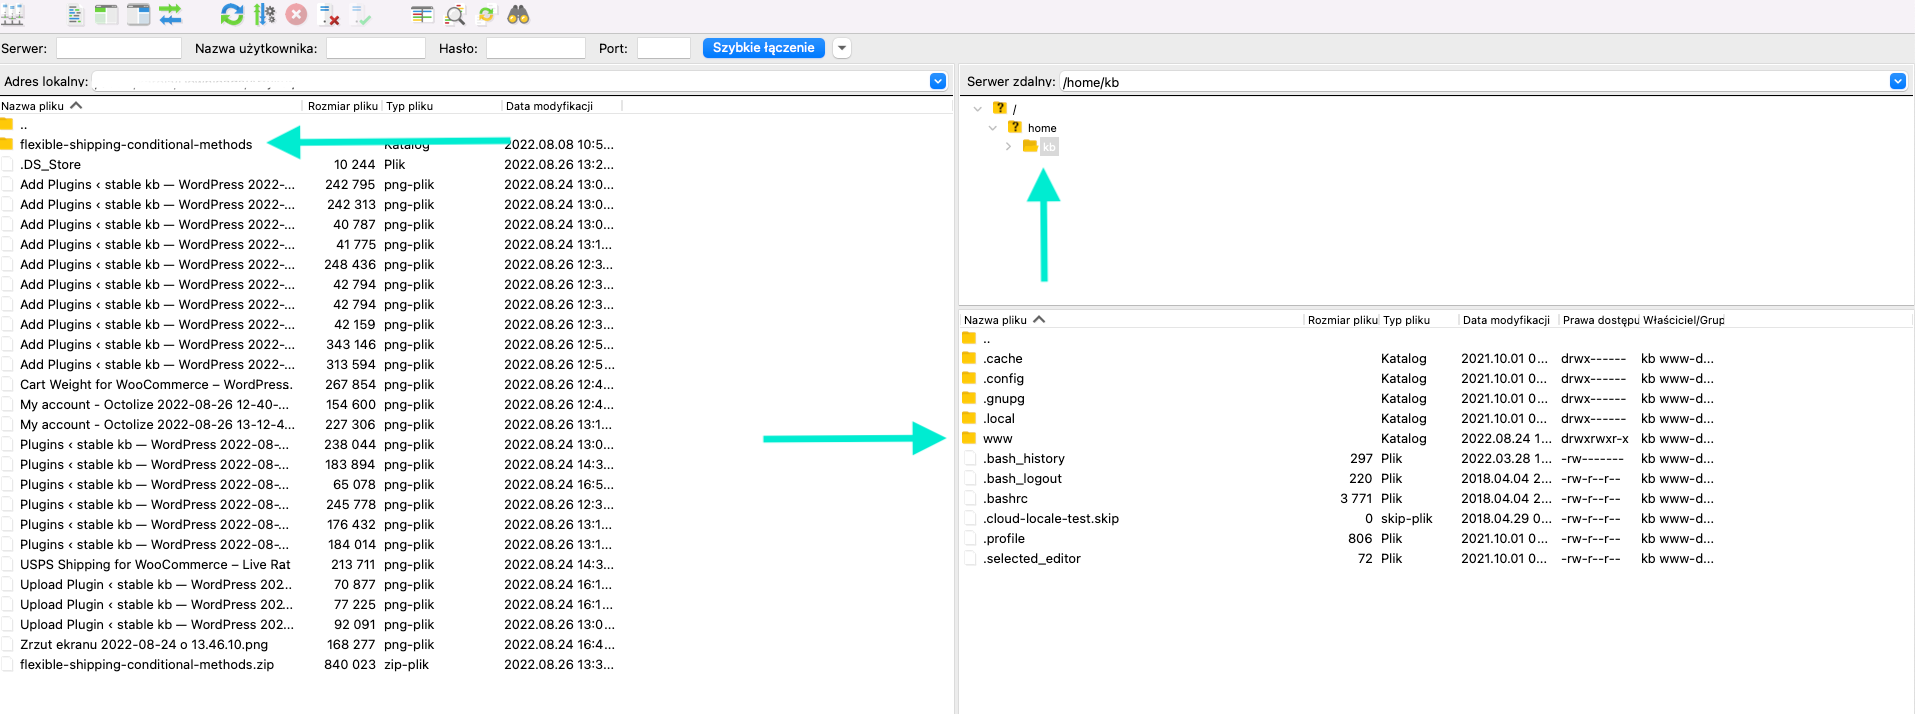
In this example, I will be using the free Filezilla FTP Client to upload the FedEx WooCommerce Live Rates PRO. For manual installation, you will need to download a plugin to your computer. It’s crucial to remember to extract the ZIP file before uploading to the server.
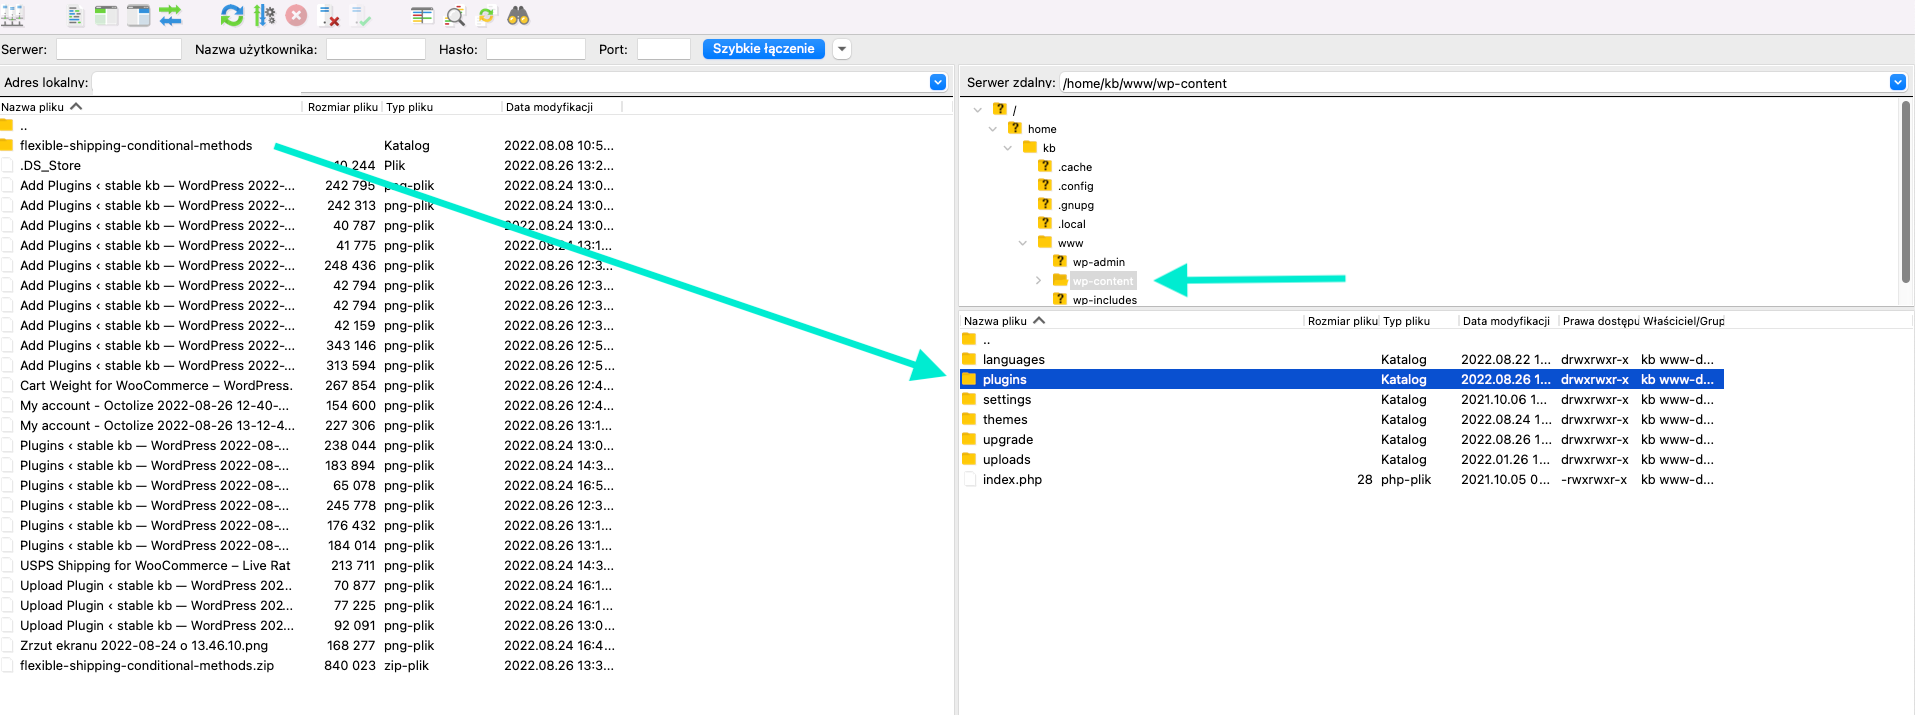
Now it’s time to upload the plugin to WordPress. Locate the plugin on your computer from the FTP level and transfer it to the WordPress folder wp-content → plugins.
Locate the plugin file on your computer and your WordPress files.Transfer plugin file to your folder Plugins.
After transferring the plugin to your WordPress server, it’s time to activate the plugin, which you uploaded via FTP. Go to your WordPress in the sidebar, click “Plugins” tab → Installed Plugins. Find the plugin that you have just installed from the list and click “Activate” to activate the plugin.
If it’s a paid version of the plugin, proceed with the steps described in point 5 and 6 explained in prior method of the plugin installation.
Troubleshooting – common installation issues
While installing plugins is usually a straightforward process, you may encounter some challenges along the way. Among the most common ones are:
Permission denied or write error: The write error, also known as permission refused, blocks the installation of plugins and themes. This issue arises when WordPress does not have the necessary rights to write files or directories.
Out of PHP memory: If your website uses more memory than PHP has allotted, you may have difficulties installing or activating new plugins.
PHP version compatibility issues: A certain version of PHP is needed for some plugins and themes to work. Installation problems might arise from incompatibility.
Error establishing database connection: This issue is more serious and can be caused by a number of things, including mistyped login information or issues with the database server.
Execution time limit exceeded: If the operation takes longer than the maximum amount of time specified in your PHP setup, an error will occur during the installation of a plugin or theme.
WordPress plugin install cannot create directory: It’s a file permission issue that happens because of improper site configurations and settings. WordPress cannot create a folder/directory for your plugin or theme if your file permission isn’t set correctly.
These problems are usually related to installations via the WordPress dashboard. If you encounter these problems, try installing the plugin manually using FTP.
We also have a video on our YouTube channel about common issues during plugin installation. Check it out!
Summary
In conclusion, this article provides a beginner’s guide to installing WordPress plugins, which are tools that enhance the functionality of a WordPress website. It outlines three methods for plugin installation: Installing from the WordPress Repository, Installing from a .zip File, and Manual Installation via SFTP. Furthermore, it also addresses common installation issues, such as permission errors, PHP memory limits, and directory creation problems, and encourages using FTP for troubleshooting.
Bartosz Gajewski is a content and marketing specialist with a solid background in SEO, WordPress content strategy, and technical documentation for digital products. With years of hands-on experience in both in-house and freelance roles, he supports tech companies – especially in the SaaS and e-commerce space – by creating content that informs, engages, and drives results.
His approach blends storytelling with data-driven SEO, and he’s been involved in projects ranging from rebranding and product marketing to growth experiments and copywriting for complex software tools. On the blog, he shares actionable insights from his work across marketing teams, product documentation, and online store optimization.
We use necessary cookies to make our site work. We'd also like to set additional cookies to understand site usage, enhance your browsing experience, and serve personalized ads or content. By clicking ‘Accept All,’ you consent to our use of additional cookies.
Functional
Always active
The technical storage or access is strictly necessary for the legitimate purpose of enabling the use of a specific service explicitly requested by the subscriber or user, or for the sole purpose of carrying out the transmission of a communication over an electronic communications network.
Preferences
The technical storage or access is necessary for the legitimate purpose of storing preferences that are not requested by the subscriber or user.
Statistics
The technical storage or access that is used exclusively for statistical purposes.The technical storage or access that is used exclusively for anonymous statistical purposes. Without a subpoena, voluntary compliance on the part of your Internet Service Provider, or additional records from a third party, information stored or retrieved for this purpose alone cannot usually be used to identify you.
Marketing
The technical storage or access is required to create user profiles to send advertising, or to track the user on a website or across several websites for similar marketing purposes.