In this article, you will learn how to configure WooCommerce USPS shipping method with live cost calculations using the free WooCommerce plugin. I’ll explain why you should use automatically calculated real-time shipping rates, and guide you through it.
Providing accurate and reliable shipping cost for all the available shipping options is crucial when it comes to ecommerce. Most customers choose their shipping method based on the cost. That’s why getting the right shipping rates in WooCommerce can be crucial. Especially when it comes to the difference between an abandoned cart and a successful conversion.
Displaying real-time USPS shipping rates directly on the checkout page helps customers make informed decisions and improves transparency.
This is why real-time WooCommerce shipping plugins like Live rates for USPS and WooCommerce are gaining so much popularity in the WordPress community. They provide exactly what online store customers need, an individual approach, even if it is only simulated. The clients see shipping methods with automatically calculated shipping cost based on their address and the exact products they order. This may seem like a small detail, but based on current ecommerce trends, they can be a significant factor.
Many shop owners also prefer using a free version of a USPS shipping plugin for WooCommerce to access essential features without extra cost.
They are the opposite solution to flat rate shipping and table rate shipping, where the store’s owner sets all the shipping cost by himself. This solution saves a lot of time when configuring shipping costs. Furthermore, it eliminates the need to update rates whenever the carrier changes their pricing.
When you think about shipping in the US, the obvious answer is USPS. The United States Postal Service (USPS; also known as the Post Office, U.S. Mail, or Postal Service) is an independent agency of the United States federal government. It is responsible for providing postal service in the United States, including its insular areas like Puerto Rico. That’s why the USPS has a monopoly on “letter” delivery within the United States. What’s more, the Post Office has exclusive access to letter boxes marked “U.S. Mail” and personal letterboxes in the United States.
All of this means that USPS shipping can become a huge advantage for any store offering US shipping. Of course, the USPS has a lot of competition in the form of UPS and FedEx, but it’s still a tried and reliable brand that many potential customers are willing to choose.
Live rates for USPS and WooCommerce is a new WooCommerce services plugin from Octolize. That WooCommerce extension allows you to display automatically calculated USPS shipping cost for each order. Display the available USPS services automatically in the cart and checkout based on the customer’s shipping address and cart weight. The USPS plugin is designed to simplify shipping operations for WooCommerce shop owners, making it easier to manage and optimize shipping options for their e-commerce stores.
Most of all, it’s completely free, and you can download it now from the official WordPress repository. Download it and install it in your store if you want to go next in this tutorial.
Offer your customers the automatically calculated USPS shipping live rates.
Add the handling fees, insurance and more. Adjust them to your needs with just
a few clicks!
As you can see on the plugin page linked above, this free WooCommerce USPS shipping plugin lets you offer a full range of USPS shipping options. Integrating the plugin takes only 5 minutes. Your clients will see every USPS shipping option in the checkout of your store with its real price.
This plugin is based on the same foundation as the very popular and well-received WooCommerce UPS shipping plugin that has more than 8,000 active installations.
The USPS shipping plugin for WooCommerce is packed with features designed to simplify and enhance your shipping operations. One of its standout capabilities is the ability to display real-time USPS shipping rates directly on your store’s cart and checkout pages, ensuring your customers always see the most accurate shipping cost for their orders. The plugin also makes it easy to print shipping labels, saving you time and reducing errors in the shipping process.
The plugin supports USPS services like Priority Mail, First Class Mail, and Media Mail, offering varied shipping options. You can restrict Media Mail to eligible products to comply with USPS rules. The PRO version allows defining custom shipping boxes for added flexibility. Both free and PRO versions integrate with WooCommerce shipping zones by region. Whether shipping locally or nationwide, you can manage rates and delivery estimates from your WooCommerce dashboard.
Maybe you are wondering how that works. Understanding how each tool works helps you decide whether to use it, and I completely understand that. So, I will try to present in the simplest possible way how the calculates the .
All the “magic” happens in three steps:
The key element is the API request. That’s why it is so important to configure the plugin settings correctly. No worries, it is not difficult. I’ll show you everything step-by-step.
A customer visiting your WooCommerce store will be able to see the shipping rates for all the WooCommerce USPS shipping services that you have enabled in the USPS shipping plugin’s settings. To display live , it is necessary to install and activate the . After configuring the plugin and adding the , customers visiting your will be able to see the rates for all the services that you have enabled in the ‘s settings.
In order to offer your customers the available USPS shipping services, you need to own a USPS account and your credentials acquired during the registration process.
To reach the plugin General settings, go to WooCommerce → Settings → Shipping → USPS Live Rates. To connect your WooCommerce store with the USPS API, you have to two different ways. It is WebTools API(deprecated one) and REST API(which we recommend).
Here you can find the REST API connection window:
We recommend to check our comprehensive documentation, in which we have described the USPS SKU Services as well as how to connect them properly.
Once you enter the login credentials, click on the Save changes button. The API Connection Status should change to OK and turn green. If for some reason, the plugin is not able to establish the connection with the USPS API, you will see the error message coming from the API with the detailed information on the cause of the problem. In that case, make sure that the credentials are correct or contact the USPS support directly.
You can also enable the debug mode. Remember to use it only when you have any issues with displaying the rates. When it comes to the shipper’s address, that will be added to API’s request, the address you’ve entered at WooCommerce → Settings → General → Store Address will be used by default.
If you have successfully connected to the USPS API, you can proceed to the next step, which is to add and configure the USPS shipping method.
Adding the WooCommerce USPS shipping method uses the same mechanism as the WooCommerce default shipping methods, and the USPS Live Rates can be easily added the same way.
In order to create a new USPS Live Rates shipping method, simply go to WooCommerce → Settings → Shipping:

Next, click the name you want to add the Live Rates method within or add a new one.
You can set the shipping zone to whole countries or strict it to smaller parts based on a postal code. Remember that WooCommerce USPS shipping plugin allows you to offer domestic and international shipping, so it can be also used for countries other than US.
Once you are in, hit the Add shipping method button at the bottom of the shipping methods table:
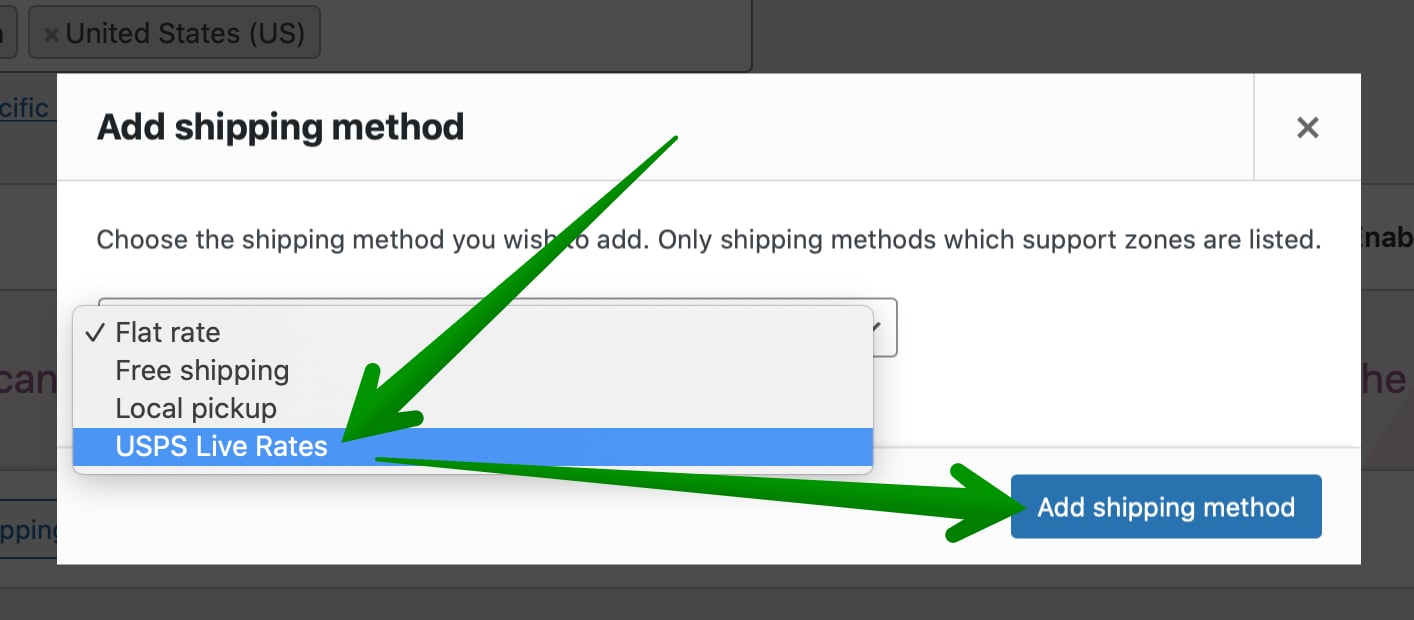
In the popup window which should appear, select the USPS Live Rates from the dropdown list and confirm your choice with Add shipping method button once again:

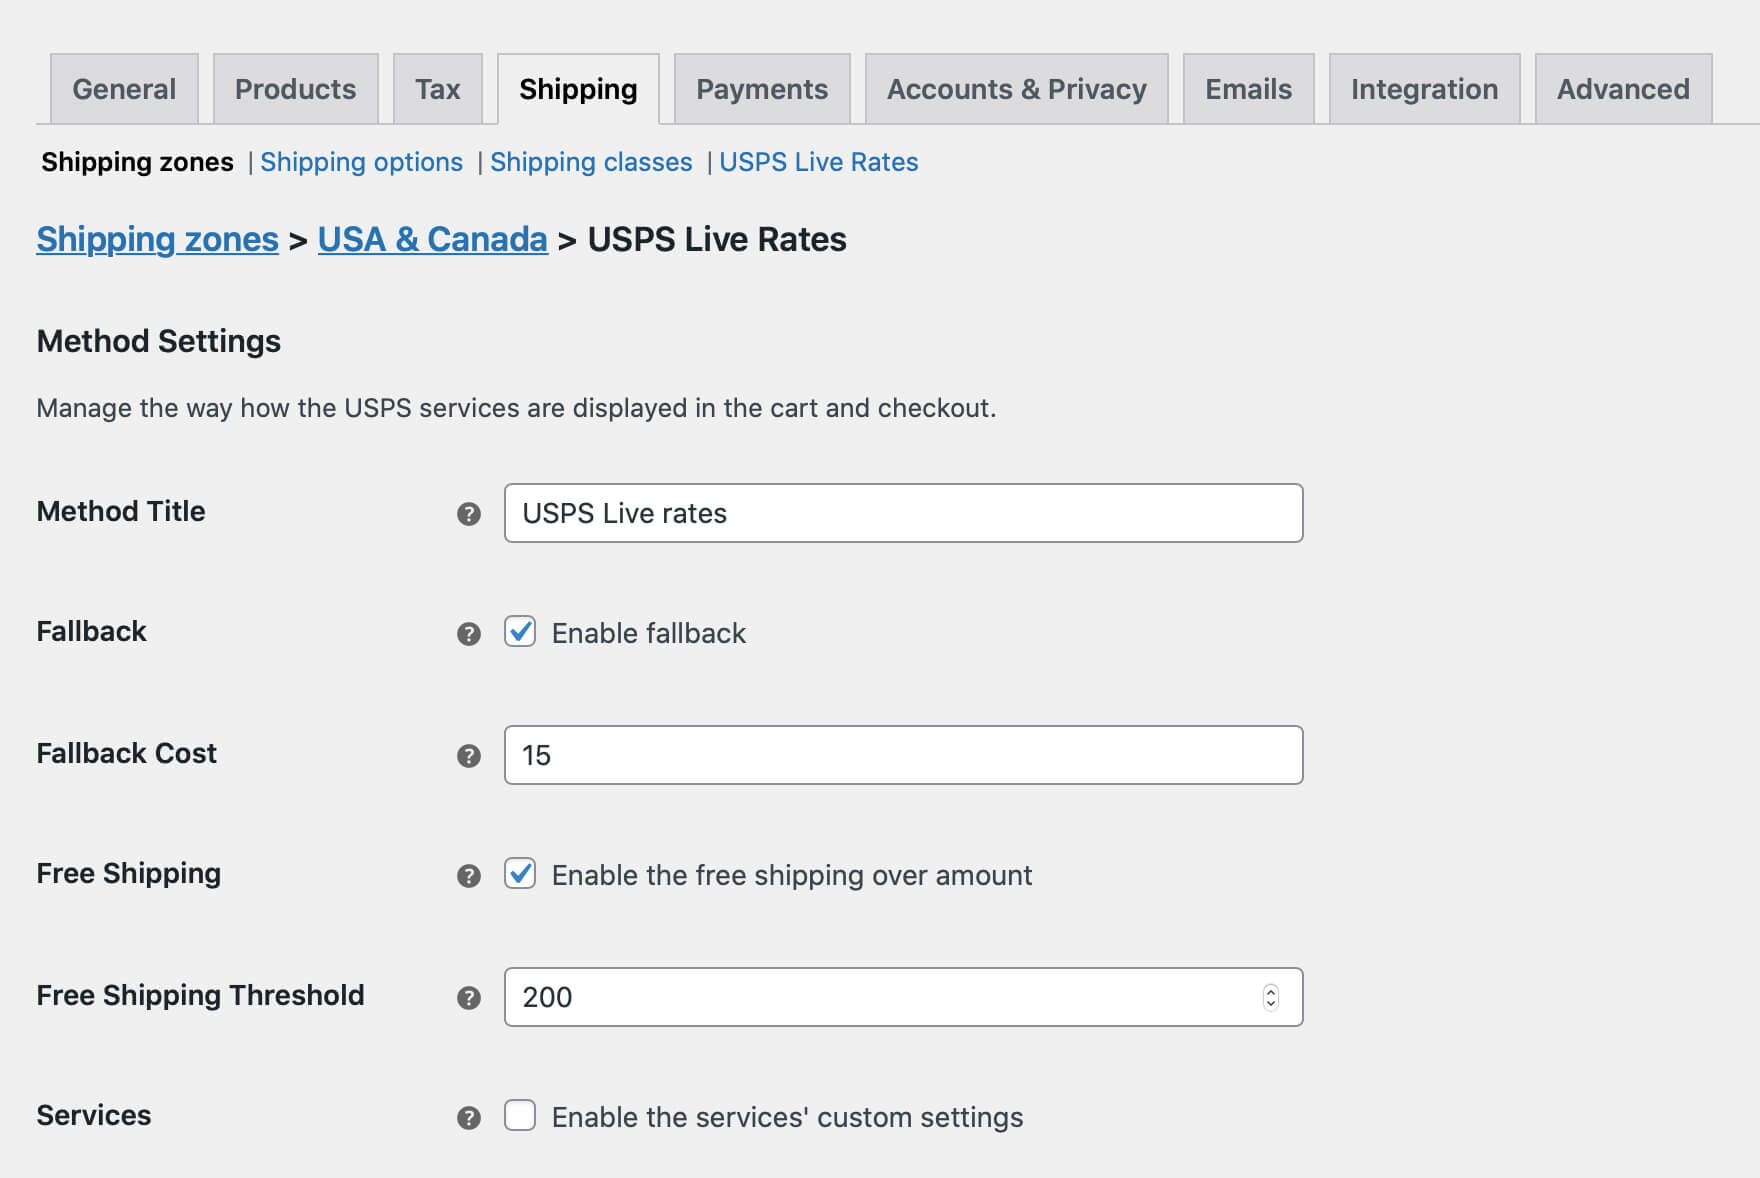
Right after it is added, click its name to reach the Live Rates method’s configuration screen.
When you have your USPS shipping method, it’s time to configure it. You can set the Method Title that will be displayed in the checkout page for your customers. The plugin allows also to enable the Fallback. It’s a flat rate used when the API returns no matching shipping rates, letting customers complete checkout. This option avoids errors and helps keep sales flowing. You can also set Free Shipping over a specific amount to boost conversions in your store.

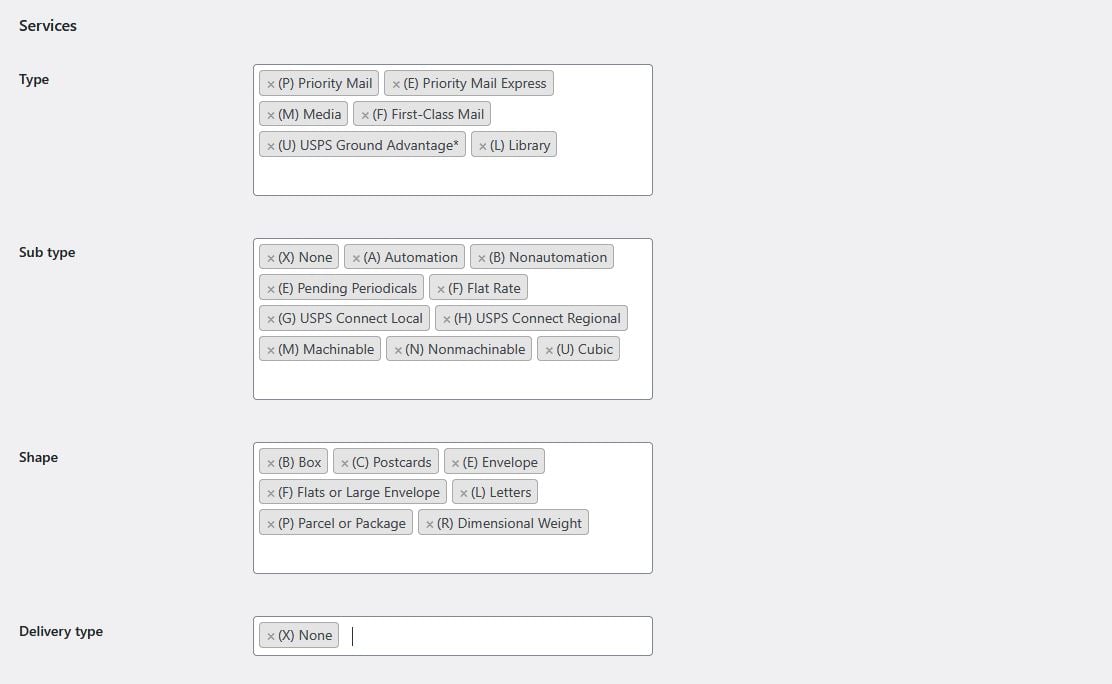
To limit available USPS services when using the REST API, use the Type, Sub-Type, Shape, and Delivery Type fields. Each option helps narrow down the list of available SKUs shown at checkout. This gives you full control over which USPS services are offered to your customers. These fields correspond to USPS service attributes, such as package size or delivery preferences, and allow precise filtering of the shipping methods displayed. For more details, see the USPS REST API Services guide.

USPS REST API integration allows you to define exactly which shipping services should be available at checkout. This includes both domestic and international services. These settings give you full control over the shipping options displayed to your customers. You can ensurr they match your specific needs for local and international delivery.
This flexible approach lets you easily tailor the USPS shipping method to support various parcel types and delivery scenarios. Keep in mind that not all available options are visible in the screenshot, make sure to explore the full set of configuration options.
If you finished the configuration, click on Save changes button. Now, the shipping method should be displayed for all the customers matching that shipping zone.
The WooCommerce USPS plugin supports international shipping by providing live rates for USPS international services. They are based on the customer’s shipping address and cart contents. The plugin uses the USPS API to fetch real-time shipping costs for available international options. The most popular international USPS services are Priority Mail International and First Class Package International. Shipping zones can be configured to cover specific countries or regions, enabling you to offer relevant USPS shipping methods to international customers with accurate pricing shown at checkout.
This setup is ideal for stores selling lightweight or compact products shipped affordably via USPS internationally. Examples include bookstores sending paperbacks and magazines, apparel shops shipping clothing and accessories, or electronics stores offering small gadgets. By integrating live USPS rates, stores provide transparent, reliable international shipping options without manual rate management. This helps reach customers worldwide efficiently and affordably.
If you need more advanced shipping options, you can also use the PRO version of the UPS Live Rates WooCommerce plugin.
Main features of the PRO plugin:
Sorry, but this wasn’t at all helpful because my USPS Live Rates setup page doesn’t look like what you show in this article. Under “Services,” I have “Type, Sub Type, Shape, Delivery Type,” with no helpful advice on what those mean or how to choose the settings. I have been struggling with this for days now, have contacted Support with no reply, and am probably going to have to go with another company’s product because I cannot get anything to show up other than the Fallback amount, even though the API connection says “ok.” Very frustrating!
Hi Steve,
Thank you for your message. I am sorry for the late response and for the issues you have encountered.
If you are seeing tabs like “Services,“Type, Sub Type, Shape, Delivery Type,”. You are using the REST API connection. In the REST API connection you should match proper tabs in order to gain access to particular services.
We have a comprehensive documentation about this type of connection – https://octolize.com/docs/article/usps-usps-rest-api-services/.
In this documentation, you can also find the official USPS SKU documentation.
As we value the feedback of our clients, I have updated this article.
Kind regards,
Mateusz