- Home
- WooCommerce
- What plugin are you looking for?
- Shopify
- About us
- Blog
- Docs
- Contact us
- What can we help you with?

Subscribe to our newsletter

Managing shipping in WooCommerce can become complex, especially when your store offers a wide variety of products—some of which might not require shipping at all. Whether you’re selling digital goods, offering local pickup, or simply want to limit available shipping methods for select products, WooCommerce gives you the flexibility to control it all.
In this guide, we’ll show you how to disable WooCommerce shipping for certain products, step by step. You’ll also learn about the benefits of applying those restrictions and how to handle them using plugins like Conditional Shipping Methods and Flexible Shipping Pro.
Watch our step-by-step guide on how to disable shipping options for certain products, categories, or tags in Flexible Shipping PRO:
We have blogged many times about the importance of having multiple shipping methods in a WooCommerce shop, and how this has a positive impact on the conversion rate of an online shop. However, there are situations where it is much more important to remove or hide shipping method for specific products or product groups.
Below are the key benefits of using this approach in your WooCommerce store:
Displaying shipping options when they aren’t needed can confuse customers and create friction during checkout. If a product doesn’t require delivery—such as a digital item or a service—offering shipping methods is irrelevant and can reduce trust in the store’s professionalism. By hiding shipping for non-shippable items, you simplify the checkout process and remove unnecessary steps.
Shipping costs often vary depending on product type, weight, size, and delivery conditions. By disabling shipping for certain products, you prevent WooCommerce from calculating costs that don’t apply, which reduces the risk of undercharging or overcharging customers. This is particularly important when using complex setups such as WooCommerce Table Rate Shipping, where logic must stay precise.
If you’re offering free shipping for certain products but want to disable WooCommerce free shipping for specific products, product-level control becomes crucial. For example, you may want to offer free shipping on low-margin accessories but exclude heavy or oversized items that would eat into your profit margins. With proper configuration, you can selectively restrict access to free shipping based on product type or category.
In some cases, specific products may not be eligible for nationwide or international delivery. For example, temperature-sensitive goods, regulated products, or high-risk items may require special handling or may be limited to local delivery. Using shipping restrictions, you can set WooCommerce to disable shipping methods that aren’t appropriate for those products—helping you stay compliant and minimise fulfilment issues.
Customers often purchase multiple types of products in a single order—like physical goods bundled with digital downloads. In these scenarios, applying the same shipping logic across the cart can lead to incorrect fees or unnecessary delivery options. By disabling shipping for specific products (e.g., virtual items), WooCommerce can focus its shipping logic only on what needs to be physically shipped, improving both clarity and cost management.
When shipping rules are not well defined, store owners may need to manually adjust orders or refund shipping fees, leading to inefficiencies and customer dissatisfaction. By setting clear shipping exclusions through automation or plugins like Conditional Shipping Methods for WooCommerce, you can reduce the need for manual intervention and improve your overall workflow.
Out of the box, WooCommerce doesn’t include a built-in feature to disable shipping for specific products, but it’s possible with a bit of configuration. There are three main approaches:
If a product is marked as Virtual, WooCommerce will automatically skip the shipping calculation for that item. To enable this, go to the product’s edit page → check the “Virtual” box → save.
This is ideal for:
For more flexibility, especially if you want to disable only specific shipping methods (like free shipping) for certain products or categories, you’ll need a plugin such as Conditional Shipping Methods for WooCommerce.
It allows you to:
Shipping classes can be used to group items that require specific rules. For instance, assign a class called no-shipping and create a rule that disables shipping when products with this class are in the cart.
It’s time to move on to a concrete guide and show step-by-step how you can disable WooCommerce shipping for certain products. In this case, I will use Conditional Shipping Methods for WooCommerce plugin, which allows shipping methods to be displayed and hidden based on the contents of the shopping cart.
Conditionally display and hide the shipping methods in your WooCommerce store based on defined rules.
View Details or Add to cartFirst, install and activate the plugin. After that, go to the Conditional Shipping Methods plugin configuration screen at WooCommerce → Settings → Shipping → Conditional Shipping Methods.
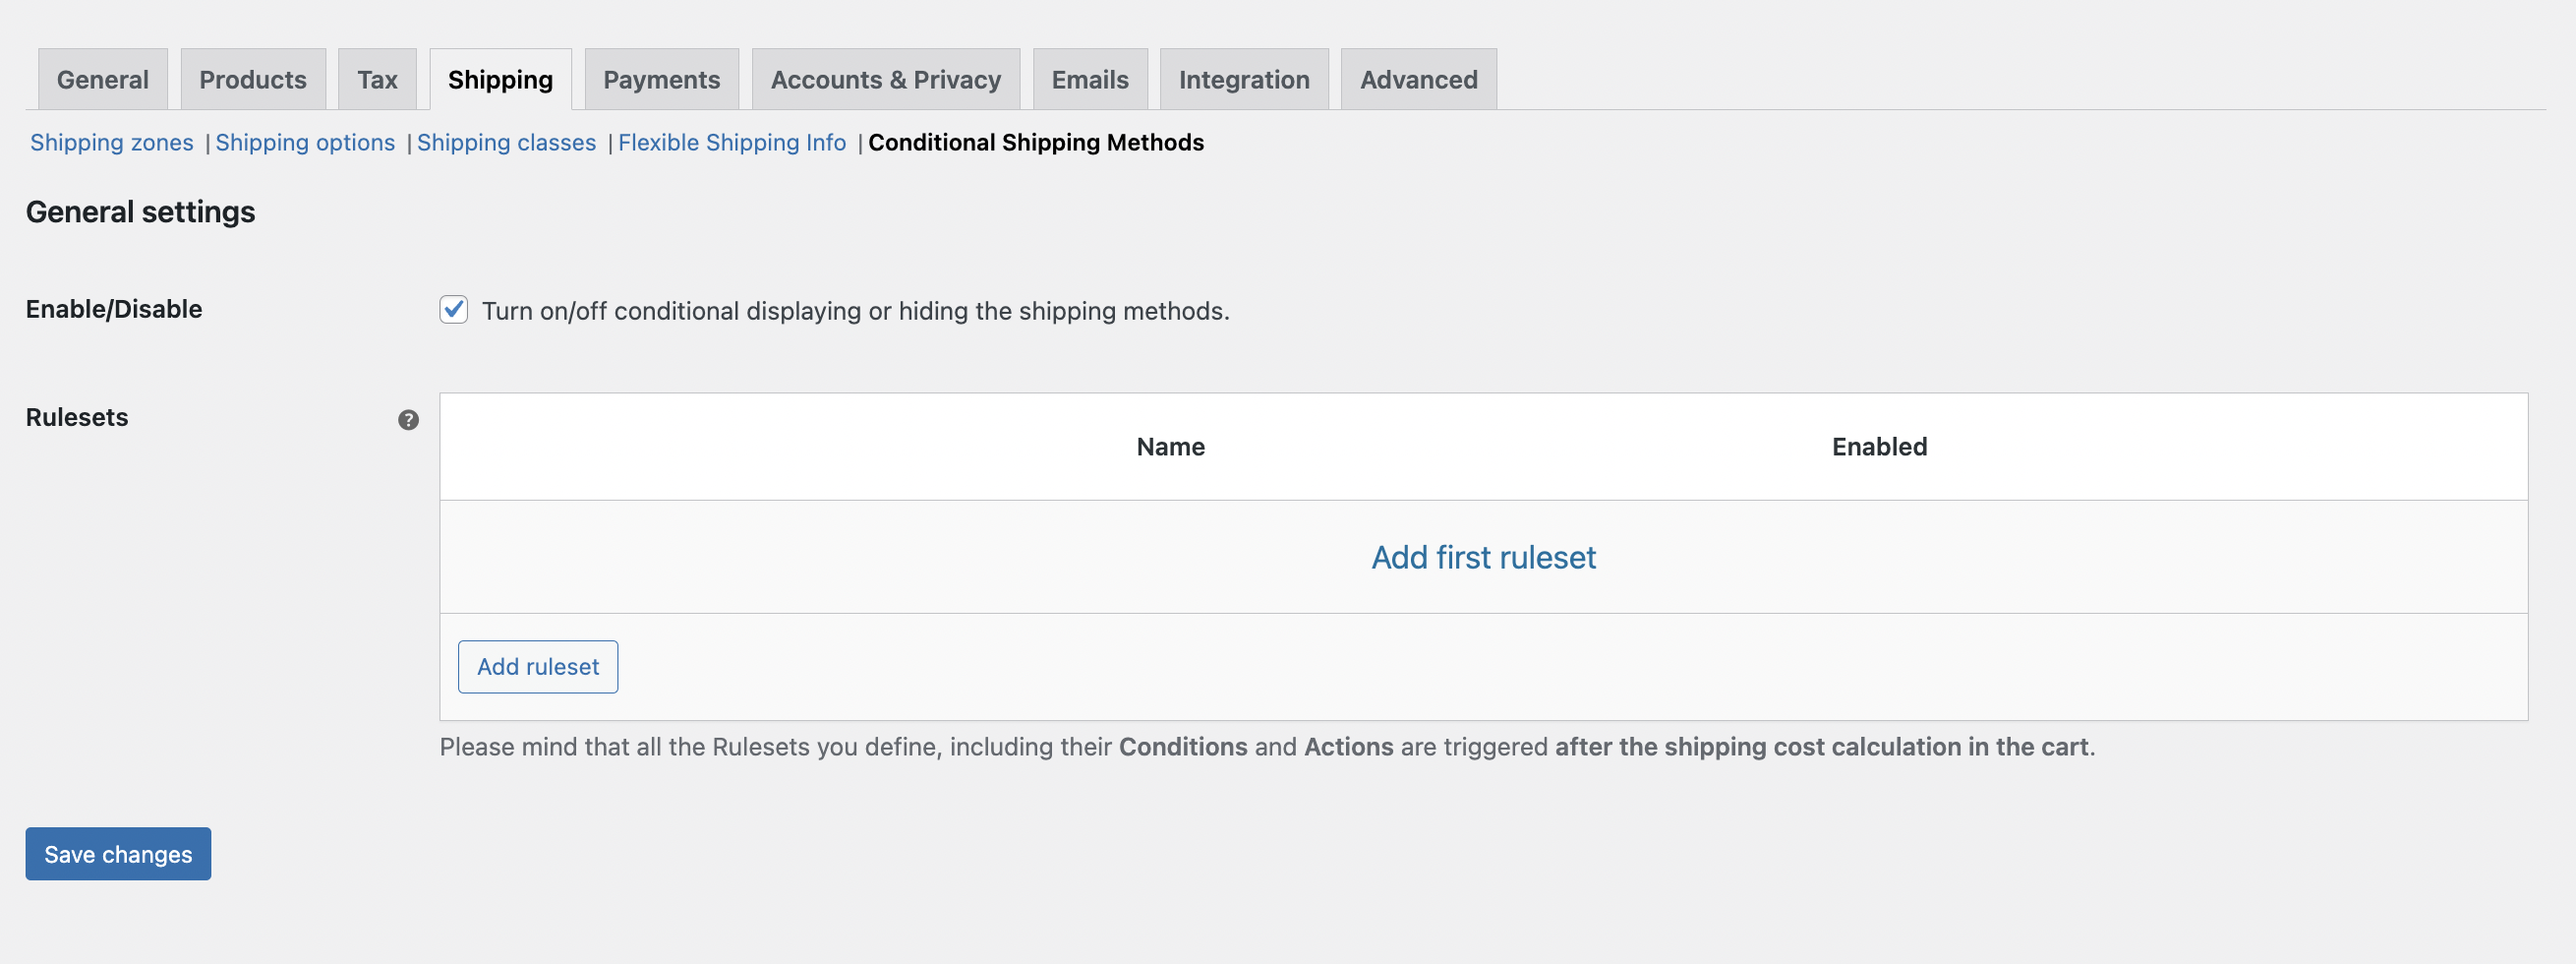
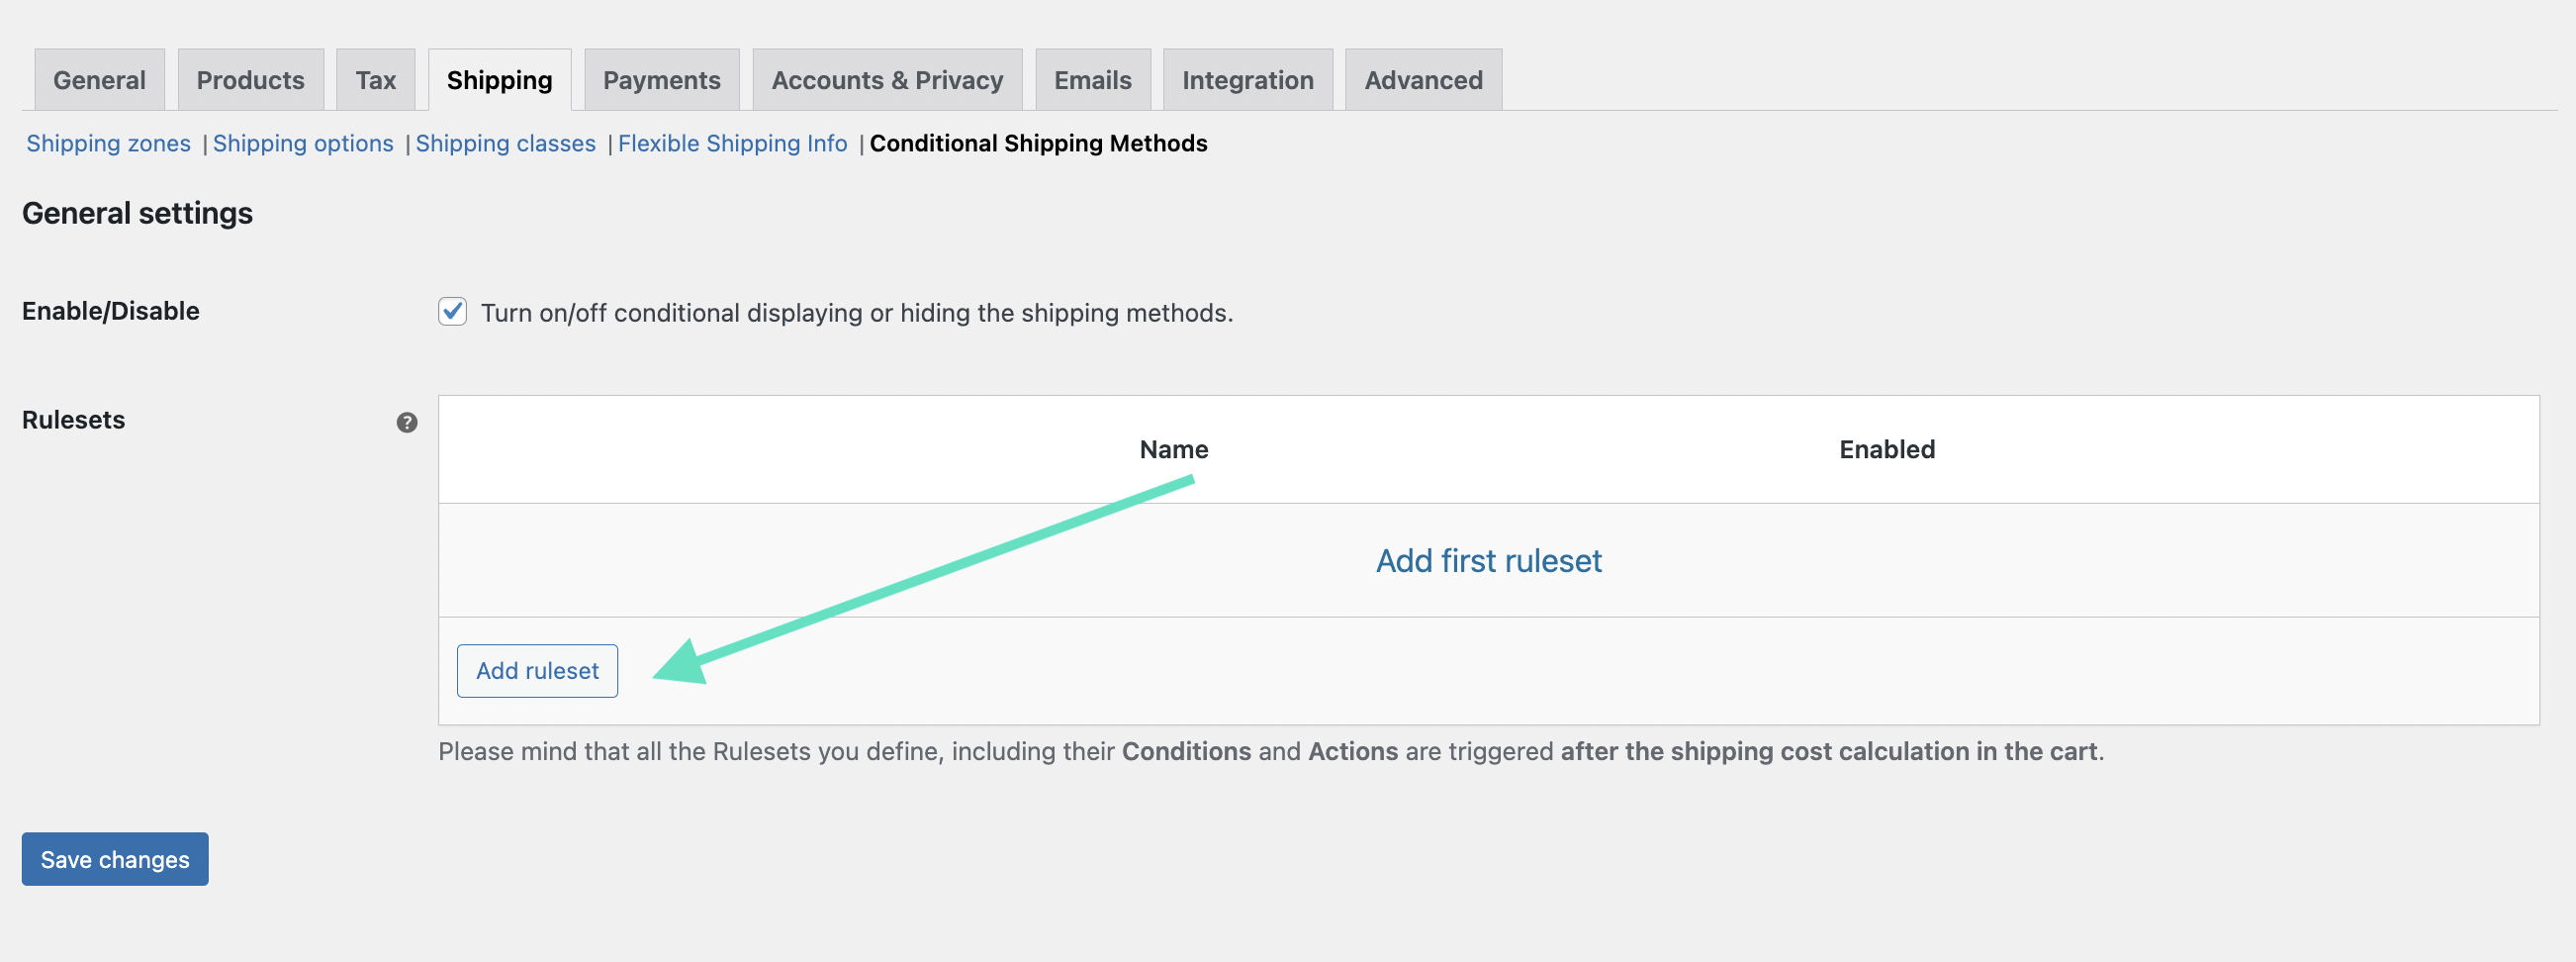
Then click on the Add ruleset button to configure a new set of rules on how your shipping methods are to be displayed.
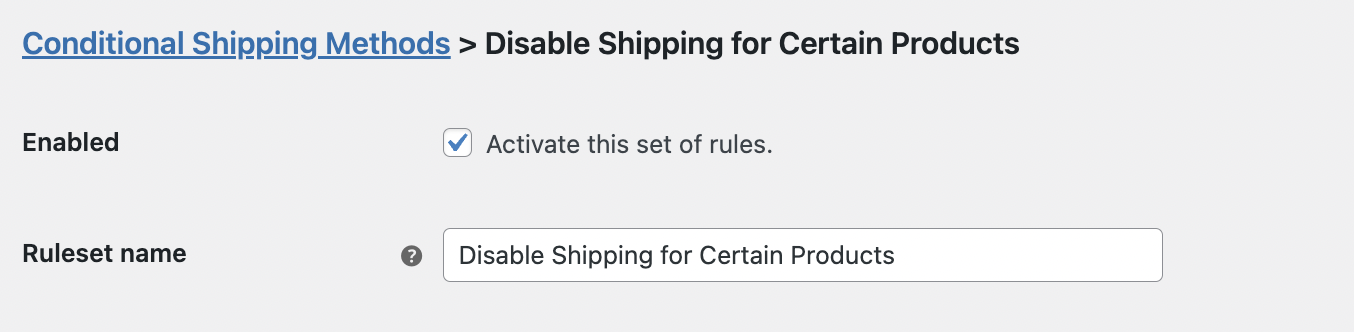
You will be redirected to a new window where you can configure all aspects of the dispatch display.
Start by entering a name in the Ruleset name field. It is useful that it clearly describes what its purpose is. In this case, I suggest something like “Disable Shipping for Certain Products”.
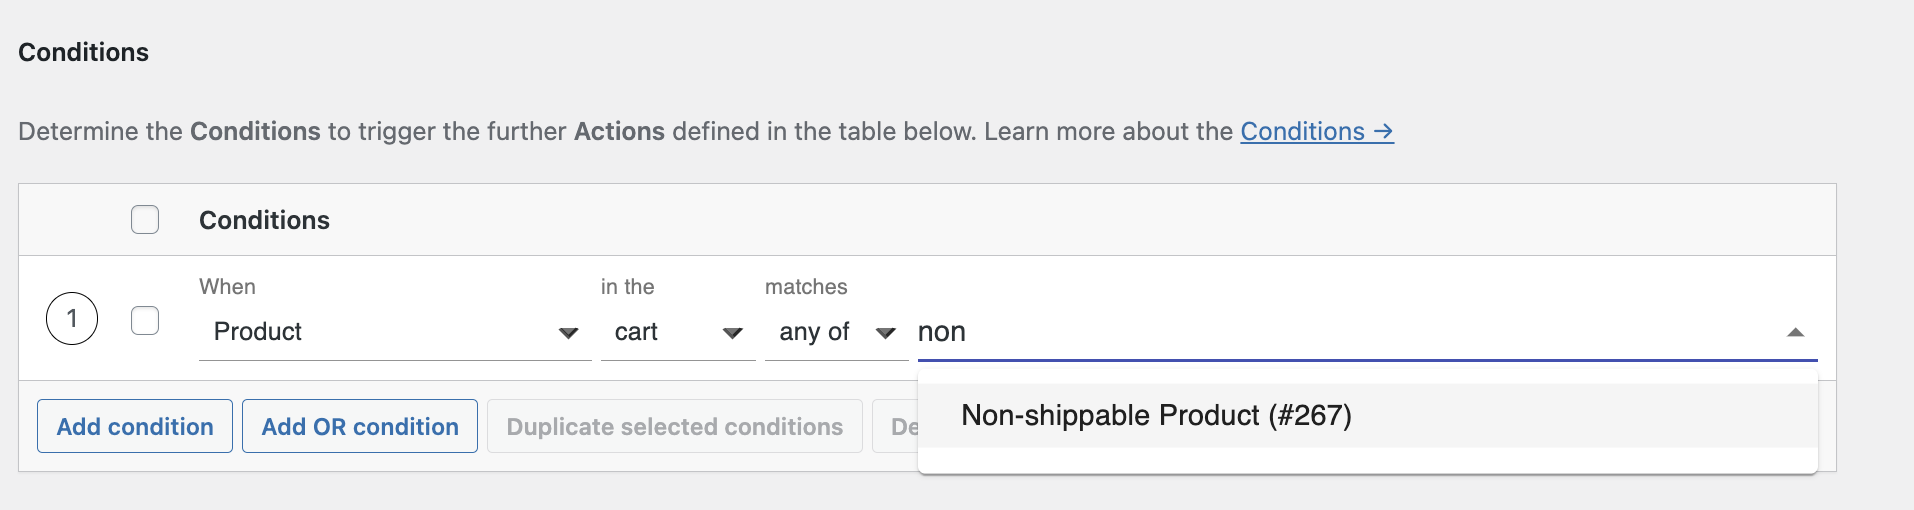
Now, it’s time to configure Conditions. It’s very simple, just click on the Add condition button to create a new condition.
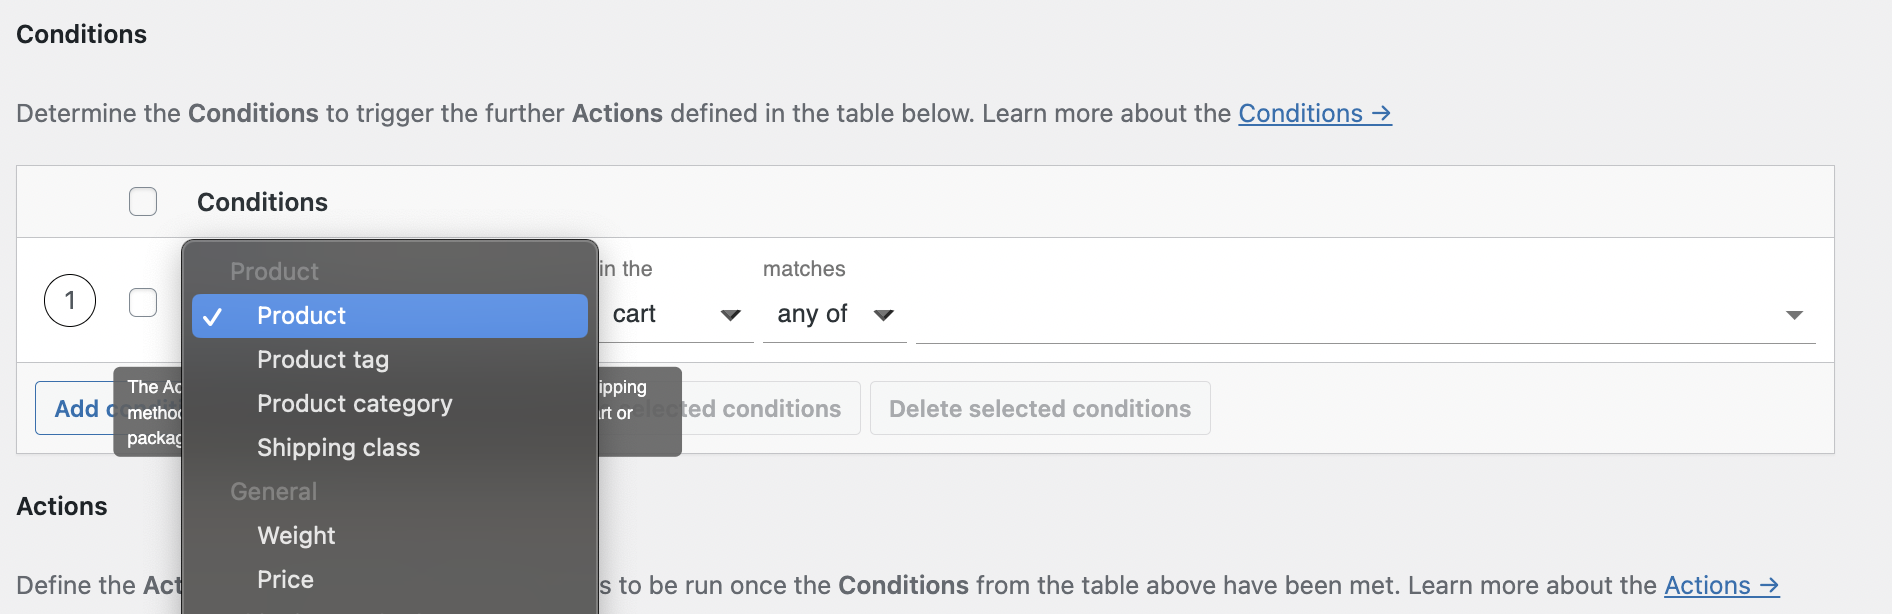
As you can see, there are a few useful options that you can choose:
If you need additional information about product categories or shipping classes, you can check the official WooCommerce documentation.
In my case, I use Product and enter the product’s name.
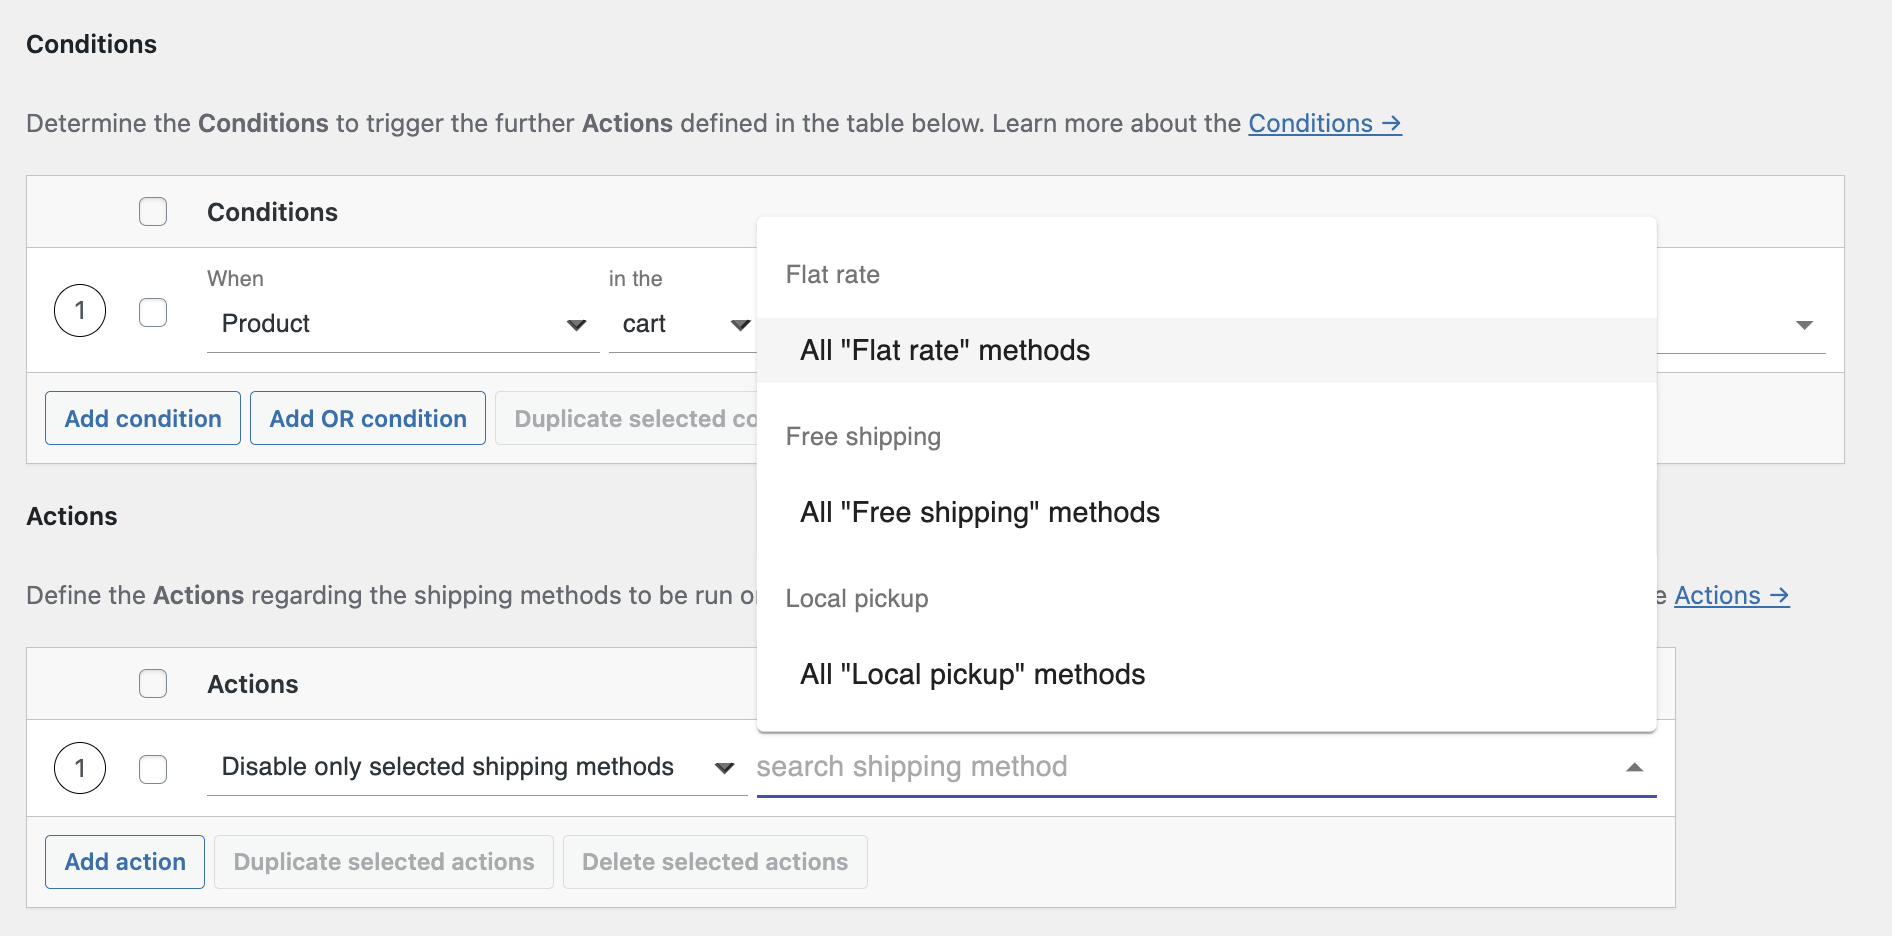
Now that you have the conditions set up, it’s time to add a new action, which is hiding shipping methods when my product is in the cart.
To do so, click on the Add action button and choose Disable only selected shipping methods.
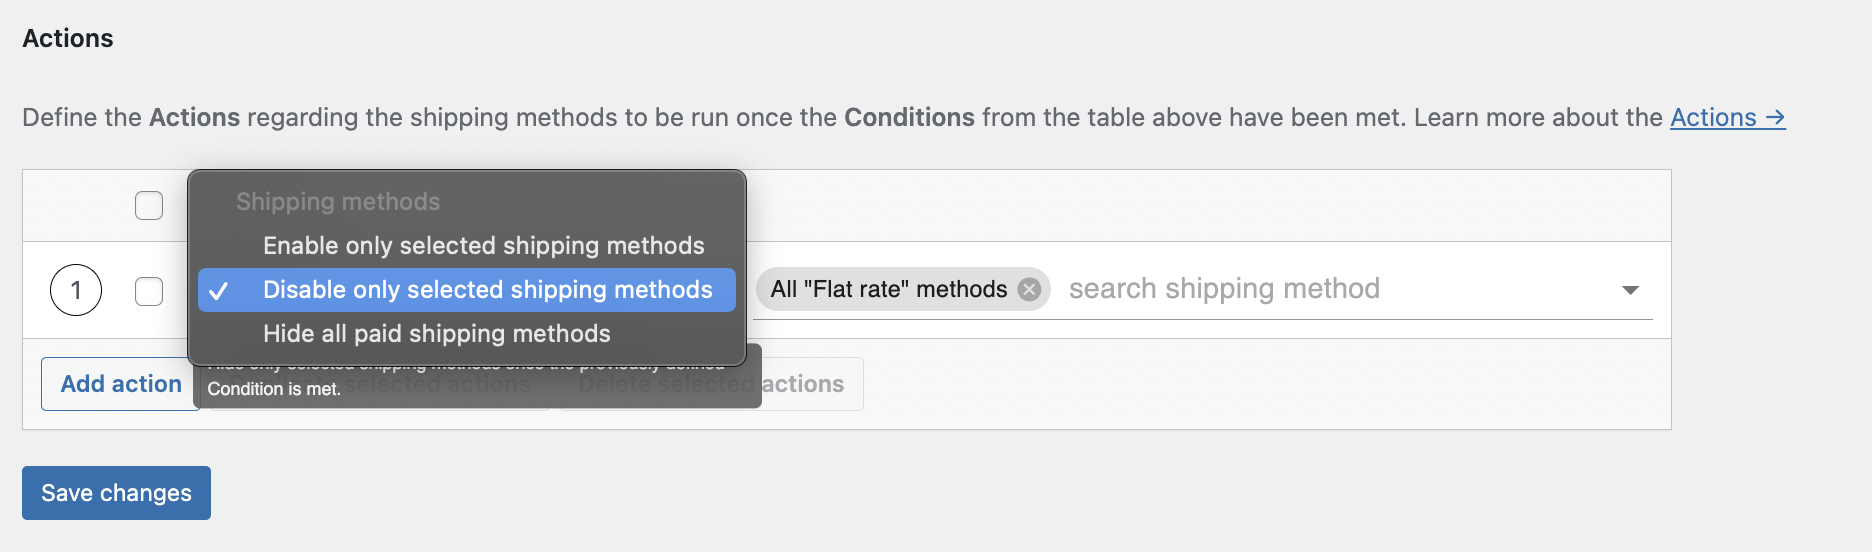
Then, choose shipping methods that you want to hide. You can choose specific shipping methods or entire groups, like all Flat Rate methods.
Lastly, go back to the plugin’s settings and tick the Turn on/off conditional displaying or hiding the shipping methods checkbox to enable all the rules that you configured.
And that’s all. In this way, when a certain product appears in the cart (configured in Conditions), all shipping methods will be hidden (configured in Actions). To complete the configuration, save the changes.
Remember to test the configuration in your shop by checking all possible variants. This will help you avoid unpleasantness and additional customer requests.
To reduce the risk of cart abandonment, change the “No shipping options were found” message. You can display information about minimum purchase requirements or suggestions to check address details carefully. Address validation and autocomplete services can also help prevent user errors during the input of shipping details. Additionally, selecting appropriate shipping services based on geographical limitations and product types is crucial to avoid such issues.
The use of a plugin is a great and very convenient solution. With Shipping Notices plugin, you can easily change the “No shipping options were found” message to your own custom notice. I’ll show you step-by-step how to do it.
First, install and activate the plugin. Shipping Notices is completely free, so you can download it from the WordPress repository.
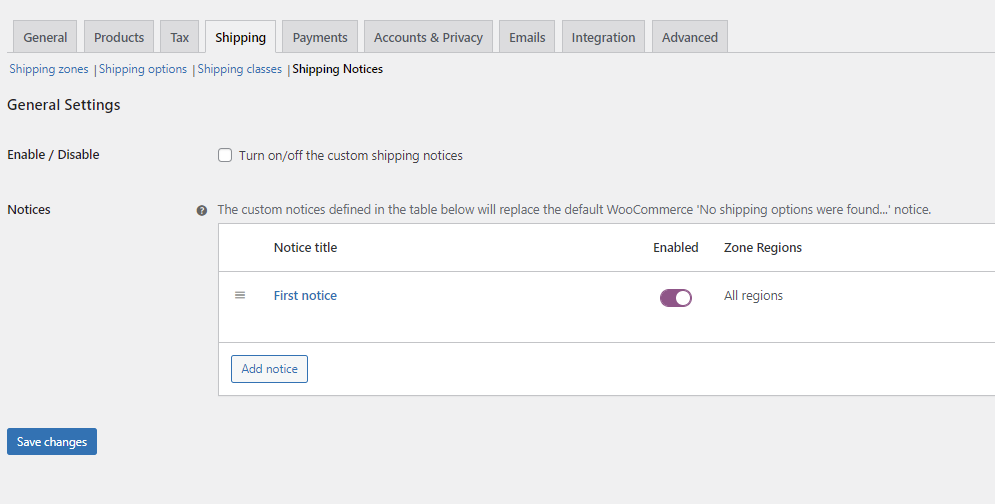
Having the plugin activated, go to the settings page: WooCommerce → Settings → Shipping → Shipping Notices.
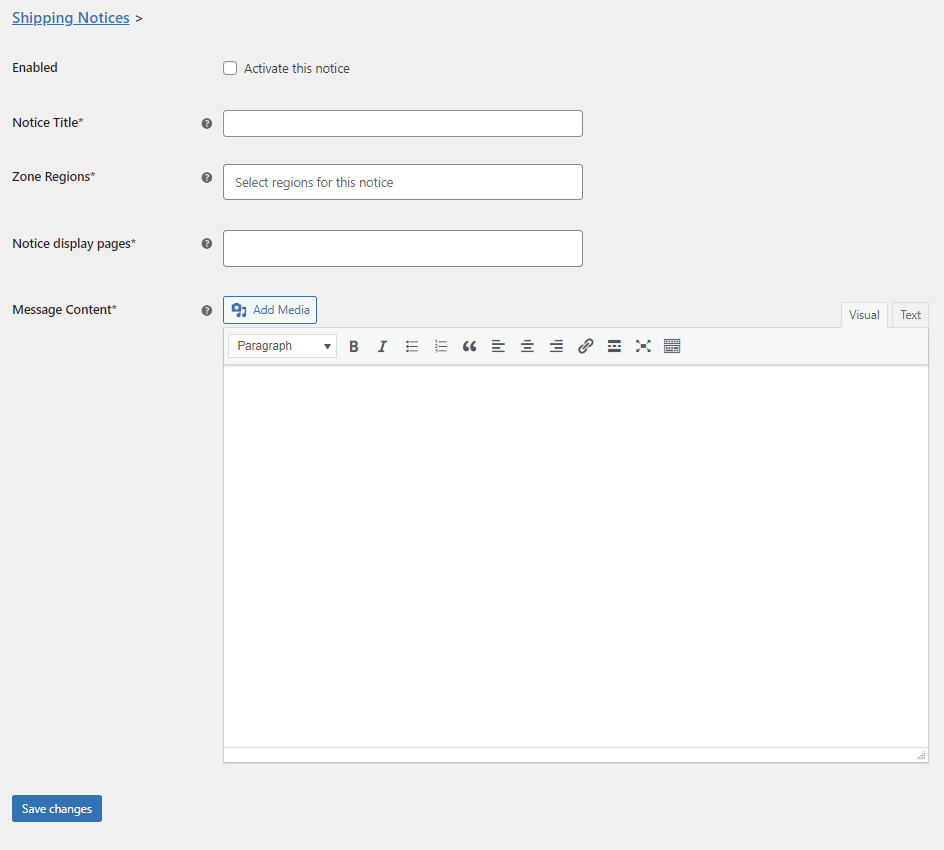
There you have the list of all your custom shipping notices. As you can see, as default there are no notices. To change that, clock on the Add notice button. You’ll be redirected to the new notice creation page.
Tick the Enabled box to activate this notice. Next, fill in the Notice Title field with the unique title for easy identification – it will be displayed only on the plugin’s settings.
Then, you can select Zone Regions, for which the notice should be displayed. It is useful if you intend to show that notice only for specific addresses. This solution will work great if individual shipping pricing is needed for specific regions. Otherwise, just select All regions.
The last step of configuration. Determine where the notice should be displayed in the Notice display pages field. You can display it on the cart or checkout or even on both of them.
After configuration, you can add the content of your notice. To do that, use the visual or text editor. You can use standard WordPress formatting, including adding media files. Having your notice configured, click on the Save changes button. Now in the list of all notices you should see the one you just added.
Now, enable it using the Turn on/off the custom shipping notices checkbox and Save changes.
And that’s it! Your custom message should display according to your configuration instead of the “No shipping options were found” one.

Content Writer at Octolize
Bartosz Gajewski is a content and marketing specialist with a solid background in SEO, WordPress content strategy, and technical documentation for digital products. With years of hands-on experience in both in-house and freelance roles, he supports tech companies – especially in the SaaS and e-commerce space – by creating content that informs, engages, and drives results.
His approach blends storytelling with data-driven SEO, and he’s been involved in projects ranging from rebranding and product marketing to growth experiments and copywriting for complex software tools. On the blog, he shares actionable insights from his work across marketing teams, product documentation, and online store optimization.


The Neurodivergence Project uses the ocean and the natural world to empower neurodivergent people to build confidence, lasting friendships and help them achieve their goals.

Dominican Liturgical Center is based in Cracow and focused on promoting the learning of traditional music and singing. They also run a smaller publishing house and a webshop that is focused on selling mainly books and CDs.

Established in 2017. SGL is focused on selling gas bottles and non-gas products. Formerly, the company offered payment by card on delivery. For now, the SGL started online payments and they launched a webstore.